I think this is a topic every parent is struggling with. How much can the kids play with their iPads (or any other tablet).
We tried multiple approaches, like fixed times, but that did not really work as our kid then always wanted to go home the moment he was allowed to play with his iPad.
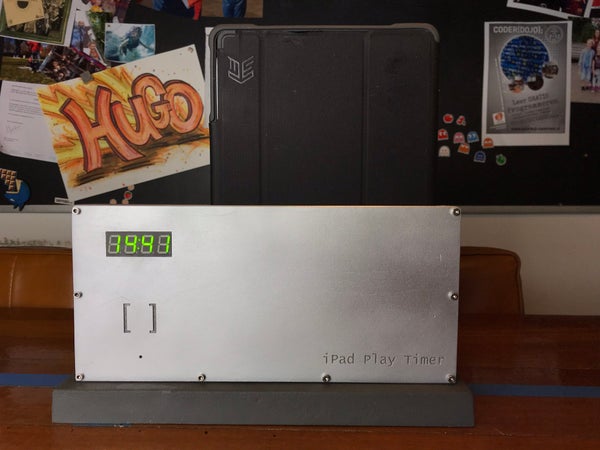
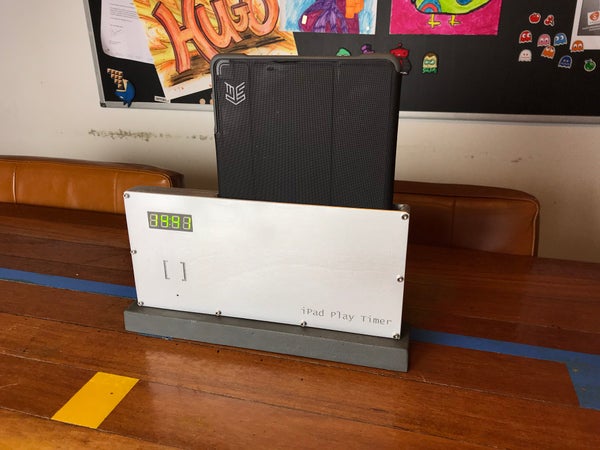
The iPad Play Timer
So I made the iPad Play Timer. A clear, simple device, that gives kids self-control on when they can use their beloved iPad. In the software you can set for each day of the week how much time they are allowed to play on the iPad (or any other Tablet). Of course, zero minutes is also an option 🙂 like in our case on school days.
BONUS CARD SYSTEM
It includes a “bonus card system”. These are RFID cards that kids can earn, for instance when they finish a healthy meal without moaning 🙂 You can setup in the software how much extra time each card will add. In our case, our son is only allowed to play on the weekends (fri, sat and sun), so he can collect these cards thru out the week and can decide him self when he wants the extra time on those days.
Of course each card can only be used once! There is a “parent” RFID tag that can reset all the used cards, so that they can be re-used.
If you like this project, please VOTE for me in the clock competition 🙂
https://www.instructables.com/contest/clocks2018/
Step 1: The Hardware
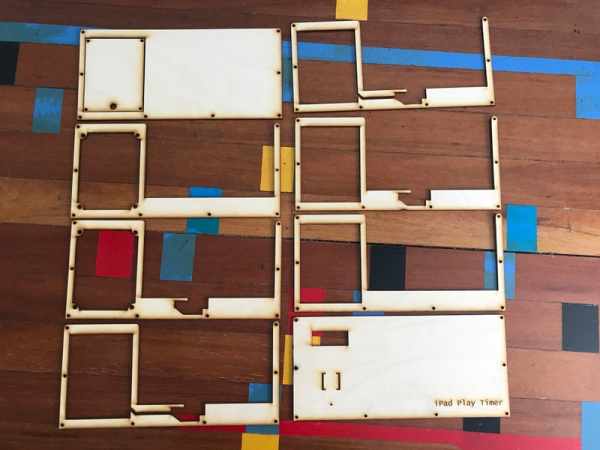
The case is lasercut out of 3mm wood. You can download the .dwg file here (see attached files). It consists of 8 layers of 3mm. You can of course adjust this to the thickness (amount of layers) and width of your Tablet device.
In the middle is an arcade style switch placed, to detect if the tabled is inserted or not.
In case you are not familiar with 2D design (.dwg files). I used the free software called draftsight. You can download it here: https://www.3ds.com/products-services/draftsight-c…
In case you do not have a laser cutter yourself, try to find a local makerspace / fablab,/ hackerspace they will likely have a laser cutter. The design is not too big, so you should be able to easily cut this (in multiple pieces) on a small laser cutter.
There are screw holes in the design, but I also glued the individual layers.
After the case was made, I sanded it, used a white primer and spray painted it after that gray/silver.
You can hang the case to a wall, or in my case I mounted it on top a heavy metal bar (that I kept after throwing away an IKEA closet, that had these bars in them, to prevent the closest to tip over.
Step 2: The Electronics
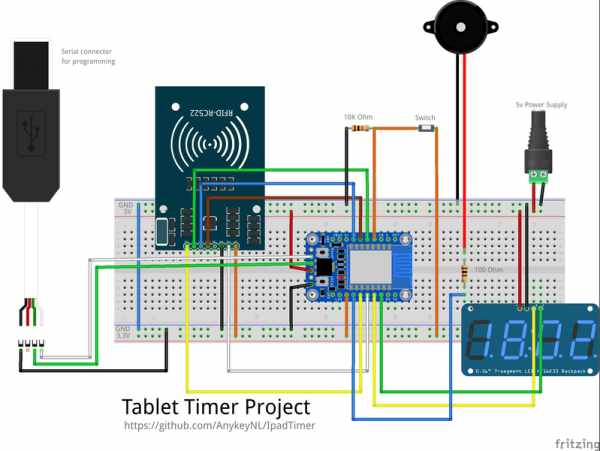
I wanted to keep the electronics cheap and easy to use. So I based the design on a ESP8266 from adafruit: https://www.adafruit.com/product/2471
It’s a $9.95 ‘arduino’ chip with wifi and on aliexpress you can find many even cheaper ESP8266 devices that all should work as well.
The design did end up maxing out all the ports of the ESP8266. Both I2C and SPI are used.
- I2C for the adafruit i2c LED back back: https://www.adafruit.com/product/878
- SPI for the MFRC-522 (just search on aliexpress.com “mfrc-522”
- One port for attaching the switch
- One port for attaching a piezo speaker, so the device can ‘beep’ 🙂
it was a little bit of a tight fit, but with the held of my good-old hot-glue gun, I was able to make everything stick in its place 🙂
Here the full list of hardware components:
- Adafruit HUZZAH ESP8266 Breakout
- Adafruit 0.56″ 4-Digit 7-Segment Display w/I2C Backpack
- MFRC-522 RF-ID reader
- Piezo buzzer
- 1x 10K Ohm resistor (for the switch)
- 1x 100 Ohm resistor (for the piezo)
- Arcade Micro Switch
- FTDI Serial TTL-232 USB Cable (for programming the ESP8266)
Step 3: The Software

You can download the Arduino code from:
https://github.com/AnykeyNL/IpadTimer
You need to configure in the software you own wifi settings (SSID and password). Also you need to add what ever RFID cards you are using.
If you do not know the IDs of your SSID cards, just run the software and check out the serial output, it will show any “unrecognized cards” and will display they IDs.
Card Configuration
Per card you can configure the amount of minutes it will add.
If you configure a card as 254 it will reset all the used card to unused.
If you configure a card as 253 it will reset the clock to that day’s default value.
The software keep tracks of what RFID card has been used. So until a reset, they will not be able to be used and a “USED” will show on the display when the card is presented.
The software also stores every minute the “last minute” in EEPROM memory, so in case of a power failure, or a kid trying to reset the device, it will always return to the last minute.
Countdown
The countdown clock will display the amount or hours:minutes left, when there are more then 60 minutes. For the last 60 minutes it will display the minutes:seconds
Notifications
One key element of the device is that it will send notifications to the tablet. As the ESP8266 can not send HTTPS packaged (not enough horse power for encryption), it is using the IFTTT notification service and webhooks, which support plain HTTP calls. See next section for IFTT configuration.
Step 4: Notification Via IFTTT
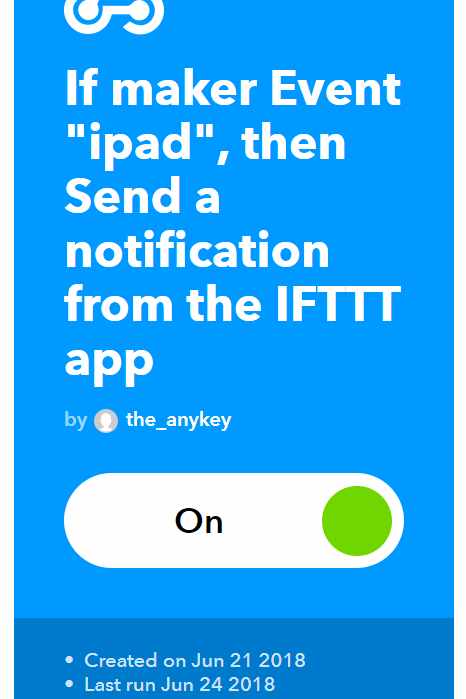
As the ESP8266 can not do HTTPS requests, most notification APIs are not possible. It is fantastic that IFTTT still has a basic HTTP webhook. It allows you to trigger an action if an HTTP request has been made. Based on that you can trigger an Notification action.
You do need the IFTTT app to be installed on your tablet. Both iPad and Android are supported. In my case I created a seperate account for the ipad to do this.
In the webhook settings, you will find the unique key, that you will need to add in the Arduino code.
Step 5: Summary
So if you are able…
- to carve out the frame using a laser cutter
- get all the components together soldered
- configure the IFTTT service
- and upload the correct Arduino code to your ESP8266
You can offer your addicted child to a clear system of device time control 🙂
Source: IPad Play Timer