
Summary of Twitter Enabled Text to Speech using an Arduino
This project uses an Arduino and Ethernet shield to fetch Twitter text, converts it to allophones with a TTS256, and sends them to a SpeakJet voice chip to produce 80s-style synthesized speech. Output is amplified and played on a speaker; code examples and mapping from SpeakJet dictionary to numeric commands are provided to create custom phrases.
Parts used in the Twitter Enabled Text to Speech project:
- SpeakJet IC (Sparkfun COM-09578)
- Text to Speech chip for SpeakJet - TTS256 (Sparkfun COM-09811)
- Arduino Uno (Sparkfun DEV-11021)
- Arduino Ethernet Shield (Sparkfun DEV-09026)
- 8ohm Speaker (Sparkfun COM-09151)
- LM386 Amplifier (Digikey LM386N-1/NOPB-ND)
- 0.047uF ceramic capacitor (Digikey P4307-ND)
- 220uF electrolytic capacitor (Digikey P15322CT-ND)
- 10ohm resistor (Digikey CF14JT10R0CT-ND)
- 10kOhm potentiometer, linear taper (Digikey 987-1308-ND)
- LED (Digikey 365-1175-ND)
- 220ohm resistor (Digikey CF14JT220RCT-ND)
- 10kOhm resistor x2 (Digikey CF14JT10K0CT-ND)
- Jumper wire
- Solder
- USB cable
- Ethernet cable
- Breadboard
Let the world know what you’re eating for breakfast with an 80’s style vocal synthesizer! This project uses an Arduino to send your Twitter stream to a voice generator chip called the SpeakJet. The setup that I use here can also be extended to other applications where you’d want to translate text into speech, some ideas:

-a robot which announces things or responds to its environment by speaking
-some kind of assitive technology for the deaf or handicapped
-at the very least, it’s a fun alternative to using the serial monitor to print data from the Arduino
In this setup the Arduino requests and receives information from Twitter via an Ethernet shield, which is directly plugged into a router (the USB connection shown in the picture is being used solely for power, not data transmission). An intermediary chip called the TTS256 translates serial text data from the Arduino into a series of allophones to send to the SpeakJet. The output from the SpeakJet is sent to an amplifier and then to a small speaker.
A demo of the SpeakJet’s voice can be found here.
Parts List:
(x1) SpeakJet IC Sparkfun COM-09578
(x1) Text to Speech chip for SpeakJet – TTS256 Sparkfun COM-09811
(x1) Arduino Uno Sparkfun DEV-11021
(x1) Arduino Ethernet Shield Sparkfun DEV-09026
(x1) 8ohm Speaker Sparkfun COM-09151
(x1) LM386 Amplifier Digikey LM386N-1/NOPB-ND
(x1) 0.047uF ceramic capacitor Digikey P4307-ND
(x1) 220uF electrolytic capacitor Digikey P15322CT-ND
(x1) 10ohm resistor Digikey CF14JT10R0CT-ND
(x1) 10kOhm potentiometer, linear taper Digikey 987-1308-ND
(x1) LED Digikey 365-1175-ND
(x1) 220ohm resistor Digikey CF14JT220RCT-ND
(x2) 10kOhm resistor Digikey CF14JT10K0CT-ND
Other Materials:
Jumper wire
Solder
USB cable
Ethernet cable
breadboard
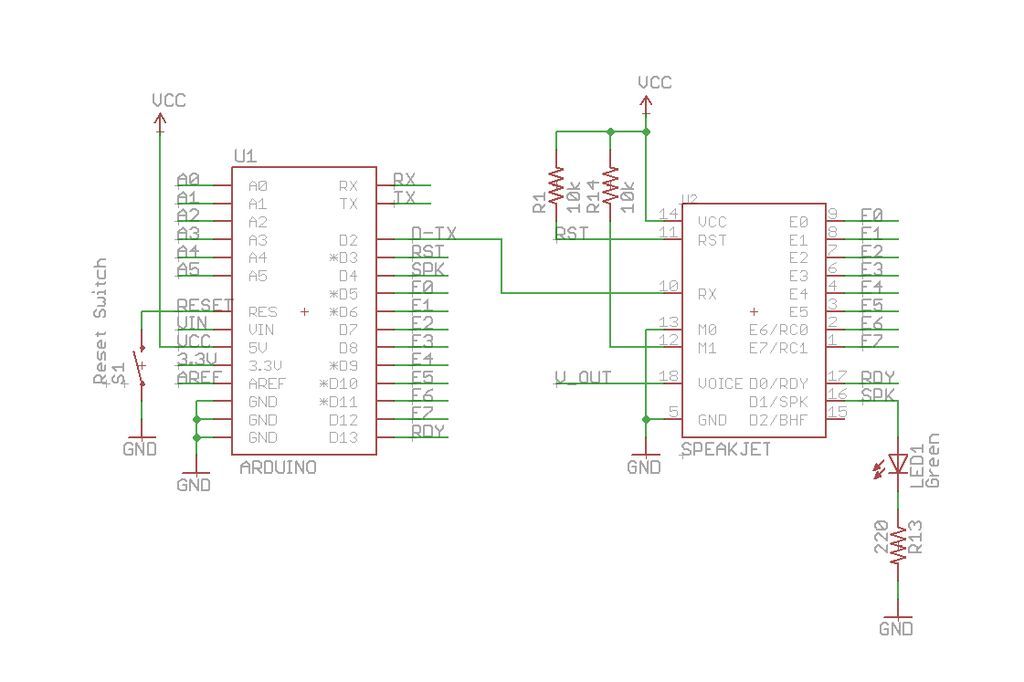
Step 1: Wire up the SpeakJet with Arduino
I wired up the SpeakJet similarly to how it is wired in Sparkfun’s Arduino shield for the SpeakJet called the “VoiceBox Shield,” here is their schematic. The main difference between the way I set up the SpeakJet and the way it is set up on Sparkfun’s shield is the amplifier; I didn’t include an amplifier in my circuit yet as I was just trying to get the chip working with the minimum amount of parts, I’ll show how to set up an amplifier in a later step. Additionally, I was confused by the Jumper labeled “jumper-32-3” in the sparkfun schematic, in my circuit I just hooked digital pin 2 of the Arduino directly to pin 10 of the SpeakJet. The circuit I set up is shown above, this schematic shown in fig 2 was modified from the original eagle files provided by Sparkfun, I’ve also included some photos of the breadboard setup for reference.
When you wire up the circuit and upload the code below (written by the Sparkfun folks), the SpeakJet will say “ready” then output the message “All your base are belong to us” in Robot-Speak voice followed by some R2D2-esque beeps, and light up the green LED attached to pin 16. (Of course, you will need to hook up a speaker between pin 18 of the SpeakJet, labeled “V_OUT” in the schematic above, and GND to hear this message). I used a small, 8Ohm speaker and only heard the message very faintly (this is why it’s good to eventually amplify the output from the SpeakJet before sending it to speakers). Press the Arduino’s reset button (fig 4) to hear the message as many times as you like.
If you want to add you own messages into this code you can use the SpeakJet Dictionary as a reference. I’ll walk you through an example here. I want to get the SpeakJet to say the phrase “Amanda is rad.” The first thing I do is construct each of the words based on the examples in the SpeakJet dictionary. For “Amanda” we have:
man= \MM \SLOW \AY \SLOW \NE
duck= \DO \SLOW \UX \KE
Combine these to get
Amanda= \SLOW \UX \MM \SLOW \AY \SLOW \NE \DO \SLOW \UX
“is” is listed in the dictionary:
is = \SLOW \IH \ZZ
for “rad” combine the following:
rabbit=\SLOW \RR \AY \BE \RELAX \IH \TT
red = \RR \SLOW \EH \ED
to get:
rad= \SLOW \RR \AY \ED
Pages 15 and 16 of the SpeakJet User Manual gives all the numerical codes for each of these sounds. Here is my example transcribed to numerical form:
Amanda = \SLOW \UX \MM \SLOW \AY \SLOW \NE \DO \SLOW \UX
Amanda = 8 134 140 8 132 8 141 175 8 134
is = \SLOW \IH \ZZ
is = 8 129 167
rad = \SLOW \RR \AY \ED
rad = 8 148 132 176
We can set the volume, speed, and other parameters of the speech by calling the numbers 20-23, I copied the following values from the Sparkfun code above:
20, 96, 21, 114, 22, 88, 23, 5,
this sets Volume (20) to 96, Speed (21) to 114, Pitch (22) to 88, and Bend (23) to 5. You can play around with these numbers to learn more about how they work. If you read the table on page 15 of the SpeakJet Manual you can find out about other control commands, as well as how to incorporate pauses into your speech.
Putting this all together, I have the following series of numbers:
{20, 96, 21, 114, 22, 88, 23, 5, 8, 134, 140, 8, 132, 8, 141, 175, 8, 134, 8, 129, 167, 8, 148, 132, 176}
And here is the final code, it is mostly copied straight from the Sparkfun code above (I made the last “a” and “d” in “rad” slow by putting an extra 8 in front of the numbers 132 and 176 to get these parts to sound a bit more clear):
(x1) Text to Speech chip for SpeakJet – TTS256 Sparkfun COM-09811
(x1) Arduino Uno Sparkfun DEV-11021
(x1) Arduino Ethernet Shield Sparkfun DEV-09026
(x1) 8ohm Speaker Sparkfun COM-09151
(x1) LM386 Amplifier Digikey LM386N-1/NOPB-ND
(x1) 0.047uF ceramic capacitor Digikey P4307-ND
(x1) 220uF electrolytic capacitor Digikey P15322CT-ND
(x1) 10ohm resistor Digikey CF14JT10R0CT-ND
(x1) 10kOhm potentiometer, linear taper Digikey 987-1308-ND
(x1) LED Digikey 365-1175-ND
(x1) 220ohm resistor Digikey CF14JT220RCT-ND
(x2) 10kOhm resistor Digikey CF14JT10K0CT-ND
For more detail: Twitter Enabled Text to Speech using an Arduino
- How does the project get tweets to the Arduino?
The Arduino with an Ethernet shield requests and receives information from Twitter via a router-connected Ethernet shield. - Can the SpeakJet speak custom phrases?
Yes; you construct phrases using the SpeakJet Dictionary and translate the allophone commands into numerical codes sent to the SpeakJet. - What converts Arduino serial text into SpeakJet allophones?
An intermediary chip, the TTS256, translates serial text data from the Arduino into a series of allophones for the SpeakJet. - Do you need an amplifier to hear the SpeakJet clearly?
An amplifier is recommended because a small 8Ohm speaker produced only a very faint output without amplification. - Which Arduino pin is used for soft serial transmit to the SpeakJet in the example?
Digital pin 2 is used for software serial transmit to the SpeakJet. - How do you set volume, speed, pitch, and bend?
By sending control command numbers 20-23 followed by desired numeric values to set Volume, Speed, Pitch, and Bend as shown in the example. - What happens when you upload the provided demo code?
The SpeakJet will say ready, then speak All your base are belong to us in robot-speak, play robot sounds, and light the green LED on pin 16. - Where should the speaker be connected to hear output?
Connect the speaker between pin 18 (V_OUT) of the SpeakJet and GND to hear the message.