Summary of Automated Greenhouse
This project details an automated greenhouse system designed to regulate temperature, soil moisture, and light. It utilizes a Raspberry Pi and Arduino Uno for data processing and actuator control, including a lamp, servomotor, fan, and water pump. A custom website hosted on the Raspberry Pi allows users to monitor real-time sensor data (ambient/external temperature, soil moisture, luminosity) and manually control devices or adjust setpoints remotely via a MySQL database.
Parts used in the Automated Greenhouse:
- Raspberry Pi 3
- Arduino Uno board
- Ambient temperature sensor
- External temperature sensor
- Soil moisture sensor
- Luminosity sensor
- PC fan
- Servomotor
- Lamp
- Water pump
- Electrovalve
- USB cable
- MySQL database
- Apache server
- PHP bridge
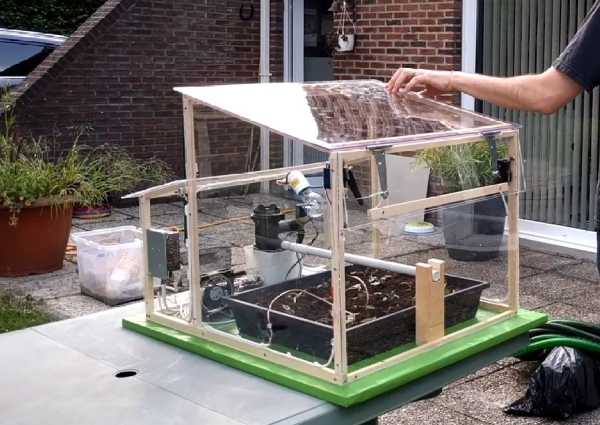
We decided to design a greenhouse as subject for our electronic project. The goal was to regulate the temperature inside the greenhouse thanks a lamp, a servomotor to open a window and a PC fan. We wanted to maintain a quite constant level of soil moisture with a pump and to receive temperature, soil moisture and luminosity measurements. Finally, we designed a website to be able to control it remotely.
This project was made for our electronic course and we wanted to use a raspberry pi and an arduino board. We know that it can be improved in so many ways but we want to give you ideas to redo it and improve it.
Step 1: Presentation

This greenhouse has different sensors to measure the ambient temperature, the external temperature, the soil moisture and the luminosity.
The ambient temperature sensor allows us to start the fan and to drive a servomotor to open the window when the internal temperature is above the temperature setpoint. Conversely, if the temperature descends under the temperature setpoint, the fan is stopped and the window is closed. Furthermore, a lamp is switched on to warm the plant. The soil moisture sensor allows to drive a pump and an electrovalve for the watering system when the earth is too dry.
Thanks to a USB cable, the Arduino uno board is connected to the raspberry 3 board. This connection allows us to recover the measures and the states of actuators. These data are stored in a mysql database. A script in python allows us to communicate with arduino uno (master/slave communication) and save the data in the database or read the database and send new values in the arduino.
Next, an apache server is installed on the raspberry in order to host a website. With the help of php, we can make the bridge between the mysql database and the website.
On the website, we can define the temperature and moisture setpoints. It is also possible to control each actuator manually and to look their states.
Step 2: List of Components
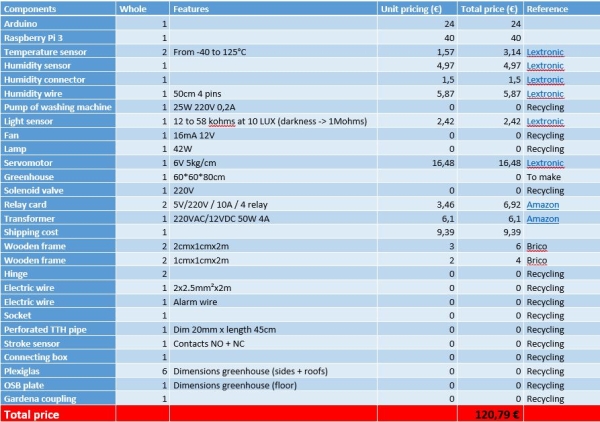
We wanted to use as much as possible components stemming from the recycling
Step 3: Coding
For this part, we give you the different programs and code that we made for this project:
Arduino’s program:
The new version is now available. The issue with the window is now fix and some little bugs.
Raspberry:
We installed the MySQL server and the Python bindings for MySQL. For the web server we installed the Apache2 package
Website:
The CSS files are now available in the .rar folder.
Raspberry script:
For this script, we used the MySQLdb library. You need to use python 2.7 to be able to run the script.
The script is the bridge between the arduino and the raspberry pi. It allows us to save the data from the arduino bord into the database and send the new setpoint values defined by the user into the arduino program.
Step 4: Mounting
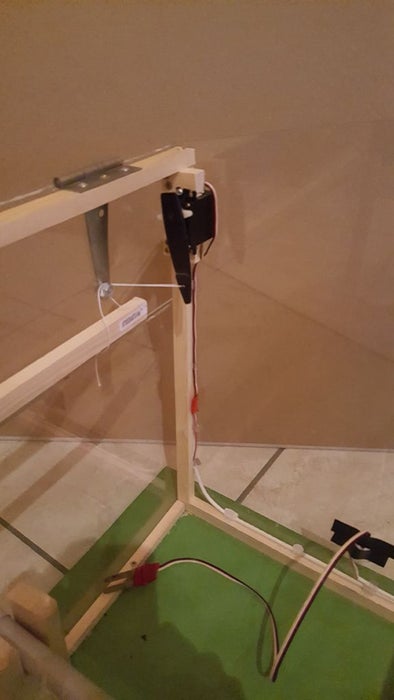
Step 5: Wiring

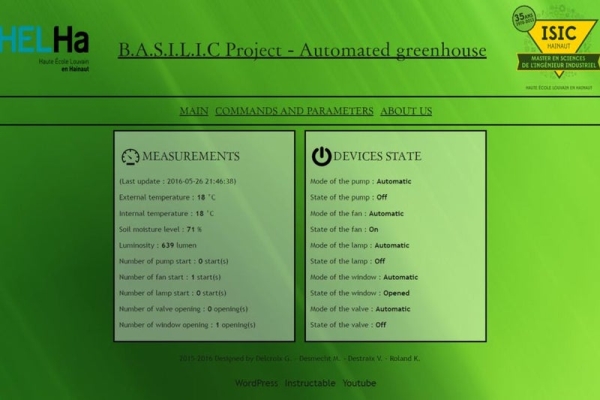
Step 6: The Website and Database
EDIT: The new version of the website is now available.
The website that we disgned is composed of three pages.
The first one is the main page. With this page, the user can see the states of the devices and the different measures.
The second page, Commands and parameters, the user can easily change the device’s mode and switch them on or off. The setpoint values and the parameters can be changed on this page too. For the parameters, we validate the new entered value to be sure that it is correct.
The last page is just about us.
Our database is made of three tables. The “mesures” table is dedicated to the collected data storage.
The “types” table contains the parameters of each measurement and the “commandes” table allows us to control the devices and to know their state.
Step 7: Time to Save Your Time and Your Plants
This is it! You have all the tools to make your own automated greenhouse !
You can take a look to the video to see the automated greenhouse in action.
Feel free to contact us if you have any questions !
Guillaume, Mathieu, Vincent and Kevin.
Engineers from Isicht Mons
Others cool projects ? Visit : https://electroniquehelha.wordpress.com/
Source: Automated Greenhouse
- How does the system regulate internal temperature?
The system starts a fan and opens a window via a servomotor when internal temperature exceeds the setpoint, while closing the window and turning on a warming lamp if the temperature drops below the setpoint. - What components are used to manage soil moisture?
A soil moisture sensor drives a water pump and an electrovalve to water the plants when the earth is too dry. - Can I control the greenhouse actuators manually?
Yes, the website allows users to define setpoints and control each actuator manually as well as view their current states. - Which programming language is required for the Raspberry script?
You need to use Python 2.7 to run the script that communicates between the Arduino and the Raspberry Pi. - How is data stored in this project?
Data from the sensors and actuator states are recovered via USB and stored in a MySQL database managed by a Python script. - What tables are included in the database structure?
The database consists of three tables: mesures for collected data, types for measurement parameters, and commandes for device control and state tracking. - What web technologies are used to host the interface?
An Apache server hosts the website, using PHP to create a bridge between the MySQL database and the user interface. - Does the system measure external environmental conditions?
Yes, the greenhouse includes sensors specifically designed to measure both ambient and external temperatures.