
Summary of Optical Theremin Musical Instrument Using Arduino Uno Board
This article details building an optical theremin using an Arduino Uno. The device detects hand movements by measuring light intensity changes on a Light-Dependent Resistor (LDR). The Arduino processes these variations via its internal ADC, maps the data to specific frequency parameters, and drives a buzzer to produce sound without physical contact.
Parts used in the Optical Theremin:
- Arduino Uno board
- Buzzer
- 1-kilo-ohm resistor
- Light-dependent resistor (LDR)
- Breadboard
- Jumper wires

Theremin is an early electronic musical instrument controlled without physical contact by the thereminist (performer). It is named after the Russian inventor, Léon Theremin, who patented the device in 1928. A typical theremin musical instrument is shown in Fig. 1.
This article explains how you can build an optical theremin using an Arduino Uno board and some readily available components.

Etherwave Theremin
The software (theremin.ino) used to program the Arduino Uno is written using Arduino IDE, which can be downloaded free of cost from the website. The open source Arduino IDE makes it easy to write the code and upload it to the board. It runs on Windows, Mac OS X and Linux operating systems.
Circuit and working of Optical Theremin Musical Instrument
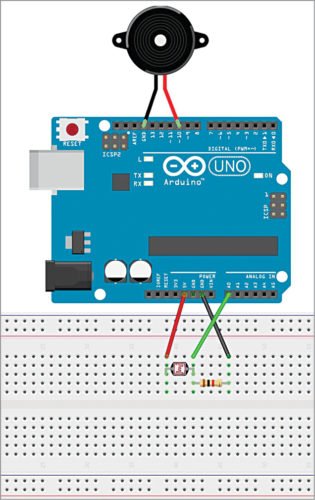
Arduino-based theremin wired on a breadboard is shown in Fig. 2. The components required are Arduino Uno, buzzer, 1-kilo-ohm resistor, light-dependent resistor (LDR), breadboard and some jumper wires.

Arduino-based optical theremin wired on a breadboard
The working of the project is fairly simple. The voltage across the LDR changes with light intensity, and the light intensity changes with hand movement of the thereminist.
The Arduino Uno records voltage variations across the LDR using Arduino’s internal analogue-to-digital converter (ADC) at a sampling rate of 25 (which can be changed by the programmer). It then takes average of the LDR readings, maps this reading according to some parameters, including minimum and maximum buzzer frequencies, and minimum and maximum sensor values. After mapping, Arduino sends out a pulse wave to the buzzer’s positive pin according to the calculated value, which creates the sound.
Construction and testing
After uploading the code to the Arduino Uno, move your hand up and down over the LDR, thus changing the light intensity falling on the LDR. If all goes well, you should hear cool space sounds from your own theremin. The author’s prototype is shown in Fig. 3.
Author’s prototype
Download source code
Read More Detail:Optical Theremin Musical Instrument Using Arduino Uno Board
- How do you control the optical theremin?
The instrument is controlled without physical contact by moving your hand over the LDR to change light intensity. - What software is required to program the Arduino Uno?
You must use the Arduino IDE software, which is free and runs on Windows, Mac OS X, and Linux. - Does the Arduino record voltage variations from the LDR?
Yes, it records these variations using its internal analogue-to-digital converter at a sampling rate of 25. - Can the sampling rate be changed?
Yes, the programmer can change the sampling rate if needed. - How does the Arduino generate sound?
It sends a pulse wave to the buzzer's positive pin based on mapped sensor values. - What happens when you move your hand up and down over the LDR?
Changing the light intensity causes the device to emit space sounds from the buzzer. - Where can the source code for this project be found?
The source code named theremin.ino can be downloaded as provided in the article. - Is the Arduino IDE open source?
Yes, the article states that the open source Arduino IDE makes it easy to write and upload code.