Summary of ESP32 Internet Radio
This project uses an affordable VS1053 MP3 codec with an ESP32 to create an internet streaming radio. By continuously sending 32-byte data chunks from the ESP32, the VS1053 decodes and plays various audio formats smoothly. A push button on GPIO D13 allows switching stations via soft resets. The VS1053 is modified to run at 3.3V, powered from a single LiPo battery with a low-drop voltage regulator to ensure stability. An optional OLED display shows the current station without affecting audio quality, using a lightweight SSD1306 library for ESP8266. The code is minimal and straightforward, making the setup easy and cost-effective.
Parts used in the ESP32 Internet Streaming Radio:
- ESP32 microcontroller
- VS1053 MP3 codec shield
- Push-to-on switch (connected to GPIO D13)
- LiPo battery (single supply voltage source)
- HT7333-1 low-drop voltage regulator
- 8 Ohm 0.3W speakers
- Optional 64x128 OLED display (SSD1306)
- Jumper wires for connections

The affordable MP3 VS1053 codec processor available on aliexpress.com is said to have the ability to decode different music formats such as Ogg Vorbis/MP3/AAC/WMA/MIDI audio. VS1053 can also record in Ogg Vobis file, but the available guidance online is mainly for proprietary boards or ESP32-IDF, which is not recommended due to the amount of coding required. A code with over 20 lines is sufficient to make me travel a distance of 100 miles!
The Idea
The idea driving the project is that by sending a 32-byte chunk of streaming data to the board continuously, it will continue playing without interruption.
This implies that the ESP32 will establish a connection with the streaming site on a specific port and subsequently receive the streaming data in precise 32-byte chunks. However, the board will continue to process the data as if it were a machine for inflow/outflow, while the stream will persist in its activity.
The primary code is just under 15 lines in length!
Construction
The ESP32 VS1053 library, which is open source, comes with several examples for reference. I have utilized a GPIO (D13) pin as a push-to-on switch for changing stations by performing a soft Reset on the VS1053 board to switch to the next station. To ensure smooth operation without bouncing, I added a boolean operator to switch between ‘false’ and ‘true’ to avoid multiple switches with a single button press.
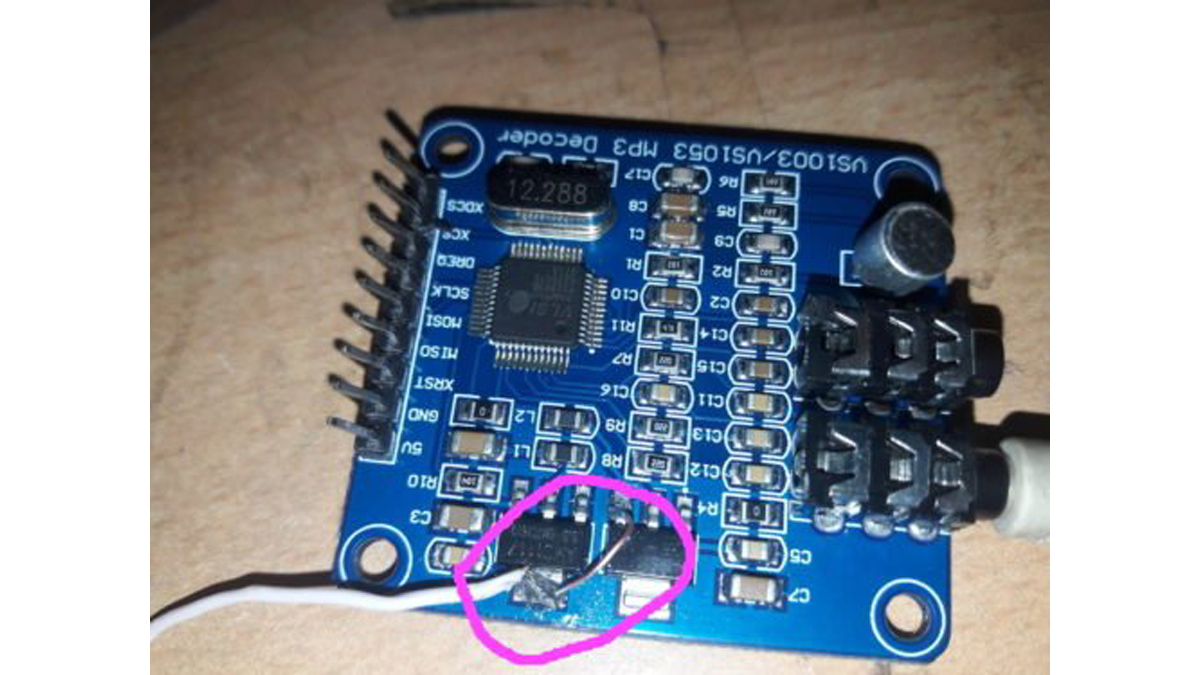
You can easily modify VS1053 to run on 3.3 volts, even though it is originally a 5Volt device. On the ESP32 radio, you will only need a single supply voltage of 3.3 volts, which can be powered by a single LiPo battery. The VS1053 board has two voltage regulators, providing outputs of 3.3 volts and 2.5 volts labeled as [AM1117]. Using a digital multimeter, identify the functions first, then link a jumper wire from 3.3 volts to the input of the 2.5 volts regulator, converting the lead to a 3.3 volts input for the board.
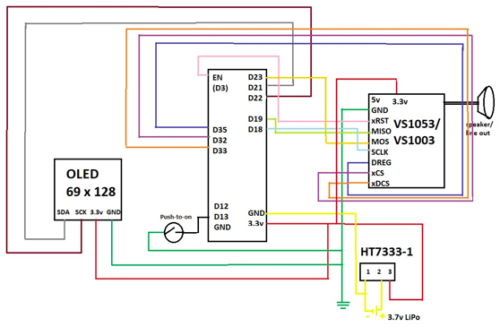
VS1053 wiring
Try to minimize the length of the connecting wires. Extended and intertwined wires could result in a buzzing sound in the sound output, a common issue with this type of circuit boards. The output sound is in stereo and loud enough to drive small speakers or headphones, but to use larger speakers you might need to include amplifiers/amplifier boxes.
Construction hurdle
A fully charged Li-Ion / Li-Po battery can increase the voltage to 4 without risking damage to the ESP32, but it may cause the VS1053 board to fail and require a 40-day wait for a replacement from aliexpress.com. Thus, it is advisable to utilize a low power, low loss HT7333-1 3 pin voltage regulator with minimal drop in voltage and minimal quiescent current loss. However, the issue lies in the fact that HT7111-1 is a small surface mount component.
Schematic with ( OLED – Optional)
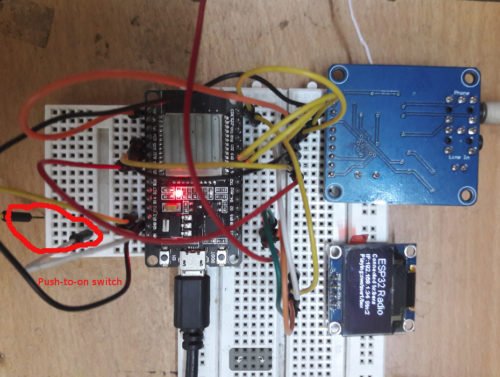
Prototype
Testing
To connect to the WiFi system, update the SSID and password at the start of the code and then upload it using the regular Arduino method. After being uploaded, the ESP32 will initially greet with ‘Hello’ to show that the VS1053 is operational. It will then hold off for a few seconds for the computer’s serial output to connect. After connecting online, it will switch to the designated station and begin streaming the lovely Beatles music. Activate the switch linked to D13 one time and the following station will be selected. The variable char *sname[7] is not required. You are able to select names for each radio station that is programmed. More station names can be included in the arrays for host, path, and port.
ESP32 Radio with OLED (Optional): The only issue remaining is the absence of a screen to indicate the current station playing! Now, the only thing needed to finish it all is an I2C universal display. However, using both the heavyweight Adafruit SSD1306 and Adafruit_GFX library together will cause the sound to be unpleasant. Hence, I employed a small SSD1306 library called esp8266-oled-ssd1306-master designed specifically for ESP8266 to operate SSD1306 OLED screens. This library enables the I2C display to function properly without impacting the audio output. Nevertheless, the OLED is not required – The radio functions perfectly even in its absence!
BOM
ESP32 $7.5
OLED 64*128 – $3
VS1053 codec shield – $6
HT-7333-1 -$1
8 Ohm speakers (0.3 watt) extra.
Softwares
Two sketches available – bare_minimum_radio_player.ino & simple_esp32_radio_mod3.ino The former consists of minimal code to receive 32-byte data from a streaming website and play it back. The second design involves a detailed plan to operate the radio with an OLED screen and a push-to-on button for station selection. Every sketch comes with a ‘helloMP3.h’ file that contains code for a short music or sound greeting. Compile the drawing with this document.
The essential Arduino libraries are included in the software package as well.