Summary of Efficient Plant Care: Arduino-Based Automatic Watering System
Summary: An Arduino-based automated plant watering system uses three soil moisture sensors, individual 5V pumps controlled by relays, and an ultrasonic sensor to monitor reservoir water level. A 16x2 LCD displays moisture percentages and tank level. Sensors are calibrated per plant (snake plant, periwinkle, cordyline) with different thresholds. The system automates watering, saves water and time, and is prototyped on PCB; drawbacks include power dependence and sensor corrosion.
Parts used in the Automatic plant watering system:
- Arduino Nano - 1 unit
- Soil moisture sensors - 3 units
- 5V water pumps - 3 units
- Wires
- Universal prototype PCB board
- Water pump compatible piping
- Plant pots - 3 units
- 16x2 Display
- Ultrasonic sensor
- 10k Potentiometer
- Berg strip
- Relays (for pump control)
- Breadboard (used for initial construction)
Greetings to all, we are glad to have you back on our website! This time around, we are showcasing a superb project: the automated plant watering system. With this project, we use technology to help plants grow on their own. After one month of being put into action, we noticed significant advancements in the growth of the plants.
Here, we will outline our extensive research process, explaining the steps we took to reach our outcomes. If you want to make your own smart irrigation system with Arduino, read our article. We will offer all the required details, covering the building stage as well as the coding part. Let’s jump in immediately and begin.
Automatic plant watering System Introduction
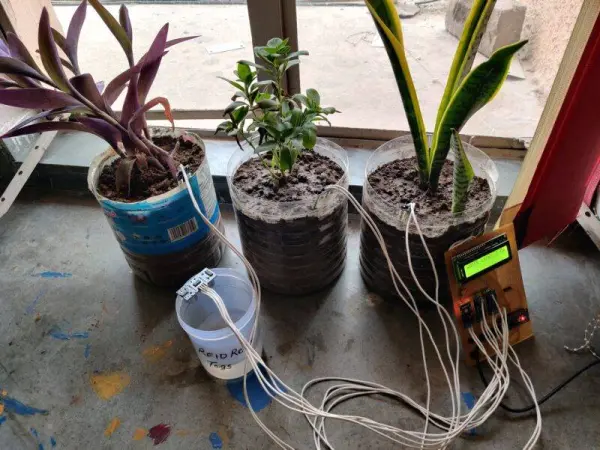
Listed below are several plants kept in containers that have sensors and a device for automatically dispensing water. These sensors observe soil moisture levels to maintain the ideal water supply in the pots. In this smart irrigation system, a water pump turns on to provide specific amounts of water when the plants need it. Once the plants get the right amount of water, the water pump stops automatically.
This system acts as an automated plant watering system, utilizing soil moisture sensors that can detect moisture levels in the soil. The sensors are connected to a relay system, turning on the water pump when necessary to keep the soil at optimal moisture levels.
The smart irrigation system is a cutting-edge and advanced method of irrigation that greatly decreases the reliance on manual labor and saves time, along with other advantages. In this setup, we have chosen three different plants, each with different levels of water needs. The “snake plant” is a popular choice due to its low water requirements – it can thrive without daily watering and can last over two months without water even during winter.
Another plant being thought about is the “sadabahar” (periwinkle), which requires watering every day. The cordyline plant, the third one mentioned, has moderate water needs compared to the other two plants.
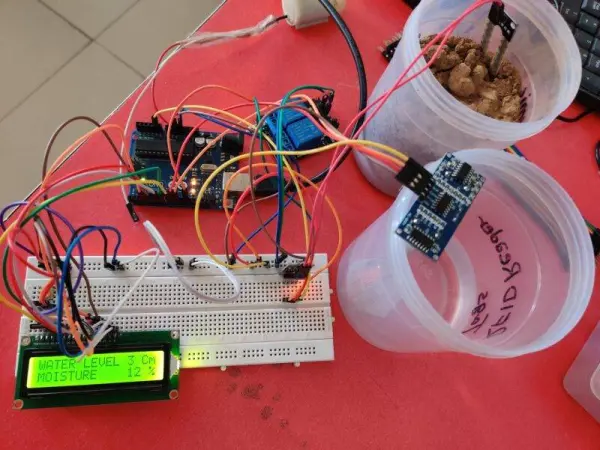
A water pump has been integrated into the system for the water supply. Furthermore, we are working on a water level sensor for the reservoir, showing the amount of water left on the screen that is incorporated into the system.
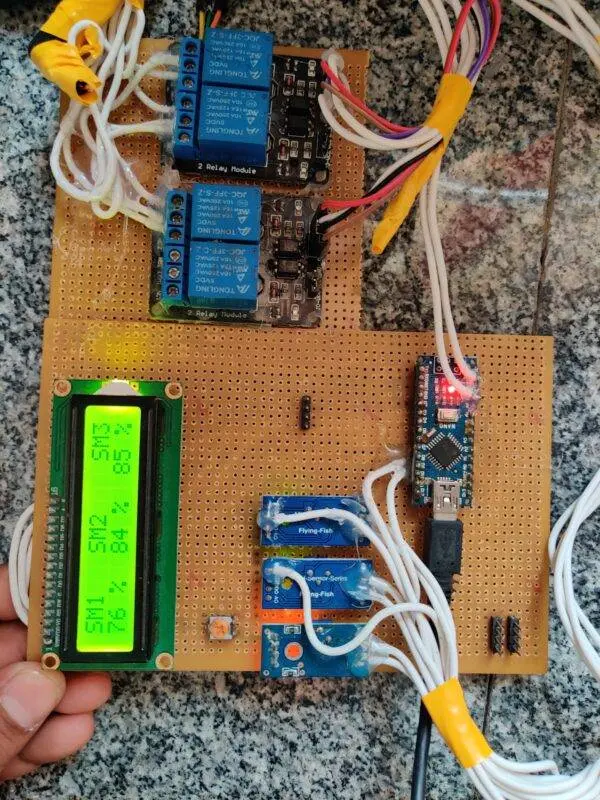
Currently, we are calibrating all sensors according to particular specifications. Every plant sensor comes with unique threshold values, which result in different readings based on the soil conditions. The system will show important details like soil conditions and water source level on the 16X2 display for all sensors.
Construction of Automatic plant watering system
In order to create this remarkable Smart Irrigation project, specific components need to be connected and assembled in a particular configuration. To begin, we’re sharing the list of required components.
Components Required
Arduino Nano – 1 unit
Three soil moisture sensors – 3 units
Three 5V water pumps – 3 units
Wires
Universal prototype PCB board
Water pump compatible piping
Three plant pots
16×2 Display
Ultrasonic sensor
10k Potentiometer
Berg strip
Construction:
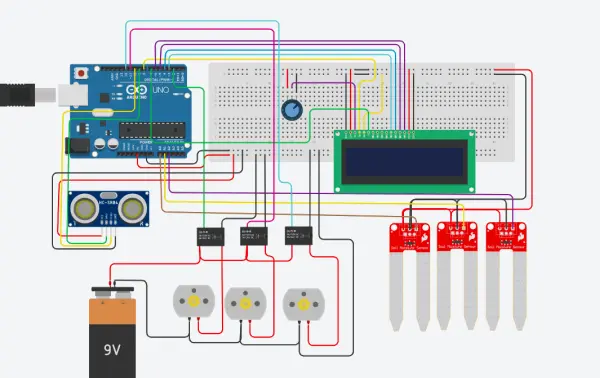
Initially, produce a PCB using zero PCB following the provided circuit diagram.
Subsequently, attach all the soil moisture sensors. Once the sensors are connected, monitor their output through the serial monitor. You should observe varying values ranging from 0 to 1000.
Following this, proceed to link the display and the relay that will activate the pump. Connect the mini water pump to the relay according to the circuit diagram.
Automatic plant watering Circuit Diagram
Smart irrigation Code / Automatic plant watering Code
const int trigPin = 9;
const int echoPin = 10;
long duration;
int distanceCm, distanceInch;
#include // initialize the library by associating any needed LCD interface pin
// with the arduino pin number it is connected to
const int rs =8 , en = 7, d4 = 3, d5 = 4, d6 = 5, d7 = 6;
LiquidCrystal lcd(rs, en, d4, d5, d6, d7);
void setup() {
// put your setup code here, to run once:
pinMode(A0, INPUT);
pinMode(A1, INPUT);
pinMode(A2, INPUT);
Serial.begin(9600);
pinMode(2, OUTPUT);
pinMode(11, OUTPUT);
pinMode(12, OUTPUT);
pinMode(trigPin, OUTPUT);
pinMode(echoPin, INPUT);
lcd.begin(16, 2);
}
void loop() {
// put your main code here, to run repeatedly:
digitalWrite(trigPin, LOW);
delayMicroseconds(2);
digitalWrite(trigPin, HIGH);
delayMicroseconds(10);
digitalWrite(trigPin, LOW);
duration = pulseIn(echoPin, HIGH);
distanceCm= duration*0.034/2;
distanceInch = duration*0.0133/2;
int soil_moisture = analogRead(A0);
int soil_moisture_2 = analogRead(A1);
int soil_moisture_3 = analogRead(A2);
Serial.print(soil_moisture);
Serial.print(” “);
Serial.print(soil_moisture_2);
Serial.print(” “);
Serial.println(soil_moisture_3);
int z= map(soil_moisture, 0, 1023, 100, 0);
int z_2= map(soil_moisture_2, 0, 1023, 100, 0);
int z_3= map(soil_moisture_3, 0, 1023, 100, 0);
//Serial.print(z);
//Serial.print(” %”);
//Serial.print(” “);
//Serial.print(“Distance: “);
int a = map(distanceCm, 0, 17, 20, 0);
//Serial.print(distanceCm);
//Serial.println(” Cm”);
lcd.clear();
lcd.setCursor(0, 0);
lcd.print(“SM1”);
lcd.setCursor(0, 1);
lcd.print(z);
lcd.setCursor(3, 1);
lcd.print(“%”);
lcd.setCursor(6, 0);
lcd.print(“SM2”);
lcd.setCursor(6, 1);
lcd.print(z_2);
lcd.setCursor(9, 1);
lcd.print(“%”);
lcd.setCursor(13, 0);
lcd.print(“SM3”);
lcd.setCursor(12, 1);
lcd.print(z_3);
lcd.setCursor(15, 1);
lcd.print(“%”);
delay(300);
lcd.clear();
lcd.setCursor(0, 0);
lcd.print(“WATER LEVEL”);
lcd.setCursor(12, 0);
lcd.print(a);
lcd.setCursor(14, 0);
lcd.print(“Cm”);
delay(300);
if(soil_moisture>500)
{
digitalWrite(2,LOW);
}
else
{
digitalWrite(2,HIGH);
}
if(soil_moisture_2>280)
{
digitalWrite(11,LOW);
}
else
{
digitalWrite(11,HIGH);
}
if(soil_moisture_3>700)
{
digitalWrite(12,LOW);
}
else
{
digitalWrite(12,HIGH);
}
}
Before establishing the connection, ensure that the provided code is uploaded to the Arduino. Making the connection prior to uploading the code might cause damage to the GPIO pins.
Working on automatic plant watering system project
The functionality of this smart irrigation system is both straightforward and fascinating, divided into three key segments: input, processing, and output. For input, we utilize a soil moisture sensor and an ultrasonic sensor. The soil moisture sensor’s role is to identify the moisture content in the soil, while the ultrasonic sensor is employed to gauge the water level within the reservoir, enabling us to efficiently water the plants.
We’ve conducted research on three distinct plants, each with unique water needs:
1. Periwinkle (sadabahar) requires daily watering. It’s a small plant with green leaves and purple-pink flowers.
2. Cordiline needs watering twice a week, but this frequency may vary based on weather conditions. In winter, it can survive with just one watering per week.
3. Snake plants’ water needs change with the seasons. During summer, they can thrive with watering once every four weeks, while in winter, they can survive for 2-3 months without water.
Based on these varying water requirements, we’ve programmed sensors and an Arduino to cater to each plant’s specific needs. For instance, if a snake plant needs less water, we’ve adjusted the sensor to detect the lowest moisture level for it. Similarly, we’ve calibrated the sensors for the other two plants according to their individual water requirements.
The subsequent step involves integrating the ultrasonic sensor, which serves the purpose of detecting water levels within the reservoir and displaying notifications on the LCD screen. In our automated plant watering system, we aim for complete automation to minimize human intervention. The ultrasonic sensor consistently checks the tank’s water levels and relays this information to the LCD display. Additionally, a buzzer can be connected to this setup. If you’re interested in incorporating IoT features, we have several other projects related to smart irrigation. You can refer to these projects for ideas on adding IoT functionalities to enhance the system.
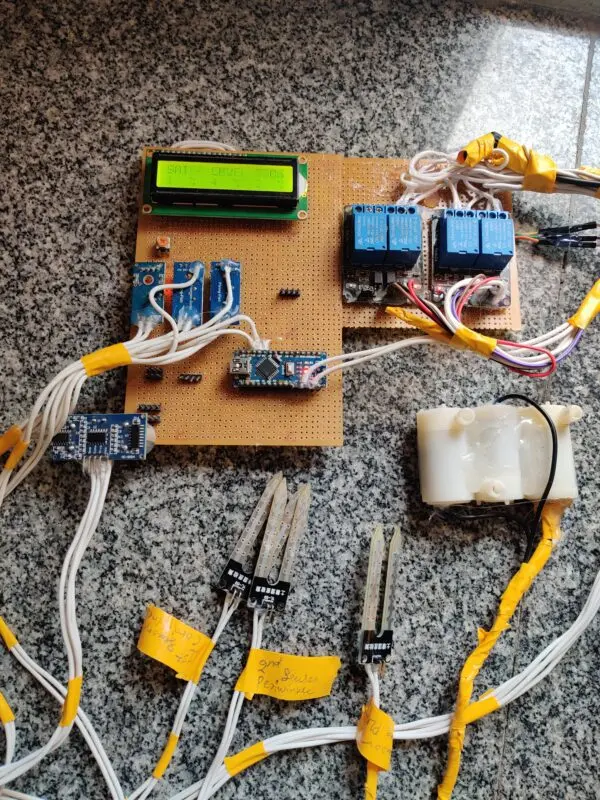
PCBWay PCB Prototyping Services
The complete circuit has been constructed on a breadboard. As you’re aware, a breadboard setup isn’t optimal for this particular project. Hence, PCBWay provides a Rapid PCB Prototyping service designed for research endeavors. I advocate for PCBWay based on the ability to swiftly deliver your initial boards within a 24-hour timeframe, allowing for a faster project initiation.
The phase of prototyping stands as a pivotal period for engineers, students, and enthusiasts alike. PCBWay doesn’t just accelerate the production of your boards; it ensures accuracy and cost efficiency. This significantly cuts down costs and streamlines the development timeline for your electronic projects.
From 2 Layer PCBs to cutting-edge HDI and flex boards, PCBWay offers a wide range of PCB variations tailored to diverse functionalities and application domains. I’m truly impressed by the board quality, the prompt delivery, and the cost-effectiveness of PCBWay’s services.
Advantages of smart irrigation / Automatic plant watering project
This system eliminates the need for daily manual plant watering, saving you time. The project autonomously waters the plant, reducing human effort.
Significantly conserving water, the smart irrigation setup delivers precise amounts required by the plant, avoiding excess water usage. It extends its utility to farming practices, presenting potential use at a corporate farming level.
Disadvantages of smart irrigation / Automatic plant watering project
It requires a constant power supply; it cannot operate without electricity.
Over time, the soil moisture sensor tends to corrode.
If the system malfunctions, it could potentially harm the plant.
- What sensors are used to detect soil moisture and water level?
Soil moisture sensors detect soil moisture and an ultrasonic sensor measures the reservoir water level. - How many plants and pumps does the system support?
The project uses three plant setups and three 5V water pumps, one per plant. - What microcontroller is used in this smart irrigation system?
The system uses an Arduino Nano as the microcontroller. - How are sensor readings displayed to the user?
A 16x2 LCD displays soil moisture percentages for each sensor and the water level in the reservoir. - Do the sensors require calibration?
Yes, each soil moisture sensor is calibrated with unique threshold values for different plants. - Can the system run without electricity?
No, the system requires a constant power supply and will not operate without electricity. - Is there code provided for the project?
Yes, the article provides Arduino code that reads sensors, maps values, updates the LCD, and drives pumps via digital outputs. - What are the main advantages of this automated watering system?
It saves time by eliminating daily manual watering and conserves water by delivering precise amounts. - What are potential disadvantages of the system?
It needs continuous power, soil moisture sensors may corrode over time, and malfunctions could harm plants.