
Summary of Arduino Alcohol Detector Circuit Board
This article details the design of an Arduino-based Alcohol Detector using a custom PCB shield created in EasyEDA. The system utilizes an MQ3 sensor to detect alcohol levels in breath, converting voltage readings into PPM values displayed on a 16x2 LCD. It includes logic to trigger a buzzer alarm if alcohol levels exceed a set threshold, simulating a breathalyzer for safety demonstrations.
Parts used in the Arduino Alcohol Detector:
- Arduino UNO
- Alcohol detector Arduino shield from JLCPCB
- Alcohol Sensor (MQ3)
- Resistor 10K
- Resistor 1K
- 16x2 LCD
- Power Supply
- 10k POT
- LED
- LM358
- Burgstips
- Push button
In this project, I am going to Interface an Alcohol Sensor with Arduino. Here I have designed an Arduino Shield PCB using EASYEDA online PCB simulator and designer. Arduino Alcohol Detector will detect the alcohol level in breath and by using some calculations in code we can calculate the alcohol level in breath or blood and can trigger some alarm.
Components Required:
- Arduino UNO
- Alcohol detector Arduino shield from JLCPCB
- Alcohol Sensor (MQ3)
- Resistor 10K
- Resistor 1K
- 16×2 LCD
- Power Supply
- 10k POT
- LED
- LM358
- Burgstips
- Push button
Circuit Diagram and Explanation:
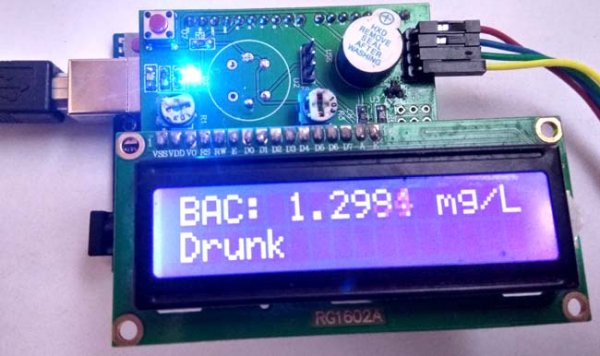
In this Arduino Alcohol Detector Shield we have used a MQ3 sensor to detect present alcohol level in the breath. A 16×2 LCD is used for displaying the PPM Value of alcohol. And an LM358 IC for converting alcohol level sensor output to digital (this function is optional). A buzzer is also place for indicating high alcohol level.
Circuit Diagram for this Arduino Alcohol Sensor Project is given above. We have a comparator circuit for comparing output voltage of Alcohol Sensor with preset voltage (output connected at pin D7). Alcohol sensor output is also connected at an analog pin of Arduino (A0). Buzzer is connected at Pin D9. And LCD connections are same as Arduino LCD examples that are available in Arduino IDE (12, 11, 5, 4, 3, 2). A push button also used here for start taking reading from Alcohol Sensor connected at digital pin D6 of Arduino. Remaining connections are shown in the circuit diagram.
Note: In the circuit, we need to short all the three pin of J2 header to calculate PPM.
For designing Alcohol Detector Shield for Arduino we have used EasyEDA, in which first we have designed a Schematic and then converted that into the PCB layout by Auto Routing feature of EasyEDA. Complete Process is explained below.
Calculations for Alcohol Level:
According to MQ3 datasheet, alcohol in clean air is 0.04 mg/L.
So we power the circuit and find the output voltage of MQ3 sensor in room air (I assume my room has clean air) so I got 0.60 voltage. It means when the sensor is giving 0.60v in the clean air then alcohol will be 0.04 mg/L.
Now we can find a multiplier by dividing alcohol by output voltage in clean air and we get
Multiplier = 0.40/0.60
Multiplier = 0.67
Now we have a formula for calculating alcohol (may be far away from the accurate or actual calculation. These are not standard calculations)
Alcohol = 0.67 * v .
Where v is the output voltage of alcohol sensor.
Note: This calculation is not accurate or standard.
Now we know the least driving limit while drinking alcohol is around 0.5mg/L. But in our calculation, we are getting around 0.40 mg/L in clean air so that we have set a threshold of alcohol while driving 0.80mg/L (just for Demonstration).

MQ3 Sensor:
MQ3 alcohol gas sensor is made by using SnO2 material which has less conductivity in clean air. Whenever it comes nearby alcohol gas its starts conducting highly according to the gas concentration. So user can sense the difference of output voltage using any microcontroller and can detect the presence of Alcohol. This is low cost and a suitable sensor for many applications for alcohol detection. This sensor has a long life and good sensitivity. Some of the applications that can be made by using this sensor are Alcohol gas alarm, portable alcohol detector, gas alarms, Breathalyzer etc.
Read more: Arduino Alcohol Detector Circuit Board
- How is the alcohol level calculated?
The article provides a non-standard formula where Alcohol equals 0.67 multiplied by the output voltage of the sensor. - What sensor is used to detect alcohol?
An MQ3 alcohol gas sensor made with SnO2 material is used to detect alcohol presence. - Can the LM358 IC be omitted?
Yes, the LM358 IC function to convert sensor output to digital is described as optional. - Which pin connects the push button?
The push button is connected to digital pin D6 of the Arduino to start taking readings. - Where is the buzzer connected?
The buzzer is connected at Pin D9 to indicate high alcohol levels. - How do you calculate PPM according to the text?
You must short all three pins of the J2 header to calculate PPM. - What is the threshold set for driving?
A threshold of 0.80mg/L is set for demonstration purposes, though the least driving limit is noted as around 0.5mg/L. - Does the sensor conduct more in clean air?
No, the SnO2 material has less conductivity in clean air and conducts highly when near alcohol gas.