
Summary of Control Servo with Light using Arduino
This Instructable shows how to control a servo motor with a photocell (light-dependent resistor) using an Arduino. It lists materials, instructs wiring to a provided schematic, and includes simple Arduino code using the Servo library to attach a servo to pin 12 and read values to drive motion. The project is aimed at beginners.
Parts used in the Photocell Servo Control Project:
- Photocell (light-dependent resistor)
- 10k resistor
- Arduino
- Breadboard
- Servo
- Jumper wires
Hello!
In this Instructable i will teach you how to control a servo using a Photocell.
This is very simple and good for beginners.

Step 1: Materials
1 x Photocell
1 x 10k Resistor
1 x Arduino
1x Breadboard
1x Servo
and some jumpers
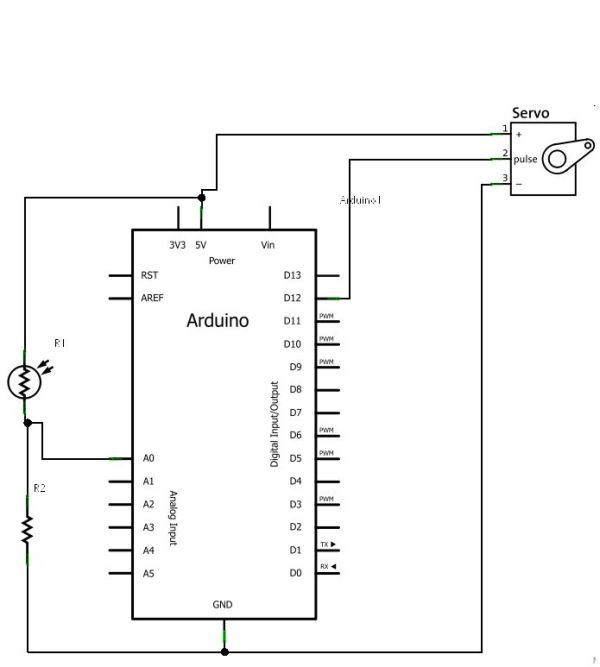
Step 2: Wiring it up
Wire everything following the schematic below.
Step 3: The Code
The Code is very simple:
#include <Servo.h>
Servo myservo;
int val;
void setup()
{
myservo.attach(12);
}
void loop()
Major Components in Project
1 x Photocell
1 x 10k Resistor
1 x Arduino
1 x 10k Resistor
1 x Arduino
For more detail: Control Servo with Light using Arduino
- What is the project about?
The project teaches how to control a servo using a photocell and an Arduino. - What materials are required?
A photocell, a 10k resistor, an Arduino, a breadboard, a servo, and jumper wires. - Which Arduino pin is the servo attached to in the example code?
The servo is attached to pin 12 in the example code. - Does the project include wiring instructions?
Yes, it instructs to wire everything following the provided schematic. - Is the code complex?
No, the code is described as very simple and uses the Servo library. - Is this project suitable for beginners?
Yes, the project is described as very simple and good for beginners. - What library does the code use?
The code uses the Servo library. - Where can I find more detail?
More detail is available at the Control Servo with Light using Arduino reference mentioned in the article.