
Summary of Sensor Board For Micro:Bit
This article introduces a Sensor Board for micro:bit, featuring analog inputs for sound, temperature, and light. It details hardware connections via pins P0, P1, and P2 using alligator clips, includes a power LED, reverse polarity protection, and supports 3V/GND expansion. The guide provides code examples in JavaScript Blocks and MicroPython to read sensor data, with specific logic for sound oscillation around 1.5V and rough temperature conversion formulas.
Parts used in the Sensor Board for micro:bit:
- Sensor Board
- micro:bit
- MEMs microphone
- Pre-amplifier
- Analog input pins (P0, P1, P2)
- Alligator clips
- LED 'power on' indicator
- Thermistor
- MonkMakes Relay Board (optional)
- MonkMakes Speaker (optional)
Features
- 3V and GND connections can be made from either side and allow you to power a second board such as the MonkMakes Relay Board or MonkMakes Speaker.
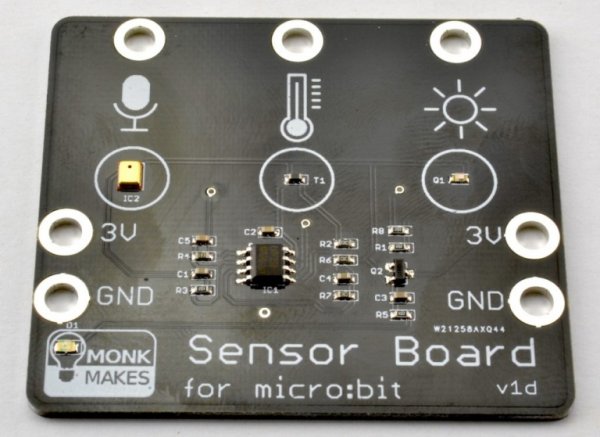
- LED ‘power on’ indicator
- Reverse polarity protection
- All three sensors are analog and can be connected to pins P0, P1 and P2 using alligator clips.
Getting Started
Connecting to your micro:bit
You only have to wire up the sensors that you are actually using, but you could wire all the sensors up as shown below. The code examples below assume that pin 0 is used for sound, pin 1 for temperature and pin 2 for light. You can use any pin for any of the sensors, but remember to modify the code to match the pin you are using.
Sound
The Sensor for micro:bit uses a MEMs (microphone on a chip) and a pre-amplifier. The output of the sound sensor is connected to an analog input where it can be sampled. The sound signal varies about the 1.5V level. So, silence will produce an analog output of around 1.5V. When there is sound the analog readings will oscillate above and below the 1.5V level like this:
This is why 511 is subtracted from the readings in the code examples below.
JavaScript Blocks Editor
Here is an example of using the Sensor Board to display a bargraph to indicate the sound level. Click on the image below to try it out. Making a noise into the microphone will make the LEDs dance.
MicroPython
from microbit import *

def bargraph(a):
    display.clear()
    for y in range(0, 5):
        if a > y:
            for x in range(0, 5):
                display.set_pixel(x, 4-y, 9)

while True:
    sound_level = (pin0.read_analog() - 511) / 100
    bargraph(sound_level)
Temperature
The Sensor for micro:bit uses a thermistor to measure temperature. The temperature output from the board is a voltage that indicates the temperature. This is then measured using an analog input on the micro:bit.
The calculations for converting this voltage reading to an actual temperature are quite complicated and so the code examples here will only give a rough idea of temperature.
If you want your temperatures in Fahrenheit, then multiply the temperature in degrees C by 9, divide the result by 5 and then add 32.
JAVASCRIPT BLOCKS EDITOR
This is an example of using the Sensor Board to display the temperature, try putting your finger on the temperature sensor to warm it up. You can run the example below by clicking on it.
Read more: Sensor board for micro:bit
- How do I connect the sensors to the micro:bit?
You can connect the three analog sensors to pins P0, P1, and P2 using alligator clips. - Can I use different pins than P0, P1, and P2?
Yes, you can use any pin for any sensor but must modify the code to match your chosen pins. - What is the baseline analog reading for silence?
Silence produces an analog output of around 1.5V, which corresponds to a value of approximately 511 in the code. - How do I calculate Fahrenheit from the board's Celsius reading?
Multiply the Celsius temperature by 9, divide the result by 5, and then add 32. - Does the project require connecting all three sensors?
No, you only need to wire up the sensors that you are actually using. - What components allow powering a second board?
The 3V and GND connections on either side allow you to power boards like the MonkMakes Relay Board or Speaker. - How does the sound signal behave when noise is present?
When there is sound, the analog readings oscillate above and below the 1.5V level. - Is the temperature calculation precise?
The provided code examples give only a rough idea of the temperature as the voltage conversion is complicated.
