Summary of How to Control arduino by bluetooth from PC
This guide shows how to control an Arduino from a phone or PC via a Bluetooth serial module. It covers required hardware and software, wiring the Bluetooth module to the Arduino (TX↔RX, RTS↔CTS, power), protecting the module, uploading Arduino sketch to toggle an LED via serial commands 0/1, and pairing the module with a PC using passkey 1234 to obtain COM ports for serial communication.
Parts used in the Bluetooth Arduino Control Project:
- Arduino board (Duemilanove 328 used)
- Bluetooth serial board (SparkFun BlueSMiRF used)
- Wires
- LED
- Computer with Bluetooth or USB Bluetooth adapter
- Pocket PC with Bluetooth
I wanted to make it possible to control an arduino board from my phone.
So that I could control other devices.
the easiest way seemed to be using bluetooth.
but when I received the parts needed I found it want quite as simple as I had hoped.
And after looking on the Internet I didn’t find much information to help.
so I have decided to write this guide to help other people that are thinking of doing the same thing.
Step 1: Parts needed
1 arduino board ( I used the duemilanvoe 328)
1 bluetooth serial board ( I used the sparkfun bluesmirf)
some pieces of wire
1 led
A computer with bluetooth or a usb bluetooth adaptor.
A pocket PC with bluetooth
Software needed
the arduino enviroment software
and some serial terminal software ( I used putty)
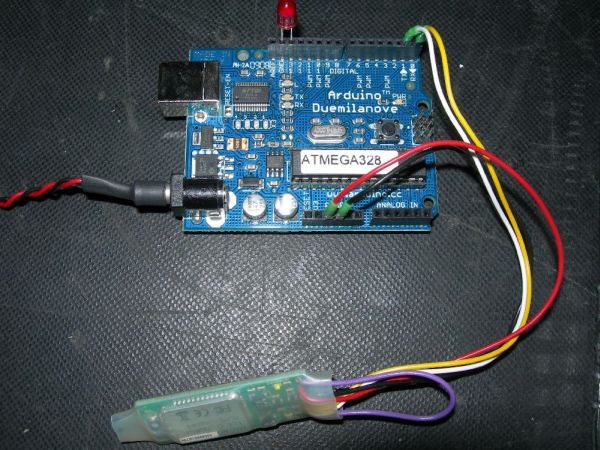
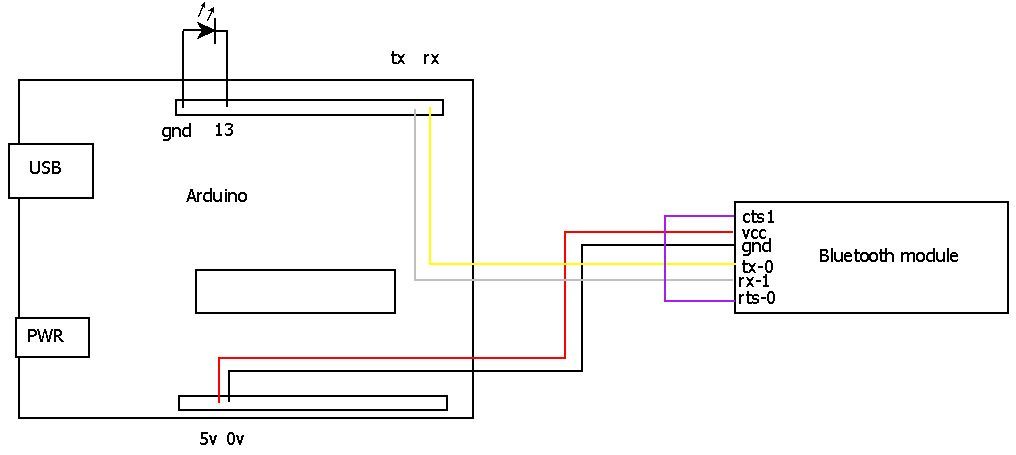
Step 2: Wiring it all up
I linked the cts1 to the rts0 on the bluetooth module.
then I wired the tx on the module to the rx on arduino
the rx on the bluetooth to the tx on arduino
I protected the bluetooth module by sealing it with heatshrink.
I then connected +5v and 0v to the bluetooth board from arduino and supplied the arduino board with 5volts.
and pluged an LED in to socket pin 13 and ground to test it.
as shown.
Step 3: Loading the software
Before I connected the board using bluetooth. I had to load some code on to the arduino board.
The easiest way to do this is to open the arduino enviroment software program and connect the board to a computer using usb.
then go to the tools tab and make sure the correct arduino board and usb ports are selected.
then up load this code on to the board.
this code will allow you to switch on and off the led by pressing 1 for on and 0 for off.
from your terminal.
/*
simple LED test
*/
char val; // variable to receive data from the serial port
int ledpin = 2; // LED connected to pin 2 (on-board LED)
void setup()
{
pinMode(ledpin = 13, OUTPUT); // pin 13 (on-board LED) as OUTPUT
Serial.begin(115200); // start serial communication at 115200bps
}
void loop() {
if( Serial.available() ) // if data is available to read
{;}
val = Serial.read(); // read it and store it in ‘val’
if( val == ‘0’ ) // if ‘0’ was received led 13 is switched off
{
digitalWrite(ledpin, LOW); // turn Off pin 13 off
delay(1000); // waits for a second
Serial.println(“13 off”);
}
if( val == ‘1’ ) // if ‘1’ was received led 13 on
{
digitalWrite(ledpin = 13, HIGH); // turn ON pin 13 on
delay(1000); // waits for a second
Serial.println(“13 on”);
}
}
Step 4: Connecting over bluetooth on the PC
the next step is to connect the arduino board using bluetooth.
disconnect the arduino usb cable and connect up the bluetooth module.
power the arduino board. and the red led on the bluetooth module should flash.
now open the bluetooth control panel on your pc this can be opened from the system control panel or from the icon in the bottom right of your desktop.
you will now have to add a new bluetooth device.
click my device is set up and ready to be found
then on the next screen to will see firefly-E754 or something similer. click next
on this screen select use the passkey found in the documentation and enter 1234.
on the last screen you will see which ports your computer assigns my computer set com11 for outgoing and com12 for incoming.
1 bluetooth serial board
some pieces of wire
1 led
For more detail: How to Control arduino by bluetooth from PC
- What parts are needed to control an Arduino via Bluetooth?
An Arduino board, a Bluetooth serial board, wires, an LED, a computer with Bluetooth or USB Bluetooth adapter, and a pocket PC with Bluetooth are needed. - How should the Bluetooth module be wired to the Arduino?
Connect module TX to Arduino RX, module RX to Arduino TX, connect CTS1 to RTS0, and power the module with +5V and 0V from the Arduino. - How is the Bluetooth module protected physically?
The Bluetooth module is sealed with heatshrink for protection. - What software is required to upload and test the Arduino code?
The Arduino environment software to upload code and serial terminal software (Putty used) for testing are required. - How do you upload the sketch before using Bluetooth?
Connect the Arduino to a computer via USB, select the correct board and port in the Tools menu, then upload the sketch from the Arduino environment. - What serial commands control the LED in the provided sketch?
Sending 1 turns the LED on and sending 0 turns the LED off. - What serial baud rate does the sketch use?
The sketch uses Serial.begin at 115200 baud. - How do you pair the Bluetooth module with a PC?
Add a Bluetooth device, choose the discovered device (e.g., firefly-E754), use the passkey from documentation and enter 1234, then note the assigned COM ports.