
Summary of Digital thermometer using arduino
This article describes a three-digit digital thermometer project using an Arduino and an LM35 temperature sensor. The device measures temperatures from 0°C to 99.9°C and can display readings in either Celsius or Fahrenheit via a selector switch. It utilizes a multiplexed seven-segment display driven by transistors, with the LM35 connected to analog pins for voltage sensing. The system operates on a 4V to 30V DC supply and includes specific code logic to convert sensor voltage into temperature values and drive the display segments.
Parts used in the Digital Thermometer Project:
- Arduino board
- LM35 temperature sensor
- Three-digit seven-segment display
- Digit driver transistors (Q1, Q2, Q3)
- Selector switch for °C/°F
- Resistors R9, R10, R11 (base current limiting)
- Resistors R1 to R8 (segment current limiting)
Digital thermometer using arduino and LM35.
This article is about a simple three digit digital thermometer using arduino. Range of this thermometer is from 0°C to 99.9°C. There is also a provision for displaying the temperature in °F scale. Three terminal analog temperature sensor LM35 is used as the sensor here. LM35 can measure temperatures between -55°C to +155°C. The supply voltage range is from 4V to 30V DC and the current drain is 60uA. The LM35 is available in TO-92 package and it is very easy to use. The output voltage of the arduino increases 10mV per °C rise in temperature. That means if 25 °C is the temperature, then output voltage of the sensor will be 250mV. Circuit diagram of the digital thermometer using arduino and LM35 is shown in the figure below.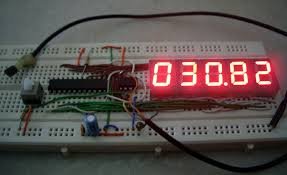
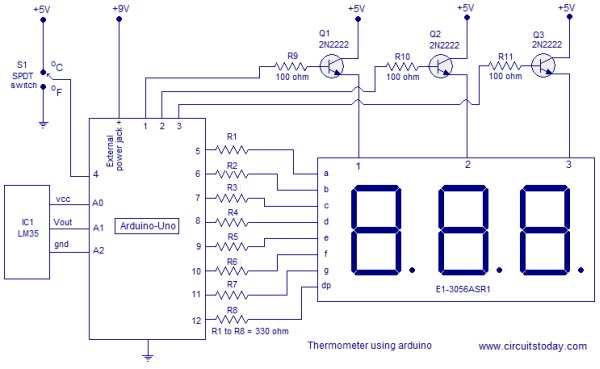
Circuit diagram.
Temperature sensor LM35 is connected to the arduino through the analog input pins. A0 pin of the arduino serves as the supply voltage source for LM35 and A2 pin of the arduino serves as the ground. Arduino reads the voltage output of the LM35 through the analog input pin A1. Digital pin 4 is used for interfacing the °C/°F selector switch to the arduino. Digit driver transistors Q1, Q2 and Q3 are interfaced to the digital pins 1, 2 and 3 of the arduino respectively. Multiplexed segment lines a to dp are interfaced to the digital pins 5 to 12 of the arduino respectively. Resistors R9, R10 and R11 limits the base current of the corresponding transistors. Resistors R1 to R8 limits the current through the corresponding segments.
Program.
int i;
int backup;
int a;
int unit;
int value;
int vcc=A0;
int sensor=A1;
int gnd=A2;
int select=4;
int disp1=1;
int disp2=2;
int disp3=3;
int segA=5;
int segB=6;
int segC=7;
int segD=8;
int segE=9;
int segF=10;
int segG=11;
int segDP=12;
void setup()
{
  pinMode(disp1, OUTPUT);
  pinMode(disp2, OUTPUT);
  pinMode(disp3, OUTPUT);
  pinMode(segA, OUTPUT);
  pinMode(segB, OUTPUT);
  pinMode(segC, OUTPUT);
  pinMode(segD, OUTPUT);
  pinMode(segE, OUTPUT);
  pinMode(segF, OUTPUT);
  pinMode(segG, OUTPUT);
  pinMode(segDP, OUTPUT);
  pinMode(sensor, INPUT);
  pinMode(vcc, OUTPUT);
  pinMode(gnd, OUTPUT);
  pinMode(select, INPUT);
  digitalWrite(vcc, HIGH);
  digitalWrite(gnd, LOW);

}
  void loop()
 {
  value=analogRead(sensor); //Reads the sensor LM35
  value=value*5;
  unit=digitalRead(select); //Reads the selector switch
  if(unit==1)
  {value=value;}  // Output in celcius
  else
  {value=(value*1.8)+320;} //Output in Fahrenheit
  backup=value; //Backs up the content in variable value

 for(i=0;i<100;i++) //Loops the display loop 100 times(steadies the display)
 {value=backup;
  a=value%10;
  digitalWrite(disp1,LOW);
  digitalWrite(disp2,LOW);
  digitalWrite(disp3, HIGH);
  digitalWrite(segDP,HIGH);
  display(a);
  delay(4);
  value = value/10;
  a = value%10;
  digitalWrite(disp3,LOW);
  digitalWrite(disp2,HIGH);
  digitalWrite(segDP,LOW);
  display(a);
  delay(4);
  value=value/10;
  a=value;
  digitalWrite(disp2,LOW);
  digitalWrite(disp1,HIGH);
  digitalWrite(segDP,HIGH);
  display(a);
  delay(4);
 }
  }
  int display (int a)
  {
  switch (a)
  {
    case 0:
    digitalWrite(segA, LOW);
    digitalWrite(segB, LOW);
    digitalWrite(segC, LOW);
    digitalWrite(segD, LOW);
    digitalWrite(segE, LOW);
    digitalWrite(segF, LOW);
    digitalWrite(segG, HIGH);
     break;

    case 1:
    digitalWrite(segA, HIGH);
    digitalWrite(segB, LOW);
    digitalWrite(segC, LOW);
    digitalWrite(segD, HIGH);
    digitalWrite(segE, HIGH);
    digitalWrite(segF, HIGH);
    digitalWrite(segG, HIGH);
    break;

    case 2:
    digitalWrite(segA, LOW);
    digitalWrite(segB, LOW);
    digitalWrite(segC, HIGH);
    digitalWrite(segD, LOW);
    digitalWrite(segE, LOW);
    digitalWrite(segF, HIGH);
    digitalWrite(segG, LOW);
    break;
 About the program.
The voltage output of the LM35 is scanned using the analogRead function. The analogRead function will read the voltage at a particular analog input pin and converts it into a digital value between 0 and 1023. If 30°C is the temperature, the LM35 output will be 300mV. The code value=digitalRead(sensor) will read this voltage, convert it into a digital value and stores it in the variable “value”. So, for 30°C the number stored in variable “value” will be 3oomV/(5/1023)=61. This number is multiplied by 5 to get 305 a decimal point is place before the last digit while displaying on the seven segment display.The result will be 30.5°C.
For more detail: Digital thermometer using arduino
- What is the measurement range of this digital thermometer?
The thermometer measures temperatures from 0°C to 99.9°C. - Can the device display temperature in both Celsius and Fahrenheit?
Yes, there is a provision for displaying the temperature in the °F scale using a selector switch. - How does the LM35 sensor output voltage relate to temperature?
The output voltage increases by 10mV for every 1°C rise in temperature. - Which Arduino pin is used to read the sensor voltage?
Analog input pin A1 is used to read the voltage output of the LM35. - How are the digit driver transistors connected to the Arduino?
Transistors Q1, Q2, and Q3 are interfaced to digital pins 1, 2, and 3 respectively. - What is the function of resistors R1 to R8 in the circuit?
These resistors limit the current through the corresponding segments of the display. - Does the program allow conversion between temperature scales?
Yes, if the select pin reads low, the code converts the value to Fahrenheit using the formula value*1.8+320. - What package type is the LM35 sensor available in?
The LM35 is available in the TO-92 package.