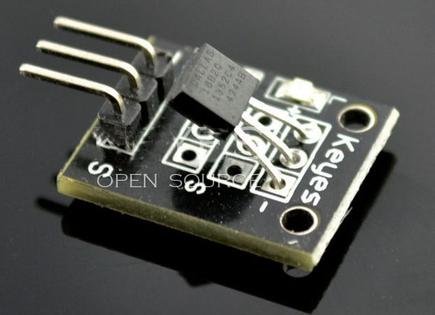
Electronic Brick, Waterproof and other Versions
NOTE: There are different-appearing versions but they work the same.
This is an electronic thermometer which has high accuracy over a wide range (accurate to ±0.5°C over the range of -10°C to +85°C) (Workable from -55°C to +125°C). You can locate these thermometer chips up to 100M away from your Arduino. Shorter cables can be just 2 wires. NOTE: There must be a pullup resistor of about 5K in all cases, but the Brick versions have this included.
Multiple thermometers can be connected on the same wire because every one has it’s own internal address. This is the “1-wire” bus system (Wikipedia). Below is an example of reading up to 5 DS18B20’s on a single Arduino pin. This requires that you know the internal address of each sensor. A utility sketch to find the address is also below.
Here (right) is what the individual chip sensors look like, and their pinout:
The DS18B20 Brick is the easiest way to get connected and measure temperatures. You can buy individual chips for about $1.50 here. or the Brick shown above, with a cable, for $3.50 here. Or a waterproofed version here:
The easy way to get connected is to simply plug the supplied cable into a YourDuinoRobo1 with built-in 3-pin connectors, or a Sensor Shield that plugs on top of an Arduino like this (above):
Plug your DS18B20 Brick’s cable into I/O pin connector 3 on Robo1 or 2 on a sensor shield. (NOTE! Pin numbers start with Zero).
How does this Work??
Now, let’s think for a minute about what we’re doing here. The earlier devices we connected were simple: Switches, LEDs, Potentiometers, etc. A single component. This is different: we are connecting to a chip that has hundreds of transistors inside it and dozens of possible functions. It expects us to send it commands and it will return data as lots of signal pulses of 1’s and 0’s. How will we communicate with it? Fortunately, we’re not in an empty room. We’re in a library. On the shelves, free for us to check out, are lots of already-published Arduino functions that we can use. We will use two library check-outs to run our temperature sensor that other people have spent 100’s of hours working on, and given us unlimited copies to check out. (Terry’s wife designs Libraries. Here’s one she designed in China: )
To make this work, you MUST download and install the two libraries for One-wire devices and Dallas Temperature chips and copy them to your Arduino software installation Library folder. (See above).
(each one is called a “Library” not a Book! )
For more about Libraries see our Arduino Libraries page.
Then just copy and paste this test code (below) into your Arduino IDE:
NOTE: If using the YourDuinoRobo1, connect to pin 3 (and change the pin number in the code below to 3).
Then:
- Click the VERIFY button. Soon you should see “Compiling” and “Done Compiling”
- Click the UPLOAD button. You should see “Uploading to IO Board” and “Done Uploading”
- Now, click the SERIAL MONITOR button. A new window should pop up and scroll lines of results showing you.. Temperature!
Troubleshooting?? Go back and get the original BLINK program working first. Check Here:
/* YourDuino Electronic Brick Test
Temperature Sensor DS18B20
- Connect cable to Arduino Digital I/O Pin 2
[email protected] */

/*-----( Import needed libraries )-----*/
#include <OneWire.h>
#include <DallasTemperature.h>

/*-----( Declare Constants )-----*/
#define ONE_WIRE_BUS 2 /*-(Connect to Pin 2 )-*/

/*-----( Declare objects )-----*/
/* Set up a oneWire instance to communicate with any OneWire device*/
OneWire ourWire(ONE_WIRE_BUS);

/* Tell Dallas Temperature Library to use oneWire Library */
DallasTemperature sensors(&ourWire);

/*-----( Declare Variables )-----*/

void setup() /*----( SETUP: RUNS ONCE )----*/
{
/*-(start serial port to see results )-*/
delay(1000);
Serial.begin(9600);
Serial.println("YourDuino.com: Electronic Brick Test Program");
Serial.println("Temperature Sensor DS18B20");
delay(1000);

/*-( Start up the DallasTemperature library )-*/
sensors.begin();
}/*--(end setup )---*/

void loop() /*----( LOOP: RUNS CONSTANTLY )----*/
{
Serial.println();
Serial.print("Requesting temperature...");
sensors.requestTemperatures(); // Send the command to get temperatures
Serial.println("DONE");

Serial.print("Device 1 (index 0) = ");
Serial.print(sensors.getTempCByIndex(0));
Serial.println(" Degrees C");
Serial.print("Device 1 (index 0) = ");
Serial.print(sensors.getTempFByIndex(0));
Serial.println(" Degrees F");

}/* --(end main loop )-- */

/* ( THE END ) */
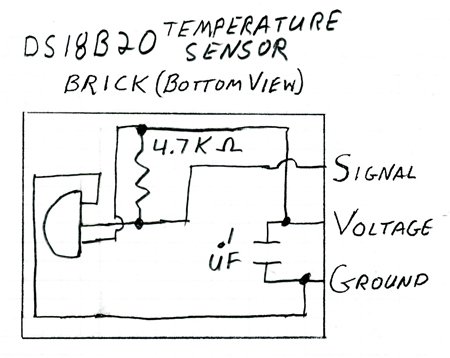
Here’s the schematic diagram of the Brick:
And here is another form of exactly the same
DS18B20 temperature sensor in a waterproof stainless steel tube. These are
You have the same connections to voltage and ground and signal, but you have to provide your own 4.7K “pullup” resistor which can be any small type resistor. Be careful to ensure the Signal and Ground connections are correct. If they are reversed, the sensor can get quite hot (even at such a low voltage).
Here (above) is a photo of this sensor connected to a “3-pin Sensor” connector so that it can be connected like our regular Electronic Bricks. You can see the 4.7K pullup resistor connected between + and Signal.
Sensor Connections: red (VCC), blue or yellow (DATA), black (GND)
Some Versions, like Adafruit, have these connections: Orange Stripe: (VCC) White: (GND) Blue Stripe:(DATA)
And on the right is a handy connection method if you need to quickly connect many temperature sensors to get their addresses, like I do. That’s one of those Stereo speaker connectors that you push the
button in and push the wire in place. Scavenged from an old Stereo. Notice the resistor (4.7K to 10K OK) on the back from +5 (Red) to Signal (White).
Read Temperatures from multiple DS18B20 sensors on 1 Arduino Pin:
You will need to know the internal address of each sensor. Farther below is a Utility Sketch that can read the address from sensors one at a time. You need to cut and paste the addresses, first to a text file and later into the example multi-sensor example sketch below.
Multiple DS18B20 Example:
NOTE: For an example that displays multiple DS18B20 temperatures on a 4-line LCD Display SEE THIS EXAMPLE:
/* YourDuino Multiple DS18B20 Temperature Sensors on 1 wire
  Connections:
  DS18B20 Pinout (Left to Right, pins down, flat side toward you)
  - Left   = Ground
  - Center = Signal (Pin 2):  (with 3.3K to 4.7K resistor to +5 or 3.3 )
  - Right  = +5 or +3.3 V

   Questions: [email protected]
   V1.01  01/17/2013 ...based on examples from Rik Kretzinger

/*-----( Import needed libraries )-----*/
// Get 1-wire Library here: http://www.pjrc.com/teensy/td_libs_OneWire.html
#include <OneWire.h>

//Get DallasTemperature Library here:  http://milesburton.com/Main_Page?title=Dallas_Temperature_Control_Library
#include <DallasTemperature.h>

/*-----( Declare Constants and Pin Numbers )-----*/
#define ONE_WIRE_BUS_PIN 2

/*-----( Declare objects )-----*/
// Setup a oneWire instance to communicate with any OneWire devices
OneWire oneWire(ONE_WIRE_BUS_PIN);

// Pass our oneWire reference to Dallas Temperature.
DallasTemperature sensors(&oneWire);

/*-----( Declare Variables )-----*/
// Assign the addresses of your 1-Wire temp sensors.
// See the tutorial on how to obtain these addresses:
// http://www.hacktronics.com/Tutorials/arduino-1-wire-address-finder.html

DeviceAddress Probe01 = { 0x28, 0x8A, 0xB1, 0x40, 0x04, 0x00, 0x00, 0xC7 };
DeviceAddress Probe02 = { 0x28, 0xCC, 0x92, 0x40, 0x04, 0x00, 0x00, 0xB6 };
DeviceAddress Probe03 = { 0x28, 0x4D, 0x8D, 0x40, 0x04, 0x00, 0x00, 0x78 };
DeviceAddress Probe04 = { 0x28, 0x9A, 0x80, 0x40, 0x04, 0x00, 0x00, 0xD5 };
DeviceAddress Probe05 = { 0x28, 0xE1, 0xC7, 0x40, 0x04, 0x00, 0x00, 0x0D };

void setup()   /****** SETUP: RUNS ONCE ******/
{
  // start serial port to show results
  Serial.begin(9600);
  Serial.print("Initializing Temperature Control Library Version ");
  Serial.println(DALLASTEMPLIBVERSION);

  // Initialize the Temperature measurement library
  sensors.begin();

  // set the resolution to 10 bit (Can be 9 to 12 bits .. lower is faster)
  sensors.setResolution(Probe01, 10);
  sensors.setResolution(Probe02, 10);
  sensors.setResolution(Probe03, 10);
  sensors.setResolution(Probe04, 10);
  sensors.setResolution(Probe05, 10);

}//--(end setup )---

void loop()   /****** LOOP: RUNS CONSTANTLY ******/
{
  delay(1000);
  Serial.println();
  Serial.print("Number of Devices found on bus = ");
  Serial.println(sensors.getDeviceCount());
  Serial.print("Getting temperatures... ");
  Serial.println();

  // Command all devices on bus to read temperature
  sensors.requestTemperatures();

  Serial.print("Probe 01 temperature is:   ");
  printTemperature(Probe01);
  Serial.println();

  Serial.print("Probe 02 temperature is:   ");
  printTemperature(Probe02);
  Serial.println();

  Serial.print("Probe 03 temperature is:   ");
  printTemperature(Probe03);
  Serial.println();

  Serial.print("Probe 04 temperature is:   ");
  printTemperature(Probe04);
  Serial.println();

  Serial.print("Probe 05 temperature is:   ");
  printTemperature(Probe05);
  Serial.println();

}//--(end main loop )---

/*-----( Declare User-written Functions )-----*/
void printTemperature(DeviceAddress deviceAddress)
{

float tempC = sensors.getTempC(deviceAddress);

   if (tempC == -127.00)
   {
   Serial.print("Error getting temperature  ");
   }
   else
   {
   Serial.print("C: ");
   Serial.print(tempC);
   Serial.print(" F: ");
   Serial.print(DallasTemperature::toFahrenheit(tempC));
   }
}// End printTemperature
//*********( THE END )***********
For more detail: Temperature Sensor DS18B20
