Summary of DIY 3D Controller using an Arduino
This article describes building a 3D hand-position sensing system using an Arduino, six resistors, and aluminum foil. The device uses three capacitive plates arranged in a cube corner to detect distance in three dimensions via RC circuits. By discharging and measuring charge time on specific pins, the system translates hand proximity into 3D coordinates for interactive applications.
Parts used in the 3D Hand-Position Sensing System:
- Arduino
- (3) 270k resistors
- (3) 10k resistors
- Solder
- Wire
- Aluminum foil
- Cardboard
- Shielded wire or coaxial cable
- Alligator clips
- Tape (e.g., Scotch)
- Zip-tie
- Shrink wrap tubing or hot glue
- Processing software
- Wire cutters
- Soldering iron
- Box cutter
Make a 3D interface using an six resistors, aluminum foil, and an Arduino. Take that, Wii.
Update: a much more thorough explanation of this project is available from Make Magazine. It might be easier to follow their instructions, and I think their code is more up to date.
The basic goal here was to make a 3D hand-position sensing system that most people can build, while still preserving some semblance of functionality. To get an idea of possible applications, check out the demo video. If you think you can build one that is simpler and equally accurate, or slightly more complex and more accurate, share in the comments!
Step 1: Materials
Tools
-
- Arduino
- Processing
- Wire cutters
- Soldering iron
- Box cutter
Materials
-
- (3) 270k resistors
- (3) 10k resistors
- Solder
- Wire
- Aluminum foil
- Cardboard
Optional:
- Tape (e.g.: scotch)
- Shielded wire (e.g.: coaxial cable, ~3′)
- (3) alligator clips
- 3-pin header
- Zip-tie
- Shrink wrap tubing or hot glue
Step 2: Make the Plates
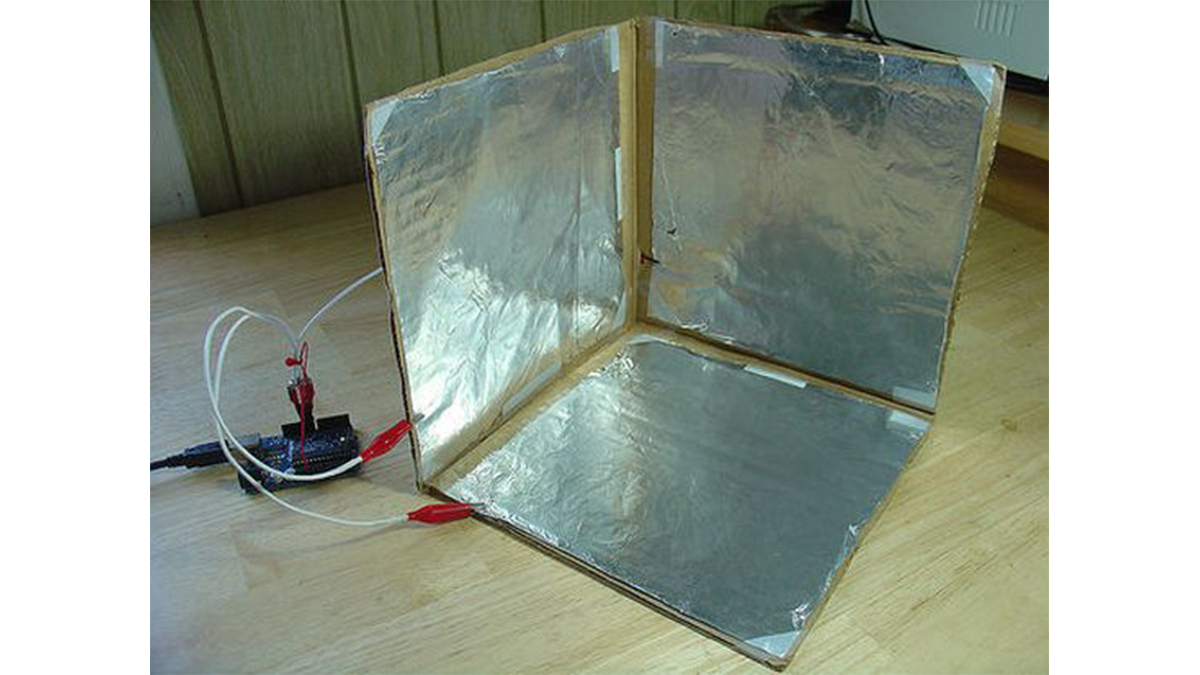
This sensor will work using simple RC circuits, with each circuit sensing distance in one dimension. I found that the easiest way to arrange three capacitive plates for this purpose is in the corner of a cube. I cut the corner of a cardboard box into an 8.5″ cube, and then cut some aluminum foil to fit as slightly smaller squares. Tape on the corners keeps them in place.
Don’t tape down the entire perimeter, we’ll need it later for attaching the alligator clips.
Step 3: Make the Connectors
To connect the Arduino to the plates we need some shielded wire. If the wire isn’t shielded, the wires themselves act more obviously as part of the capacitor. Also, I’ve found that alligator clips make it really easy to connect things to aluminum — but there are probably plenty of other ways, too.
- Cut three equal lengths of shielded cable. I chose about 12″. The shorter the better. Coaxial cable works, but the lighter/more flexible the better.
- Strip the last half inch or so to reveal the shielding, and the last quarter inch to reveal the wire.
- Twist the alligator clips to the wires onto the wires and solder them together.
- Add some heat shrink tubing or hot glue to keep things together.
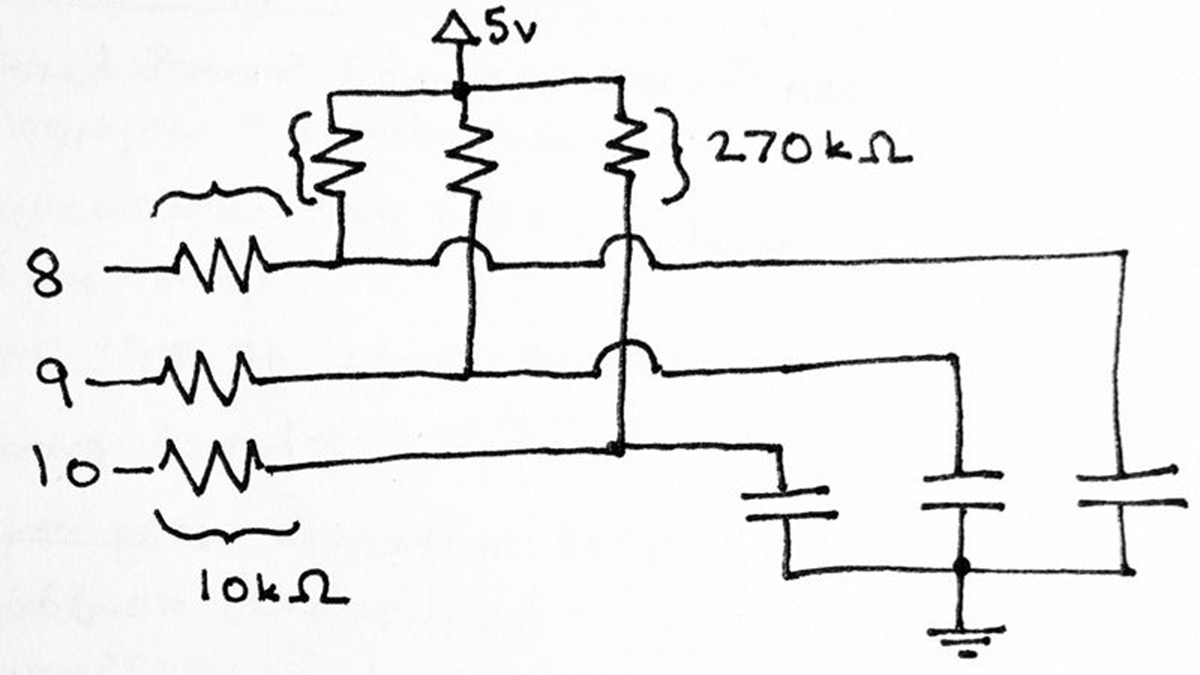
Step 4: Make the Circuit
The “circuit” is just two resistors per piece of aluminum. To understand why they’re there, it helps to know what we’re doing with the Arduino. What we’ll do with each pin, sequentially, is:
-
- Set the pin to output mode.
- Write a digital “low” to the pin. This means both sides of the capacitor are grounded and it will discharge.
- Set the pin to input mode.
- Count how much time it takes for the capacitor to charge by waiting for the pin to go “high”. This depends on the values for the capacitor and the two resistors. Since the resistors are fixed, a change in capacitance will be measurable. The distance from ground (your hand) will be the primary variable contributing to the capacitance.
The 270k resistors provide the voltage to charge the capacitors. The smaller the value, the faster they’ll charge. The 10k resistors affect the timing as well, but I don’t completely understand their role.
- Arduino
- Processing
- Wire cutters
- Soldering iron
- Box cutter
For more detail: DIY 3D Controller using an Arduino
- How does the sensor determine distance?
The system measures the time it takes for a capacitor to charge, which depends on capacitance changes caused by the distance of a hand from the ground. - What is the best way to arrange the capacitive plates?
The easiest arrangement is placing three plates in the corner of a cube made from cardboard. - Does the type of wire matter for this project?
Yes, shielded wire is recommended because unshielded wires act more obviously as part of the capacitor. - What role do the 270k resistors play?
The 270k resistors provide the voltage to charge the capacitors, with smaller values resulting in faster charging. - Can I use regular wire instead of shielded wire?
You can, but unshielded wires will act more obviously as part of the capacitor compared to shielded ones. - How are the alligator clips attached to the circuit?
They are twisted onto the stripped ends of the shielded cable and soldered together. - What steps does the Arduino perform sequentially?
It sets the pin to output low to discharge, then switches to input mode to count the time until the pin goes high. - Why should I avoid taping the entire perimeter of the foil?
You need to leave parts of the perimeter untaped to attach the alligator clips later. - What is the primary variable contributing to capacitance in this setup?
The distance from the ground, specifically your hand, is the primary variable affecting capacitance.