
Summary of DS1307 I²C Clock using arduino
This article details building an Arduino-based real-time clock using a DS1307 chip and I²C interface. The author explains the hardware setup, including the crystal oscillator and backup battery options, and describes software techniques for syncing time via Linux serial commands. A Nokia 3310 LCD shield is used to display the output, while internal pull-up resistors simplify the wiring.
Parts used in the DS1307 I²C Clock:
- Arduino Duemilanove
- DS1307 clock kit
- Crystal (32.768kHz)
- Nokia 3310 LCD shield
- 3V button backup battery
I wanted to learn how to interface with I²C devices using my Arduino, so I bought a DS1307 clock and crystal kit from Earthshine Electronics. I’ve no association to them, but I’d recommend having a look at their shop. Their prices are very reasonable, unlike most Arduino component retailers.
 I²C is an addressable serial interface. That means that you can communicate with many I²C devices using the same 4 pins all the time. On the Arduino Duemilanove, the SDA and SCL lines are connected to analog in pin 4 and analog in pin 5 by default, but this can be changed by editing the Wire library. The I²C specification requires the SDA line to be pulled up when not in use, but all of the ATmega328 pins have internal pull up resistors, which saves us having to use an external one. The DS1307 datasheet shows the full pinout of the chip.
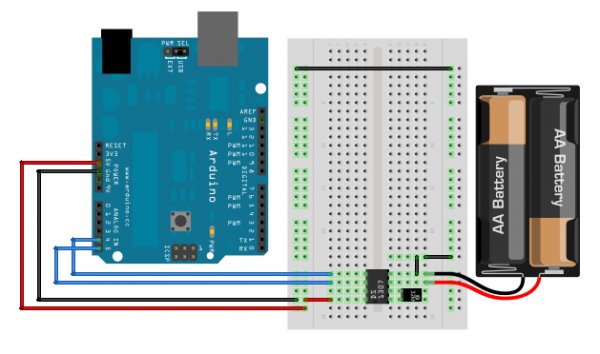
Below is a schematic of the circuit diagram. It looks slightly different to my actual circuit, but that was only because Fritzing didn’t have the components in the library, so I either replaced them with functionally identical components or else made them using a generic component. A Nokia 3310 LCD shield was added to display the time, but again, this doesn’t exist in Fritzing.
The DS1307 uses a 32.768kHz crystal connected between pins 1 and 2 to create the oscillations needed to drive the clock. The downside to this, of course, is that temperature variations will cause the clock to lose or gain seconds. In my experience however, this was negligible. Once set, the DS1307 will keep time provided that it is powered either by the Arduino, or the 3V button backup battery. I wrote the Arduino sketch to accept the date in the standard output format from the *nix date command. That meant that to sync the clock, I simply had to pipe the date command to the serial port.
sudo date > /dev/ttyUSB0
//Fri Sep  3 14:18:22 IST 2010
 I tried to be as efficient as possible with the sketch size, and I use a hash table approach to convert the date output into a numeric byte. This approach won’t always work. But I was lucky in that there are no collisions in the function below for the input [Mon-Sun] and [Jan-Dec].
\[f(x,y,z)=x+y+z \\Where\:x,y,z\:corresponds\:to\:a\:3\:letter\:input.\]
For more detail: DS1307 I²C Clock
- How are SDA and SCL lines connected on the Arduino Duemilanove?
The SDA and SCL lines connect to analog in pin 4 and analog in pin 5 by default. - Does the ATmega328 require external pull-up resistors for I²C?
No, all ATmega328 pins have internal pull-up resistors that satisfy the I²C specification requirement. - What frequency crystal does the DS1307 use?
The DS1307 uses a 32.768kHz crystal connected between pins 1 and 2. - Can the DS1307 keep time without the main Arduino power?
Yes, it keeps time if powered by either the Arduino or a 3V button backup battery. - How can you sync the clock from a Linux system?
You can pipe the date command output to the serial port using sudo date > /dev/ttyUSB0. - What method was used to convert date strings into numeric bytes?
A hash table approach was used to convert the standard *nix date output format. - Does temperature affect the accuracy of this clock?
Temperature variations can cause the clock to lose or gain seconds, though the effect was negligible in this project.