Summary of Arduino – A Basic Theremin
This article explains how to build a basic Arduino Theremin, an electronic instrument that changes pitch based on hand distance from a sensor. Using an SRF05 ultrasonic sensor and a speaker connected to an Arduino Duemilanove, the project calculates distance to control sound frequency. The code ensures no sound is played if the object is further than 30 cm, creating a simple musical interface with minimal components and straightforward wiring.
Parts used in the Arduino Theremin:
- 1x speaker
- SRF05 Ultrasonic range finder
- Arduino Deumilanove w/ ATMEGA328
- Breadboard / Prototyping board
- Jumper/ Connector wires
Theremins are cool. Fact. You may also have heard of them as either aetherphone/ etherophone or termenvox/ thereminvox. Essentially its an electronic music instrument that plays a certain note depending on the position of your hand and its distance from an antenna.
Building a very basic one with Arduino is easy – easier than my basic Arduino drum machine. Very easy. Basically we can replicate one by building a circuit of a speaker and a distance sensor, such as my favourite the SRF05 ultrasound thingy. We calculate the distance and the nearer you get the difference in note/frequency emitted from the speaker.
You’re going to need only a few parts and not much code. You can read more about my applications of the SRF05 along with sample code here: Arduino SRF05 Projects. If you can’t be arsed with reading any of that then no worries all is revealed below…
Arduino Theremin Parts List
1x speaker
SRF05 Ultrasonic range finder
Arduino Deumilanove w/ ATMEGA328
Breadboard / Prototyping board
Jumper/ Connector wires
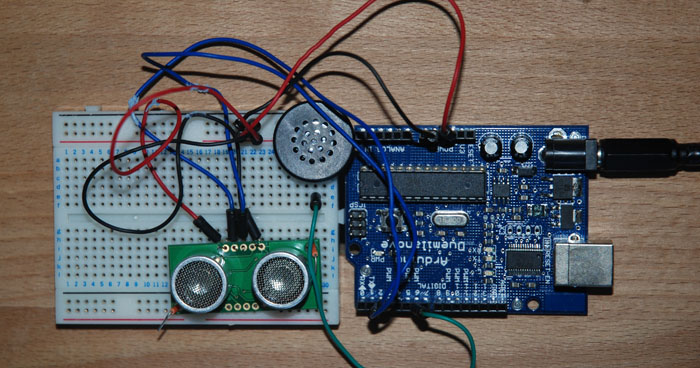
Arduino Theremin Circuit
Very simple,we have a speaker with the negative running to Arduino’s GND, and it’s positive going to digital pin 6 on the Arduino board. The code will tell the speaker to turn on and off rapidly based on the objects distance from the ultrasound sensor. This rapid turning on and off of the speaker is what will generate different sounds (like my drum machine). The only other part of the circuit is the SRF05 distance/ proximity sensor. It has a positive and negative connected to the Arduino and then 2 pins for trigger and echoing an ultrasound wave both going to digital pins 2 and 3 respectively on the Arduino board.
Theremin Arduino Sketch
To save the annoyance of those around you I’ve added in a small statement that basically says if your hand is not within 30 cm of the sensor then don’t play a sound. But otherwise basically we measure distance constantly and when an object is detected we convert the distance in to a value for which to use in the oscillation of the speaker to generate different pitchs and frequencies.
// written at: luckylarry.co.uk
// very easy Theremin

// setup pins and variables for SRF05 sonar device
int echoPin = 2;                                // SRF05 echo pin (digital 2)
int initPin = 3;                                // SRF05 trigger pin (digital 3)
int speakerPin = 6;                             // Speaker pin
unsigned long pulseTime = 0;                    // stores the pulse in Micro Seconds
unsigned long distance = 0;                     // variable for storing the distance (cm) we'll use distance as a switch for the speaker
unsigned long soundDelay = 0;                   // variable for storing the deay needed for the pitch

//setup
void setup() {

  pinMode(speakerPin, OUTPUT);                  // sets pin 6 as output
  pinMode(initPin, OUTPUT);                     // set init pin 3 as output
  pinMode(echoPin, INPUT);                      // set echo pin 2 as input

 }
For more detail: Arduino – A Basic Theremin
- What is a Theremin?
An electronic music instrument that plays a note depending on the position of your hand and its distance from an antenna. - How does the Arduino Theremin generate sound?
The code tells the speaker to turn on and off rapidly based on the objects distance from the ultrasound sensor. - Can I build this without reading external code samples?
No worries all is revealed below including the necessary sketch and circuit details. - Which digital pins are used for the SRF05 sensor?
The trigger pin connects to digital pin 3 and the echo pin connects to digital pin 2. - Where should the speaker be connected?
The negative runs to Arduino GND and the positive goes to digital pin 6. - Does the device play sound at any distance?
It only plays sound if your hand is within 30 cm of the sensor. - What variable stores the calculated distance?
The variable named distance stores the value in centimeters. - Is this project harder than an Arduino drum machine?
Building this basic one is easier than a basic Arduino drum machine.