Summary of 5″ capacitive touch panel with GSL1680 up’n running with arduino
The author successfully integrated a 5-inch capacitive touch panel using the GSL1680 controller with an Arduino Mega. While the NHD-5.0 display is reliable, its high cost prompted a search for cheaper alternatives. The BuyDisplay RA8875-based solution was chosen despite the complex firmware requirements of the Silead GSL1680 chip. By adapting code from the Teensy forum and utilizing flash memory (PROGMEM) to store the necessary firmware, the project achieved stable operation on the Arduino platform through I2C communication.
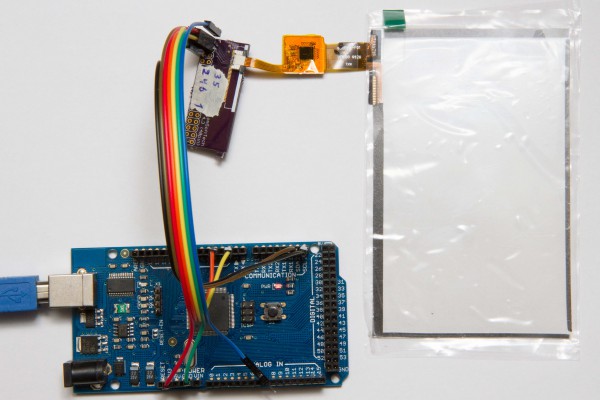
Parts used in the 5 Inch Capacitive Touch Panel Project:
- Arduino Mega (1280)
- 5 inch capacitive touch panel with GSL1680 controller
- BuyDisplay RA8875 based display
- Silead GSL1680 touch controller
- I2C bus
Some months ago I wrote about getting a 7″ capacitive touch LCD up’n running with Arduino. Since that time I’ve investigated 5″ displays with capacitive touch. There are some, such as the NHD-5.0-800480TF-ATXL#-CTP from Newhaven which uses the FT5306 capacitive touch controller. That one is interesting because I already have touch driver for the FT5x06 series. However, it costs $70.
A much cheaper alternative is i.e. the RA8875 based 5″ from BuyDisplay. It costs $35. Half the price. You can also buy separate touch panel to put on your own display for $8.50. The problem is that they use a Silead GSL1680 touch controller which is a bit tricky when it comes to writing drivers for it. Among other things it requires special firmware to work. I just gave up on it. That was until Tomek started the Has-anyone-tried-running-the-GSL16880-capacitive-touchscreen-controller-with-Teensy3 thread over at PJRC(Teensy) forum. January 14th, wolfmanjm got the buydisplay GSL1680 based board up’n running with a STM32L100 discovery board. He posted a video on youtube. After that it was tested on Teensy, and finally CosR1 managed to get it up’n running on an XMEGA AVR.
fter some help from wolfmanjm and CosR1, I managed to get a separate Buydisplay based GSL1680 touch panel up’n running on an Arduino Mega (1280) with only minor modifications to wolfmanjms code.
The firmware is an integrated part of the sketch. Instead of using ram, it is put in the flash memory using PROGMEM. Some, to me, special memory magic is used to read the firmware from the sketch flash (Thanks to CosR1). There might be other ways, but I haven’t investigated further. From there it is easy to write the firmware to the GSL1680 though the I2C bus. Initialization of the GSL1680 is also a bit special. It needs some special sequence of operations. I’m not sure if the code is optimal in that regard, but it seems to be stable. Linux-sunxi.org has a wiki with some info. There is even some information on the internal firmware registers here (haven’t verified if this info is correct).
For More Details: 5″ capacitive touch panel with GSL1680 up’n running with arduino
- Why did the author switch from the NHD-5.0 display?
The NHD-5.0 costs $70, while the alternative RA8875 based display costs only $35. - Which microcontroller was used to run the GSL1680 touch panel?
An Arduino Mega (1280) was used with minor modifications to existing code. - How is the firmware stored for the GSL1680 controller?
The firmware is integrated into the sketch and stored in flash memory using PROGMEM instead of RAM. - What interface is used to write the firmware to the GSL1680?
The firmware is written to the GSL1680 through the I2C bus. - Where can users find information about the internal firmware registers?
Information on internal firmware registers is available at linux-sunxi.org wiki. - Who initially got the GSL1680 board running with STM32L100?
wolfmanjm successfully ran the board with a STM32L100 discovery board. - What makes the GSL1680 initialization special?
It requires a specific sequence of operations that differs from standard initialization procedures.