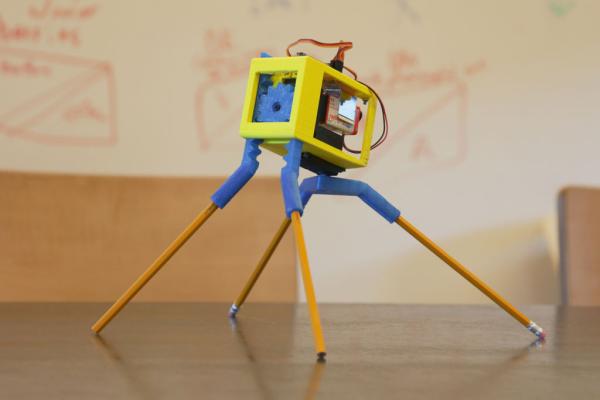
The nice thing about 3D printing is that it makes building robots easy. You can design whatever configuration of parts that you can dream up and have them in your hand virtually right away. This allows for rapid prototyping and experimention. This particular 3D printed robot is an example of that.
This idea to have a walker bot that shifted its front center of balance is one that I have had for a few years. However, implementing it with off the shelf parts always proved rather tricky and prevented me from really trying. Yet, when I realized that this could be done quickly and easily with 3D printing, I was able to finally create this robot in about two days. Basically, 3D printing had enabled me to take an idea and actualize it in less than 48 hours.
If you want to try your hand at making this easy robot, I have included the files and posted instructions for you to make on yourself. This is definately a fun weekend project for someone with a 3D printer who knows a little bit about electronics and soldering to get their feet wet with robotics.
Step 1: Robot Parts
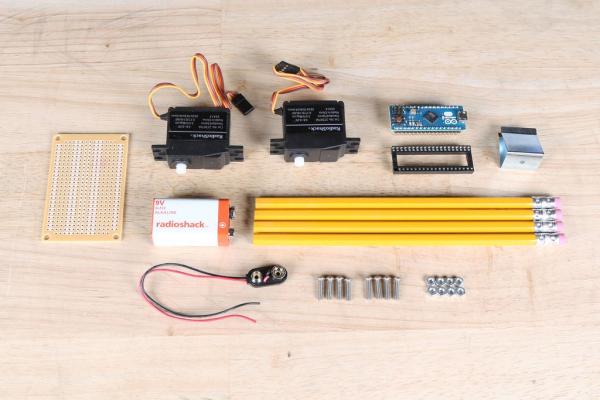
Get the following materials:
(x1) Afinia 3D printer (RadioShack #277-224)
(x2) Standard servos (RadioShack #273-766)
(x1) Arduino micro (RadioShack #276-258)
(x1) 40-pin socket (RadioShack #276-1996)
(x1) PCB (RadioShack #276-150)
(x1) 9V battery snap (RadioShack #270-324)
(x1) 9V battery holder (RadioShack #270-326)
(x1) 9V battery (RadioShack #23-2209)
(x2) 3-pin headers (RadioShack #276-266)
(x13) M3 nuts and bolts
(x4) pencils
Step 2: 3D Print Parts
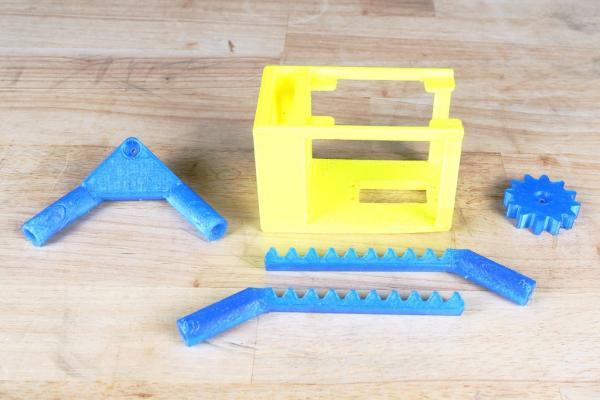
3D print the attached files using your particular 3D printer. You may need to setup the files to work with support for your particular setup.
Step 3: Front Assesmbly
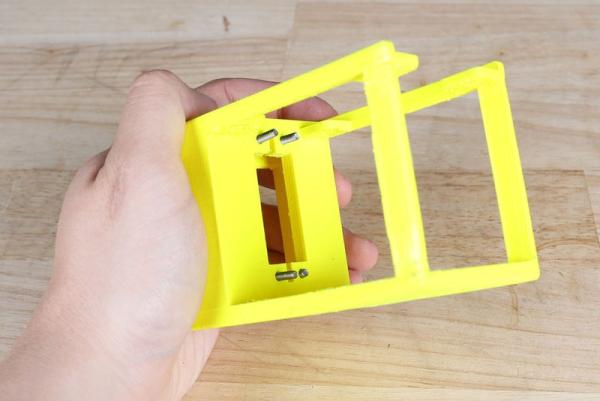
Insert four bolts into the front of the robot.
Slide the two front leg gears into the compartment in the front of the robot body such that the leg sockets are pointed outwards.
Place the gear inbetween the two rack gears of the legs.
Press the servo’s drive shat into the socket on the center gear and use a screw to fasten this into place.
Finally, bolt the servo in place using the bolts installed earlier to complete the front assesmbly.
Read more: 3D Printed Robot