Description
Hey everyone What’s up!
Let me show you something COOL!
A completely 3D Printed Mini Air Cooler that is powered by a Jet Turbine.
So the goal here was to make a small but powerful Air Cooler that utilizes water to cool down air that is fed by a Jet Turbine.
In this post, I’m going to show you guys how I prepared this Air-Water Cooler in few easy steps.
So Let’s get started!
Supplies
Stuff I used for this built
Electronics-
- Arduino Nano
- BLDC Motor
- 12V Li-ion Battery Pack
- Potentiometer
- Breadboard
3D Printed Parts
- LID
- Mainbody
- Turbine Connector
Prologue, Basics, and Stuff
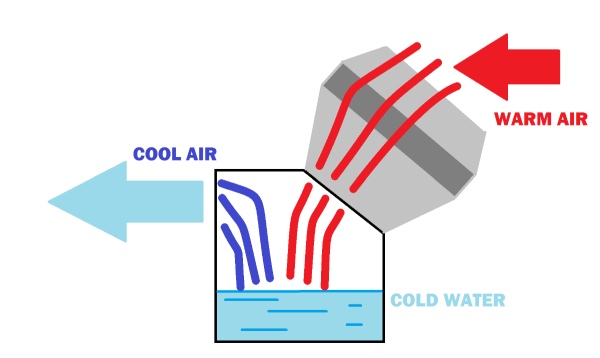
Fun Fact, you could use water to cool down just about anything, in this case, Air.
So I wanted to create a portable Mini Cooler that utilizes water to cool down the air which is fed by a DC Fan.
This project utilizes the concept of evaporative cooling wherein evaporation of water is used to cool the air.
The water extracts the heat from the warm air and starts to evaporate leaving behind cool, fresh, and moistened air which is thrown via a fan into the room.
For this project, I could use a normal Computer Fan but those are slow and not ideal for blowing air at a fast pace so instead, I had an idea of using my 3D Printed jet Turbine in this project which I made a few months ago.
Benefits Of Using Air Coolers
- It’s Efficient
- Portable and easy to install
- It’s Cheap and pretty much DIY.
CONSTRUCTION
- I first designed a base body in fusion360 that is modeled in a square shape, I place the turbine on one side of the body at an angle so air will blow inside it directly.
- On the front side, I made grills for air to pass through.
- The base body will hold the water and the turbine will blow warm air on it from the outside.
- Water will cool down the warm air and air will go out from the front grills.
3D Printing
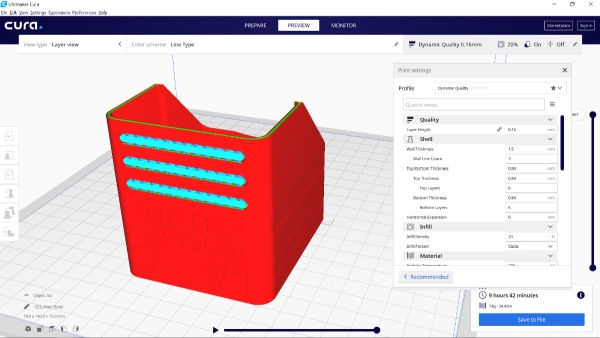
After Preparing the 3D Model of the whole setup, I then 3D Printed them on my ender 3 with a 0.5mm Nozzle.
I used PLA at 15% infill but you could use any material as we are not dealing with heat or something that could warp or deform the plastic.
also, This project required a waterproof and water sealed base to hold water so layer height is an important factor here. To make this Model water sealed, I just decreased layer height from 0.2mm to 0.16mm just to make things TIGHT!
After 3D Printing the Base, I tested its water-holding capability by pouring water into it and it didn’t leak.
Also, here’s a quick trick on waterproofing 3D Prints, just spray them with metal or plastic paints!
3D Printed Jet Turbine Construction
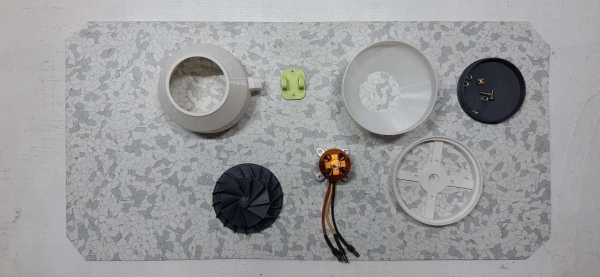
Following are parts of the Jet Turbine that you need to 3D Print.
- Nozzle
- Compressor
- Motor Holder
- Turbine
This Jet Turbine is powered by a Generic BLDC Motor (the orange one), I first Modeled a Fan Blade in fusion360, then I prepared a body around it. Please see the video for the construction part.
(construction part of this turbine is not very complex, we just attach everything together like a custom lego set)
Overall Design and Pre Assembly
As for the design part of this project, I modeled everything in Fusion360.
I have already modeled the Jet Turbine before so I just imported it into my setup and designed the main body according to the angle of the turbine. (turbine is shifted at an angle so air will blow inside at an angle of 60 Degree)
Air will get blown inside the Main Body through turbine and water inside will cool it down.
Assembly Process
The Assembly Process of this project was pretty straightforward,
- I first removed the Support material from the base body’s Grill.
- After that, I attached the Turbine cover with the base body in its assigned location/position with help of four 2.2mm Screws.
- Then I added LID to the Turbine cover by using two 2.2mm x 10mm Screws to hold the LID in its place.
- At Last, I added the 3D Printed Turbine which I prepared earlier to this setup.
- The Turbine will go directly on the Turbine cover part. for adding strength to the whole Turbine joint, I added hot glue between Turbine and its holding part.
- And that is pretty much the Assembly process.
Now we add Microcontroller and ESC to this setup to run it.
Wiring of Arduino and ESC With BLDC Motor
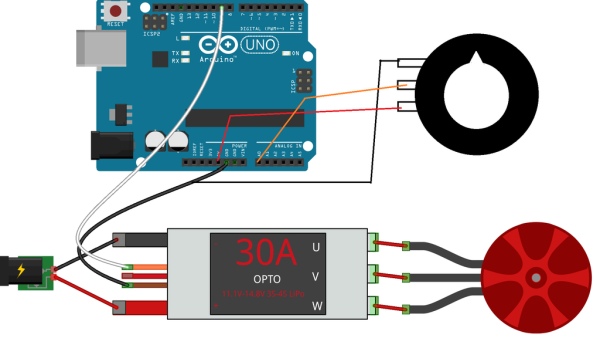
For the Electronic Setup, I used an Arduino Nano connected with a generic ESC to control the BLDC motor.
I used a 12V Lithium-ion Battery Pack to power this setup. (Drone Battery Pack will work as well or Lead-acid battery 12V or just any SMPS)
Wire everything according to the following pinout
- VCC of ESC to Battery +ve
- GND of ESC to Battery -ve
- Signal wire of ESC to D6 (use any GPIO with PWM out for this Pin)
- 5V of ESC to 5V of Arduino or VCC
- GND of ESC to GND of NANO
- POT VCC to 5V of Arduino
- POT Signal to A0
- POT GND to GND of Arduino
After Wiring, Upload the attached code to the Arduino.
Then attach the battery to the setup and slowly turn the potentiometer from one side to another, the rotation of POT will control the speed of your BLDC Motor.
Now let’s operate this thing!
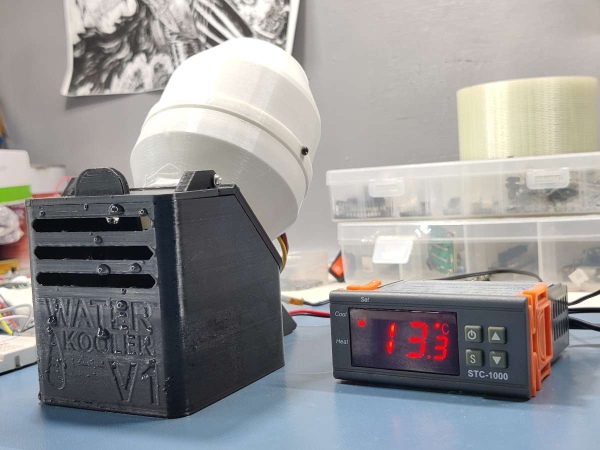
Testing the Cooler
As For Testing the Cooler, I poured some cold water along with few ice cubes in the base body to almost filling it up below the grill.
I set up a thermostat to measure the temperature in front of the grill and on the backside of the cooler.
First I power the motor at the lowest speed and then slowly increase the speed of the turbine.
The turbine speeds up and that increases the airflow quite a bit. this causes water to spray outside the Base body from the grill.
To reduce this, we can decrease the volume of water inside the base body
But anyway, after letting the cooler run for 2-3 mins, I took the temperature readings.
Backside Temp Reading- 19-20°C
Frontside Temp Reading-17-18°C
Temperature Reading at the front will be much less if we continuously run the cooler for more than 5 Mins but the end result was alright I guess.
Result, Conclusion, and Improvements
I’m happy with the results so far.
Ice and water cool down air from 24°C to 17-18°C, But I want to decrease the Temperature a little more and add a silent motor so this setup can become more practical.
I’m planning to add a Peltier module with a powerful silent fan instead of the Overengineered JET TURBINE!
An Attiny85 will be used to power this whole setup to keep things nice and small because we are utilizing only two Digital Pins in this and using an Arduino board for this project will be such a waste.
Source: 3D Printed Mini Air Kooler (the OverEngineered Edition)