Summary of 3D Printed EMG Prosthetic Hand
This article details a cost-effective 3D-printed prosthetic hand project combining an InMoov robotic arm with an Arduino-compatible MyoWare muscle sensor. Designed for amputees in developing countries, the prototype demonstrates how 3D printing enables rapid prototyping, customization, and affordable replacement of parts. The system uses electromyography (EMG) signals to control servos, offering comparable functionality to expensive limbs at a fraction of the cost while encouraging interest in prosthetic engineering.
Parts used in the 3D Printed EMG Prosthetic Hand:
- 3D Printed Hand from InMoov
- Arduino Nano
- MyoWare Muscle Sensor
- Electrodes
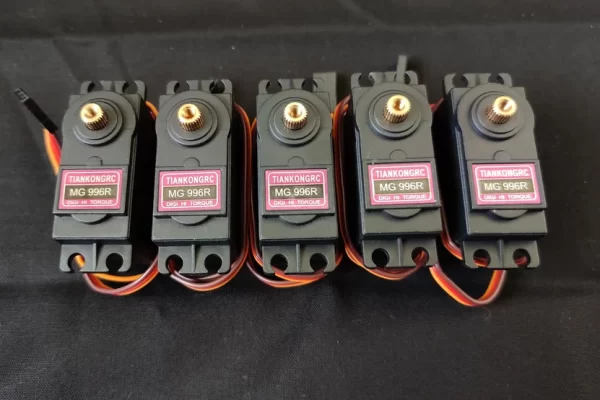
- Servo Motors (MG996R)
- Wires
- 7.2 Volt Battery
- Fishing line
- Screws
- Drill and sandpaper
- Two-part plastic adhesive
- Wire stripper
- Screwdriver
- Electrical tape
If you’ve ever looked at prices for prosthetic hand, you may have noticed that they can cost upwards of $5000, with more advanced myoelectric controlled arms priced at over $20,000. Such prices are not ideal considering that over 80 percent of amputees are from developing countries where access to prosthetic limbs is limited by lack of health care and financial resources.
With 3D printing, however, we can create more cost-effective prosthetics that can better address the need of amputees. Some of the major advantages of 3D printing are rapid prototyping, customization of size, and the flexibility to replace parts by printing new ones. This project combines a 3D printed robotic arm from an open source project called InMoov with an Arduino compatible muscle sensor from Advancer Technologies. While this arm may not be as advanced as a $20,000 prosthetic limb, it is still a proof of concept that demonstrates the possibility of creating cost effective limbs that can provide comparable functionality at a fraction of the price. I also think it’s a cool project in general and one that can spur great interest for those who wish to work with prosthetics.
Supplies
Major Parts:
- 3D Printed Hand from InMoov
- Arduino Nano
- MyoWare Muscle Sensor
- Electrodes
- Servo Motors (I used MG996R servos)
- Wires
- 7.2 Volt Battery
- Fishing line
- Screws
Other:
- Drill and sandpaper to enlarge openings and create a smooth finish
- Two-part plastic adhesive to glue 3D printed parts
- Wire stripper
- Screwdriver
- Electrical tape
Step 1: 3D Printing & Assembly
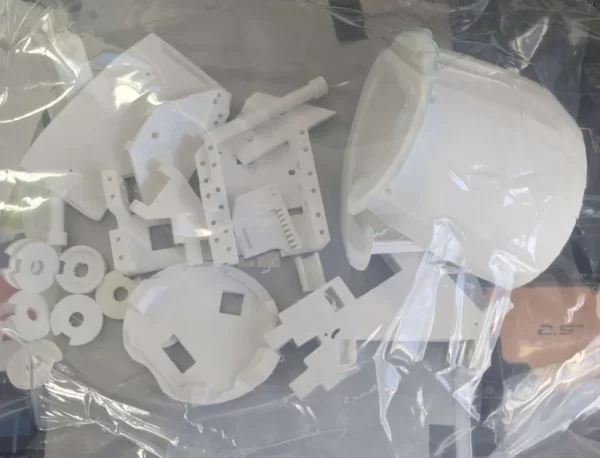
As mentioned in the intro, the 3D printed hand used in this project comes from an open-source project called InMoov. For this project we will only be using the hand and forearm. The link to the STL files can be found here and the link for the assembly instructions can be found here.
Since there are a plethora of guides and resources on how to build this arm. I won’t be covering the build process in this guide. I have included pictures of some of the steps in case you want to reference them. It is important to be patient with the build process since it may take some trail and error to get all the pieces to fit and move smoothly. Take your time with each step and enjoy the build process. I promise it will be very satisfying once you finish.
Step 2: Wiring Everything Together
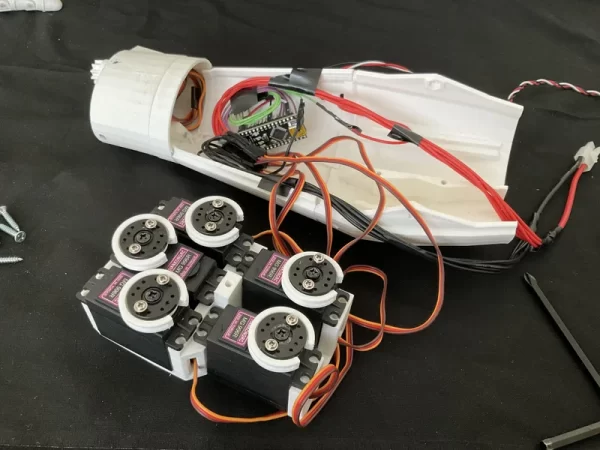
While it may look daunting at first. The wiring for this circuit is actually pretty simple. In essence we want to connect each of the 5 servos to a power, ground, and signal wire. In total, you should have 6 power wires and 6 ground wires coming from your battery. I have included an image that illustrates this better.
You may be asking why we need 6 wires when we only have 5 servos. This is because we need to attach one of the power wires to the Arduino board in order to power it and one of the ground wires to the ground pin on the Arduino. The signal wires should be directly attached to any of the digital pins on the Arduino. For my circuit, I attached the servos to digital pins D3, D5, D6, D9 and D10 on the Arduino Nano board.
Next, we want to attach our Myoware muscle sensor to the Arduino. To do this we want to attach the positive lead of the Myoware sensor to the 3.3 Volt output on the Arduino board. We then want to take the negative lead of the Myoware sensor and attach it to the ground pin on the Arduino board. Lastly, we want to attach our signal lead of the Myoware sensor and attach it to one of the analog pins on the Arduino (I attached it to A3). This will allow the Arduino to read signals from the muscle sensor that will be used to control the servos.
If you’re new to circuits this may seem overwhelming and that’s okay. This is all part of the learning process. It may take some time to understand all the details. But with patience and curiosity you will come out of this experience knowing so much more than when you started.
Source: 3D Printed EMG Prosthetic Hand
- Why is this project important for amputees?
It addresses the high cost of traditional prosthetics by creating a cost-effective solution for over 80 percent of amputees in developing countries. - What are the major advantages of using 3D printing for prosthetics?
The advantages include rapid prototyping, customization of size, and the flexibility to replace parts by printing new ones. - Which open-source project provides the 3D printed hand for this build?
The hand and forearm components come from the open-source project called InMoov. - How many power and ground wires are required for the circuit?
You need six power wires and six ground wires coming from the battery to power the servos and the Arduino board. - How is the MyoWare muscle sensor connected to the Arduino?
The positive lead connects to the 3.3 Volt output, the negative lead to the ground pin, and the signal lead to an analog pin like A3. - Can I use different servo motors for this project?
The author used MG996R servos, but the guide implies other compatible servos can be used if they fit the design requirements. - What materials are needed to finish the 3D printed parts?
You will need two-part plastic adhesive to glue parts, along with a drill and sandpaper to enlarge openings and create a smooth finish. - Does this prosthetic match the functionality of a $20,000 limb?
No, it is not as advanced as a $20,000 prosthetic, but it serves as a proof of concept with comparable functionality at a lower price.