Summary of 3 Amazing BRAIN / MIND Control Projects Lights LedStrip LED With Arduino and Neurosky
This article details three brain-controlled Arduino projects using a Neurosky Mindwave headset: MoodLight, Relay Control, and LED Strip. The guide covers hardware setup, driver installation for the ThinkGearConnector, COM port identification, and configuring Visual Studio C# code to interpret mental states like stress or relaxation to control electronics.
Parts used in Brain Control Projects:
- Arduino Uno or Nano
- Neurosky Mindwave headset (RF version)
- RGB common anode Led
- N channel Mosfet (3x)
- Visual Studio 2017
- 5v Relay
- BC 547 Transistor
- 5V LED
- WS2812 RGB Led Strip
- ThinkGearConnector software
- Drivers from ArduMind Github repository
Have you ever wanted to turn the lights ON or OFF just by thinking about it? Or do you want to know how stressed you are by looking at the color of a RGB led? While now you can by following this Instructables!
To get a feeling for what we are going to make today I recommend you first watch the youtube video above for a short Demonstration!
This Instructables actually exists of three projects that all use brain control. Yes that are three for the price of one!
The first project is the MoodLight. This project uses a RGB led to show your mental status. When you are very relaxed it is green, but when you become stressed it will turn red. This project needs the following:
1x Arduino Uno or Nano
1x Neurosky Mindwave headset
1x RGB common annode Led
3x N channel Mosfet
1x Visual Studio 2017
The second project is the Relay project. This project uses a Relay to turn a led ON or OFF just by thinking about it! Because it uses a Relay you can hook everything up to it. Your Lights, Your TV or even your coffee machine! For this project we need:
1x Arduino Uno or Nano
1x Neurosky Mindwave headset
1x 5v Relay
1x BC 547 Transistor
1x 5V LED
1x Visual Studio 2017
The third project is the Led Strip project. This project uses a WS2812 individueel addressable RGB Led Strip which will turn on more Led’s and turn more Red how more stressed you become. For this project we need the following
1x Arduino Uno or Nano
1x Neurosky Mindwave headset
1x WSD2812 RGB Led Strip
1x Visual Studio 2017
This project uses the Mindwave RF version. You can buy it for example here:
So lets get Started!
Step 1: Setting Up the Connections
For all three projects we first need to setup the connection. We will do this with a little program called ThinkGearConnector.
To get started download all the code and drivers from the Github repository below:
https://github.com/sieuwe1/ArduMind
Also download the Mindwave pairing installer from here:
http://download.neurosky.com/updates/mindwave/education/1.1.28.0/MindWave.zip
Drivers
After downloading the Github repository unzip the ArduMind.zip file.
After that open the ArduMind folder and go to the Drivers folder.
Now plug in the Mind Wave reciever into your computer.
After that double click on the SETUP.EXE and install it.
Connection
After having installed the Drivers unzip the MindWave.zip file and run the installer still with the headset plugged in.
ThinkGearConnector
After having established the connection we can install the ThinkGearConnector.
From the ArduMind folder go to ThinkGear Connector > win32 and double click the ThinkGear Connector.exe with the headset still plugged in.
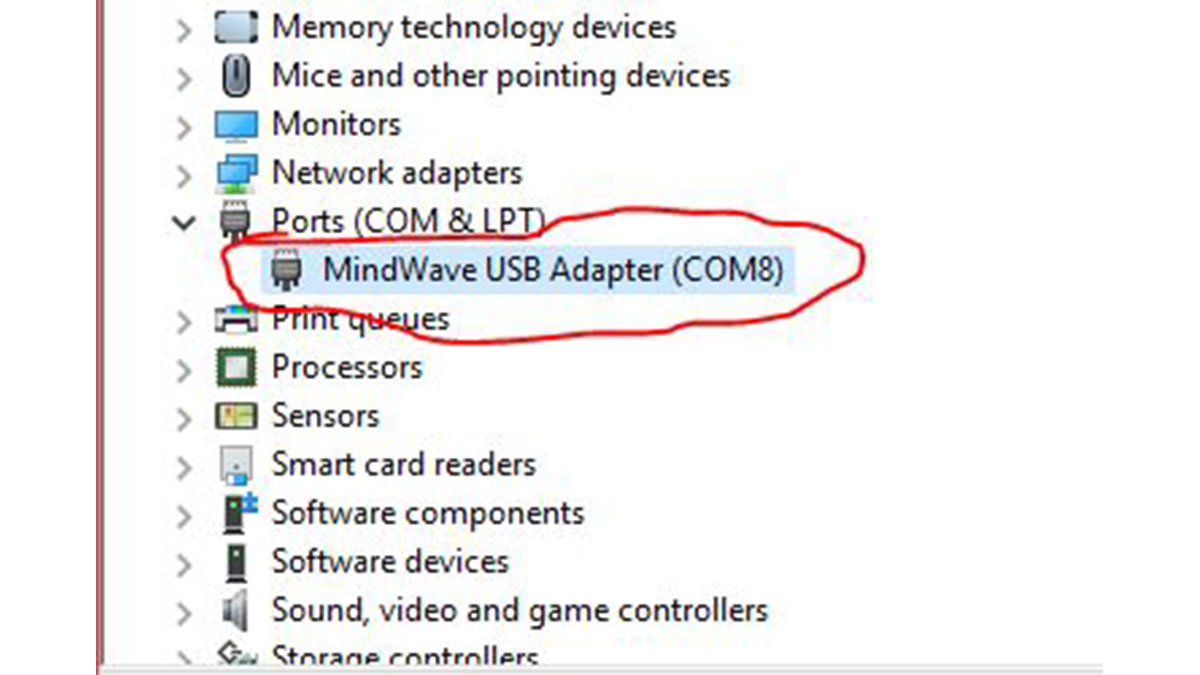
Getting the COM port
While the headset is still plugged in we need to get the comport of the MindWave headset. This is needed for step 2.
To get the COM port:
1 press windows key + x and select device manager
2 go to ports(COM&LPT)
3 then look for MindWave USB Adapter
By this name you can find the COM port. If you look at the image above you can see my COM port is COM8
Step 2: Setting Up Visual Studio
Now we can start with the Fun part!
First of all select which of the three projects you want: Moodlight, Led Strip or Relay.
I am going to choose the Relay project.
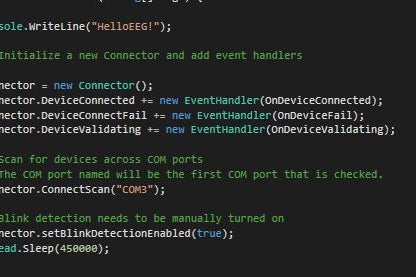
After having selected the project go to the ArduMind folder and then to: 3 Mind Control Projects > Relay Control > RelayControl C#.
Now double click on the HelloEEG.sln to open it in Visual Studio.
In the solution explorer on the right click on the HelloEEG.cs file.
In here search for line 30 and change:
connector.ConnectScan(“COM3”); to the comport we found in step 1.
So for me:
connector.ConnectScan(“COM8”);
After this we can start with the hardware. But keep Visual Studio open because we will need it again!
Also unplug the Mindwave headset
Source: 3 Amazing BRAIN / MIND Control Projects Lights LedStrip LED With Arduino and Neurosky
- How do I install the drivers for the Mindwave receiver?
Unzip the ArduMind.zip file, navigate to the Drivers folder, plug in the receiver, and double click SETUP.EXE. - Can I use this system to turn on lights by thinking?
Yes, the Relay project uses a relay to turn LEDs, TVs, or coffee machines on or off based on thought. - What does the MoodLight project indicate with colors?
The RGB LED turns green when you are relaxed and red when you become stressed. - Which software is required to run the projects?
You need Visual Studio 2017 to open and edit the provided C# solution files. - How do I find the correct COM port for my headset?
Press windows key + x, select device manager, go to ports(COM&LPT), and look for MindWave USB Adapter. - Where can I download the necessary code and drivers?
Download the code and drivers from the Github repository at https://github.com/sieuwe1/ArduMind. - Does the LED strip project react to stress levels?
Yes, the WS2812 strip turns on more LEDs and becomes redder as your stress increases. - What specific version of the headset is recommended?
The guide recommends using the Mindwave RF version for these projects.