Architecture
RaspiDuinoRover is made of three main parts:
- A Raspberry Pi which receives commands from a remote device through a TCP connection, and sends these commands to an Arduino Uno through an I2C connection. The same TCP channel is used to send back the remote data grabbed from the Arduino Uno about pan and tilt servo positions, camera lighting status and motors current usage. The Raspberry Pi also provides an MJPEG video stream from its camera module.
- An Arduino Uno which receives commands from the Raspberry Pi though an I2C connection, and accordingly drives rover motors (with the help of an Arduino Motor Shield) and positions pan and tilt servos. It regularly gets infos about pan and tilt servo positions, camera lighting status and motors current usage, and sends it back to the Raspberry Pi when asked for.
- An iOS device which serves as a remote control for the rover. It connects to the Raspberry Pi through a TCP connection, and displays its MJPEG video stream.

The base of the rover is made of a Dagu Rover 5 Tracked Chassis. The Raspberry Pi camera module is mounted on a pan/tilt support with servos, and a lighting feature based on three white LED is added to allow the use of the camera in the dark. It should be possible to replace camera module by a NoIR camera module and white LED with IR LED if you want / need a discreet illumination.
Servo motors, Raspberry Pi, Arduino Uno and camera lighting are powered by a common 5V power line. This 5V power may come from a wall power supply (at least 2A), while the chassis motors have their own power source. It may be possible to make a common power supply for all items, including chassis motors, but this page won’t cover this topic.
Requirements
RaspiDuinoRover needs the following items to be built:
- A Raspberry Pi.
- A Raspberry Pi camera module.
- An Arduno Uno R3.
- An Arduino Motor Shield R3.
- Some items listed into “bill_of_materials.ods” file.
- For server part :
- Python (with Debian / Raspbian : packages “python”, “python-dev”).
- SMBus library . On Raspbian, install package “python-smbus”.
- Twisted library. On Raspbian, install package “python-twisted”.
- MJPEG Streamer (but not the version from raspbian packages, see below)
- (optionnal) a fresher version of raspimjpeg, see below
- For iPhone part :
- An iPhone (or iPad, or iPod Touch) with iOS 7
- XCode 5.0.x
To help you with the assembly, you may refer to the following files:
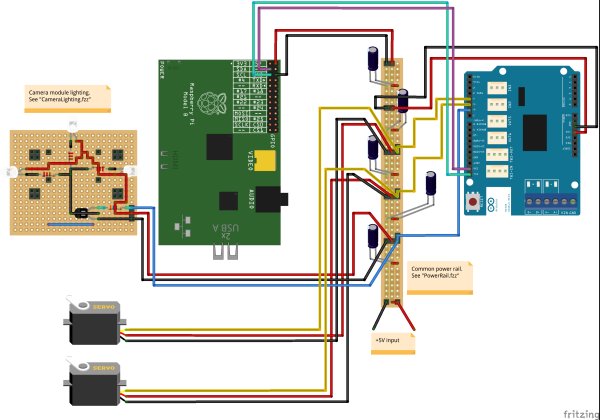
- RaspiDuinoRover.fzz: the global assembly, to open with Fritzing (http://fritzing.org/).
- CameraLighting.fzz: details for the camera support and lighting assembly, to open with Fritzing.
- PowerRail.fzz: details for the commond power rails.
Breadboard assembly and schematics
How to use RaspiDuinoRover (server)
You’ll first have to upload “Arduino/Arduino.uno” sketch to your Ardunio Uno and build the assembly.
Important: Don’t forget to cut “Vin” jumper on the backside of the shield.
Then you have to install MJPEG Streamer, following these steps (steps 1 to 6).
You may want to install a fresher version of raspimjpeg even if a working binary is provided (into “./RaspberryPi/bin/” folder).
Then update “./RaspberryPi/config.py” file to fit your needs.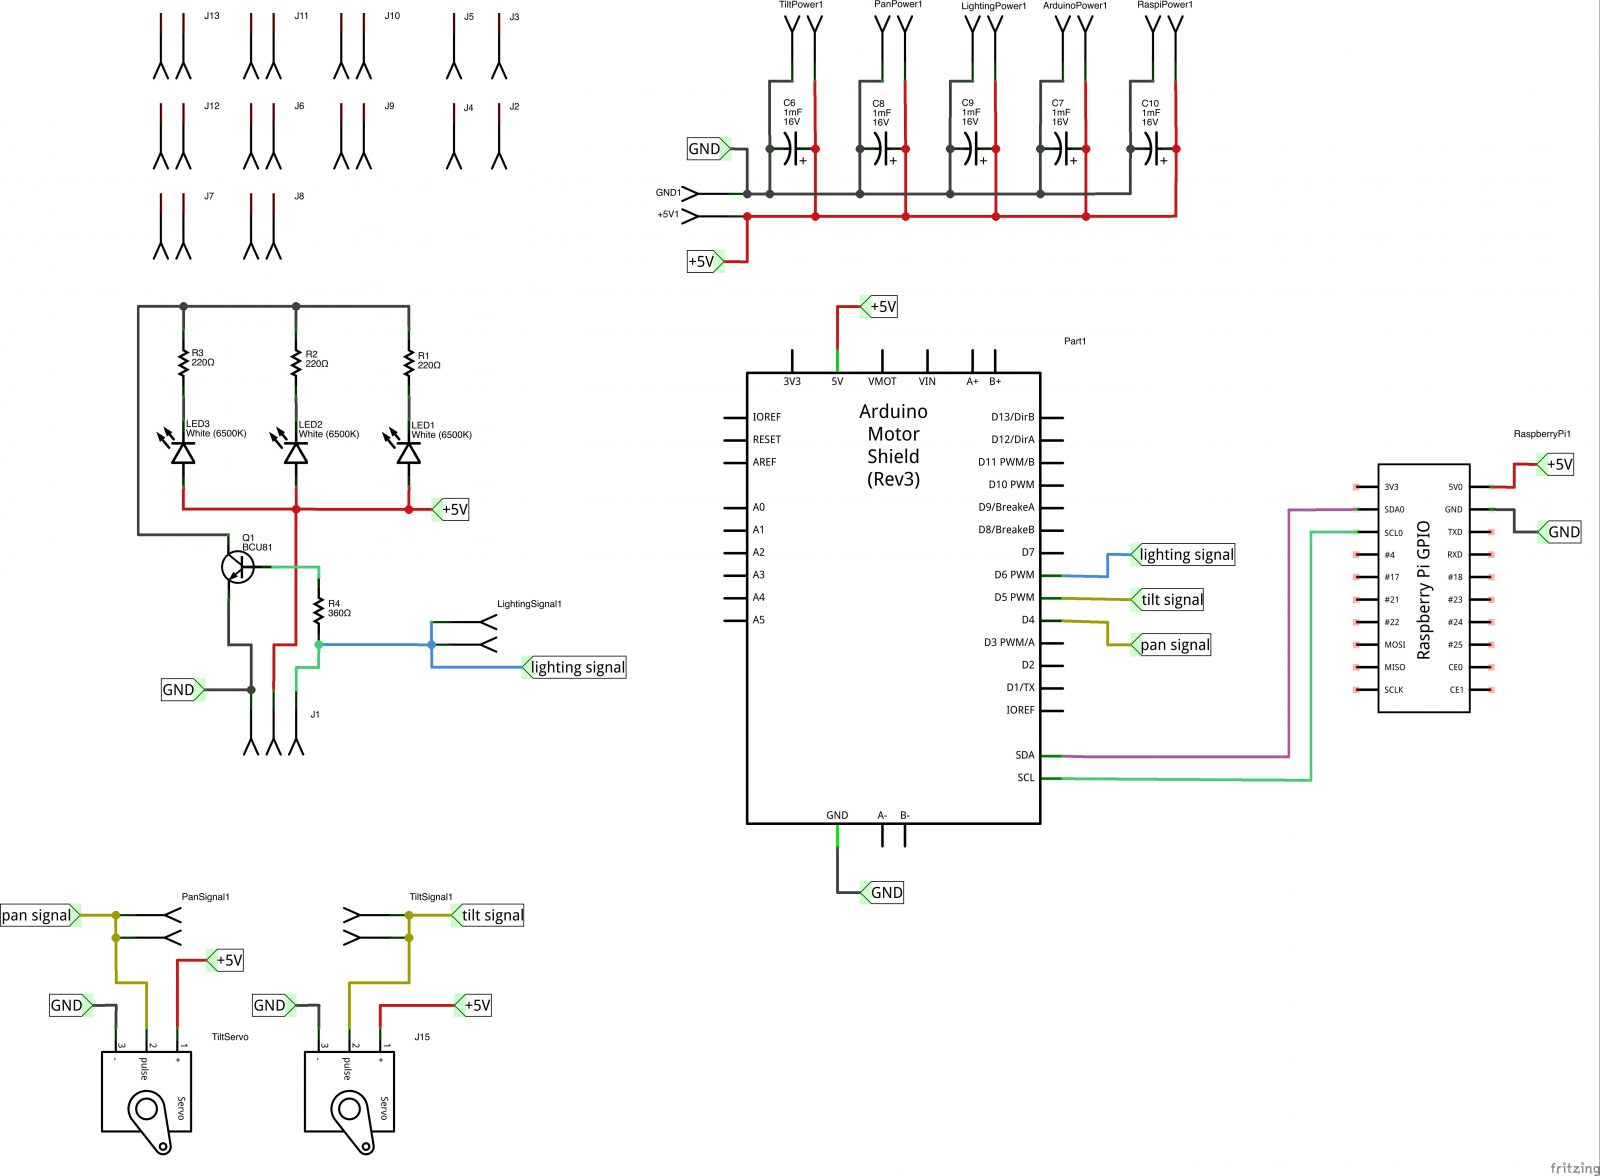
When you’re done, just launch RaspiDuinoRover with “./RaspberryPi/raspiduinorover.sh start” as root user. When you want / need to stop it, just execute “./RaspberryPi/raspiduinorover.sh stop” as root user.
The start script will start RaspiDuinoRover server.
Streaming will be started when a user connects to the server (have a look to “./RaspberryPi/bin/stream.sh” script) and will be stopped when the last user disconnects.
How to use RaspiDuinoRemote (iPhone)
Just open XCode project then build and install RaspiDuinoRemote on your iDevice. If you don’t have an Apple iOS Developper account, you may use RaspiDuinoRemote within iOS Simulator.
When application is started, enter hostname (or IP adress) of your Raspberry Pi, the server port (default value is 8000, unless changed into “config.py” file) and MJPEG stream URL (if you use MJPEG Streamer, it should be “http://<raspberrypi_ip>:8080/?action=stream”. Then tap “Connect” button.
For more detail: RaspiDuinoRover – (Yet another) iPhone driven moving Raspberry Pi and Arduino rover