Summary of Mini weather station with Attiny85
The article describes a mini weather station project using two Attiny85 microcontrollers to measure and display temperature and humidity. The transmitter uses a DHT11 sensor and sends combined temperature and humidity data via a 433 MHz transmitter using Manchester encoding. The receiver uses another Attiny85, a 433 MHz receiver module, and a 2x16 LCD with a 74LS164 shift register for display. This compact design avoids using two Arduinos, making the setup smaller and less power-hungry.
Parts used in the Mini Weather Station with Attiny85:
- Attiny85 (two units: one for transmitter, one for receiver)
- DHT11 humidity and temperature sensor
- 433 MHz transmitter module
- 433 MHz receiver module
- 10 kΩ resistor (two units: one for each Attiny85 reset pull-up)
- 74LS164 shift register
- 1N4148 diode
- 1 kΩ resistor (three units: two regular, one variable)
- 1 kΩ variable resistor (potentiometer)
- 2x16 LCD display
- Wire antenna (17.2 cm)
In a recent instructable Indigod0g described a mini weather station that works pretty well, using two Arduinos. Maybe not everyone wants to sacrifice 2 Arduinos to get humidity and temperature readings and I commented that it should be possible to do a similar function with two Attiny85’s. I guess talk is easy, so I better put my money where my mouth is.
In fact, if I combine two earlier instructables I wrote:
2-Wire LCD interface for Arduino or Attiny
and
Receiving and sending data between Attiny85 (Arduino IDE 1.06)
then most of the work is already done. Only need to adapt the software a bit.
 I chose for a two wire lcd solution with a shift register, rather than an I2C LCD because on the Attiny the shift register is easier to implement than the I2C bus. However… if you for instance want to read a BMP180 or BMP085 pressure sensor, you need I2C for that anyway so you might as well use an I2C LCD then too. TinyWireM is a good library for I2C on an Attiny (but it requires extra space).
BOM
The transmitter:
DHT11
Attiny85
10 k resistor
433MHz transmitter module
The receiver
Attiny85
10k resistor
433 MHz receiver module
The display
74LS164 shift register
1N14148 diode
2x1k resistor
1x1k variable resistor
an LCD display 2×16
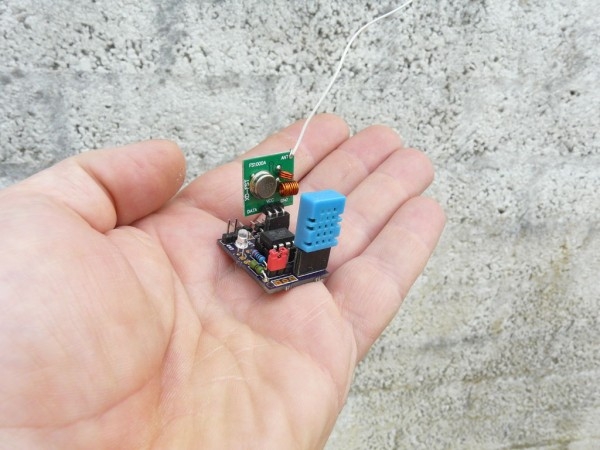
Step 1: Mini weather station with Attiny85: the transmitter
The transmitter is a very basic configuration of the Attiny85 with a pull up resistor on the reset line.
A transmitter module is attached to digital pin ‘0’ and the DHT11 data pin attaches to digital pin 4.
Attach a wire of 17.2 cm as antenna.
The software is as follows:
//will work on Attiny85/45<br>//RF433=D0 pin 5
//DHT11=D4 pin 3

// libraries
#include <dht11.h>
#include <Manchester.h>
dht11 DHT11;
#define DHT11PIN 4
#define TX_PIN 0  //pin where your transmitter is connected
//variables
float h=0;
float t=0;
int transmit_t = 0;
int transmit_h = 0;
int transmit_data = 0;


void setup()
{
  pinMode(1, INPUT);
  man.setupTransmit(TX_PIN, MAN_1200);
}

void loop() {
 int chk = DHT11.read(DHT11PIN);
 h=DHT11.humidity;
 t=DHT11.temperature;
// I know, I am using 3 integer variables here
// where I could be using 1
// but that is just so it is easier to follow
 transmit_h=100* (int) h;
 transmit_t=(int) t;
 transmit_data=transmit_h+transmit_t;
  man.transmit(transmit_data);
  delay(500);
}
The software uses Manchester code to send the data.
It reads the DHT11 and stores the temperature and humidity in 2 separate floats. As the Manchester code doesnt send floats, but an integer, I have several options:
1- split the floats into two integers each and send those
2- send each float as an integer
3- send the two floats as one integer
With option 1 I need to combine the integers into floats again in the receiver and I have to identify which integer is what, making the code long winded
With option 2 I still need to identify which integer is for humidity and which for temperature. I cannot go by sequence alone in case one integer is lost in transmission, so I would need to send an identifier attached to the integer.
With option 3, I can send just one integer. Obviously this makes the readings a bit less accurate – within 1 degree- and one cannot send below zero temperatures, but it is just a simple code and there are ways around that. For now it is just about the principle.
So what I do is I turn the floats into integers and I multiply the humidity with 100. Then I add the temperature to the multiplied humidity.
Given the fact that the humidity will never be 100% the max number I will get is 9900. Given the fact that the temperature will also not be above 100 degrees, the max number will be 99, therefore the highest number i will send is 9999 and that is easy to separate at the receiver side.
Ofcourse my calculation in which i use 3 integers is overkill as it could easily be done with 1 variable. I just wanted to make the code easier to follow.
the code now compiles as:
Binary sketch size: 2,836 bytes (of a 8,192 byte maximum)
so that fits in an Attiny 45 or 85
Step 2: Mini weather station with Attiny85: the receiver
Again the Attiny85 is used in a basic configuration with the Reset pin pulled high with a 10 k resistor. The Receiver module is attached to digital pin 1 (pin 6 on the chip). The LCD is attached to digital pins 0 and two.
Attach a wire of 17.2 cm as antenna.
The code is as follows:
#include <Manchester.h>
#include <LiquidCrystal_SR.h>
LiquidCrystal_SR lcd(0,2,TWO_WIRE);
#define RX_PIN 1 //= physical pin 6

void setup() {
  lcd.begin(16,2);
  lcd.home();
  man.setupReceive(RX_PIN, MAN_1200);
  man.beginReceive();
}

void loop() {
  if (man.receiveComplete()) {
    uint16_t m = man.getMessage();
    man.beginReceive();
    lcd.print("Humid: ");
    lcd.print(m/100);
    lcd.setCursor(0,1);
    lcd.print("Temp ");
    lcd.print(m%100);
   }
}
The code is fairly simple: the transmitted integer is received and stored in variable ‘m’.
It is divided by 100 to give the humidity and the modulo of 100 gives the temperature.
So suppose the integer received was 3325
3325/100=33
3325 % 100=25
This code compiles as 3380 bytes and therefore can only be used with an attiny85, not with a 45
For more detail: Mini weather station with Attiny85