Summary of DIY Arduino or The DIY-Duino
This tutorial guides hobbyists through building a custom "DIY-Duino" Arduino from scratch using a homemade Printed Circuit Board (PCB). It details the Toner-Transfer (Gootee) Method for etching copper boards, sourcing specific electronic components like the ATmega328 chip and voltage regulators, and programming the device via a USB-to-Serial converter. The process emphasizes learning electronics by soldering parts onto a self-made board rather than buying pre-assembled units.
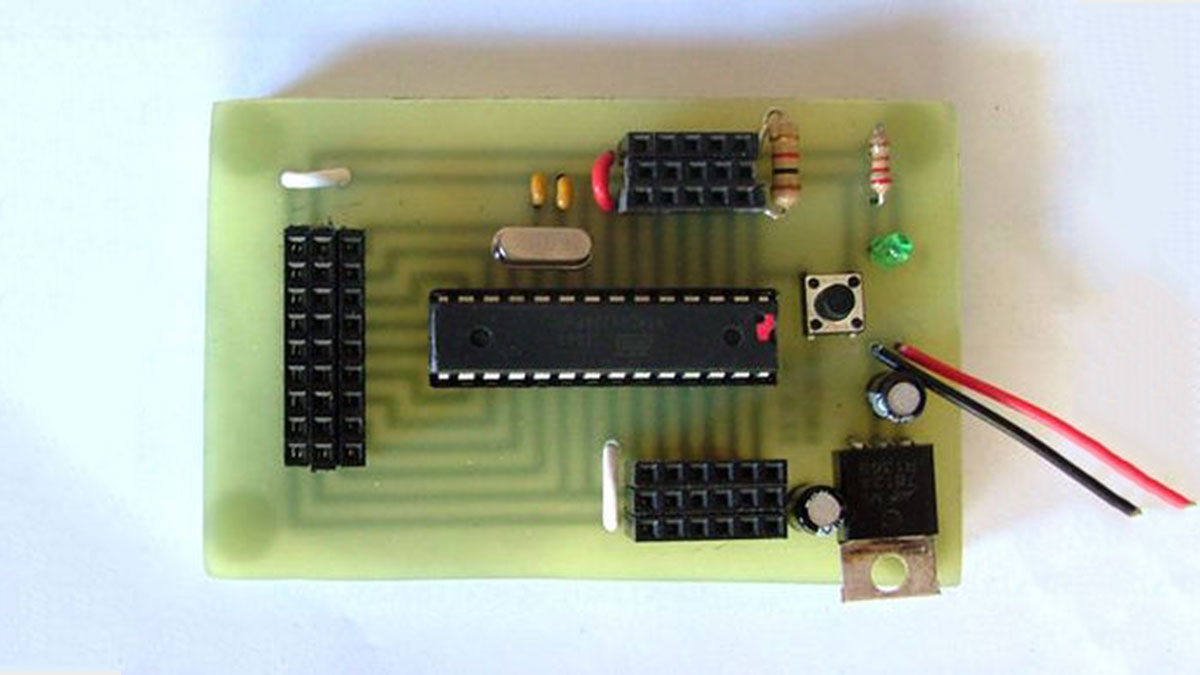
Parts used in the DIY-Duino:
- Copper Board 12x12
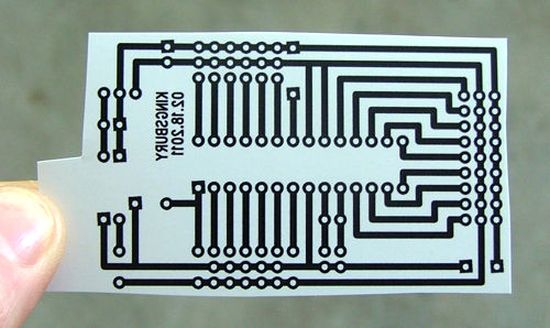
- DIY-Duino Pattern sheet
- Photo Paper glossy finish
- Laser Printer
- Fine grain sandpaper
- Common household tape
- Piece of scrap cardboard
- Paper towels
- Clothes Iron
- Plastic container
- Tweezers
- Muriatic Acid
- Lacquer Remover
- Hydrogen Peroxide
- Acid disposal container
- Plastic dishwashing gloves
- Breathing and eye protection
- Measuring Cup
- Wire bits
- DIP Sockets 28-Pin
- ATmega328 with Arduino Bootloader
- Basic LED Green
- Resistor 330 Ohm
- Resistor 10k Ohm
- Mini Push Button Switch
- Electrolytic Decoupling Capacitors 10uF/25V
- Voltage Regulator 5V
- Capacitor Ceramic 0.1uF Crystal 16MHz
- Capacitor Ceramic 0.1uF
- Female Headers
- Standoffs
- FT232RL USB to Serial
- Breadboard
- Dremel or Hacksaw
- Drill bit 1/32 inch
- Metal-cutting disc for Dremel
- Solder
- Flux
- Desoldering braid
- Soldering Iron
- Soldering Gripper
THIS ENTIRE TUTORIAL IS ALSO AVAILABLE ON MY WEBSITE AT
http://www.theparsley.com/arduino/diy/
To quote the Arduino website:
“Arduino is an open-source electronics prototyping platform based on flexible, easy-to-use hardware and software. It’s intended for artists, designers, hobbyists, and anyone interested in creating interactive objects or environments.”
I got one a while ago and life has never been the same. Here is the official website for Arduino: http://www.arduino.cc/
There are a bunch of tutorials that show you how to build your own Arduino on a breadboard, called Hack-duinos or something similar. While these are handy, I prefer to use more solid electronic devices. So I build them with a home made PCB and solder all the components on there myself.
Some may say, “This task seems time consuming and a tad expensive… Why not just kerplunk the 30-some-odd bucks for an REAL Arduino?” Well, some of us enjoy the craziness of making something completely from scratch — and in doing so, learning more about the device you are using.
This tutorial will take you through all the steps of making your own printed circuit board(PCB), building an Arduino or “DIY-Duino” and loading your own programs/sketches onto the board you have built.
Step 1: Materials List — For All Steps
You will find detail on these materials throughout the specific steps of this instructable.// ——- PCB MATERIALS LIST ——- //
Copper Board: 12″ x 12″
You can buy a smaller board, if you want.
I buy the 12×12 because I use it for a lot of projects.
https://www.parts-express.com/Copper-PC-Board-12-x-12-Single-Sided-055-140
DIY-Duino Pattern sheet
Click here to download the Pattern file
You must use this file to ensure the proper resolution and size of the image.
Photo Paper
High-quality photo paper with a glossy finish is the best to use.
Laser Printer
Or copies from a place like Kinkos or Staples.
Fine grain sandpaper
To rough up the board and make it able to absorb the pattern better.
Common, houshold tape
For securing the pattern to the copper board
Piece of scrap cardboard
This will be your makeshift ironing board.
Paper towels
To put over your board before ironing.
Clothes Iron
Use one you don’t mind being ruined.
Chances are, it will get funky.
Plastic container
To bathe your board in warm water after ironing.
Tweezers
Not necessary, but can be helpfull for peeling off transfer remnants.
//——- ETCHING MATERIALS LIST ——-//
Jug of Muriatic Acid
You can get this at the hardware store.
Container of Laquor Remover
Removes the toner once the pattern is etched.
Also useful if you make mistakes on transfering your pattern.
You can remove the toner and try again.
You can get this at the hardware store
Container of Hydrogen Peroxide
Any Grocery Store
Standard kitchen paper towels
Use for the ironing, agitating the acid solution, and removing the toner with the lacquer remover
(2) Plastic containers
(1 for the acid mixture, one to rinse, one to bathe the PCB in hot water)
Acid disposal container
Size this, depending on how much you’re using.
Pair of plastic dishwashing gloves
You can often find a better, more durable pair of gloves at the hardware store — right near the muriatic acid oddly enough.
Other Protection
Breathing and eye protection.
Package of photo paper
I if you have access to a laser printer or laser copier. Otherwise, skip this.
1/4 Cup Measuring Cup
Use one that you don’t mind being destroyed. Once you use this to measure out the Muriatic Acid, It should only be used for this purpose. NEVER use it to measure food again.
//——- DIY-DUINO COMPONENTS LIST ——-//
(3) Little bits of wire
DIP Sockets Solder Tail – 28-Pin 0.3″
http://www.sparkfun.com/products/7942
$1.50
ATmega328 with Arduino Bootloader
http://www.sparkfun.com/products/9217
$5.50
Basic LED – Green (or whatever color tussles your vessel)
http://www.sparkfun.com/products/9650
$0.35
Resistor 330 Ohm 1/6th Watt PTH
— 220 Ohm will work fine too if you have one
http://www.sparkfun.com/products/8377
$0.25
Resistor 10k Ohm 1/6th Watt PTH
http://www.sparkfun.com/products/8374
$0.25
Mini Push Button Switch
http://www.sparkfun.com/products/97
$0.35
(2) Electrolytic Decoupling Capacitors – 10uF/25V
http://www.sparkfun.com/products/523
$0.45×2=$0.90
Voltage Regulator – 5V
http://www.sparkfun.com/products/107
$1.25
(2) Capacitor Ceramic 0.1uF Crystal 16MHz
http://www.sparkfun.com/products/536
$0.95
(2) Capacitor Ceramic 0.1uF
http://www.sparkfun.com/products/8375
$0.25×2=$0.50
(3) Female Headers
You’ll need to cut them, and it’s a little trickey…
http://www.sparkfun.com/products/115
(4) Standoffs
From Radio Shack or
From Sparkfun
//——- PROGRAMMING MATERIALS LIST ——-//
FT232RL USB to Serial
http://www.sparkfun.com/products/718
$14.95
A breadboard
4 short wires
4 longer wires
An LED– to test if your upload was a success
//——- TOOLS LIST——-//
Dremel or Hacksaw
I suggest buying a Dremel or other rotary tool for this instructable, you will probably need a Dremel to drill the holes.
1/32″ Drill bit
I don’t know of one of these for a normal drill, neither did the lady at Lowes — again… Dremel
Metal-cutting disc for Dremel
To cut out the copperboard
Solder
Flux
Desoldering braid — for errors!
Soldering Iron
Soldering Gripper
Step 2: About making PCBs
A little background first… People who are new to making their own PCBs often call this method “The Toner-Transfer Method”.
When searching for how to make your own PCBs on the Net, this is the phrase that will often come up.
However, those who have been making these for a while will correctly call it the “Gootee Method” — and the PCBs themselves are called “Gootee Boards”. The reason is this — the most in-depth documentation on how to etch your own PCB (at least that I know of) has been compiled and tested by Thomas Gootee.See his website: http://fullnet.com/~tomg/gooteepc.htm
The PCB you will be making in this instructable is founded in Gootee’s teachings, with a few differences/deviations.
Step 3: Transfering the Pattern – Materials
Copper Board: 12″ x 12″
You can buy a smaller board, if you want. I buy the 12×12 because I use it for a lot of projects.
http://www.parts-express.com/pe/showdetl.cfm?Partnumber=055-140
Photo Paper
High-quality photo paper with a glossy finish is the best to use.
Clothes Iron
Use one you don’t mind being ruined.
Chances are, it will get funky.
Piece of scrap cardboard
This will be your makeshift ironing board.
Arduino Pattern sheet
Download the Pattern file here
You must use this file to ensure the proper resolution and size of the image. You don’t want to print and etch your board and have it be the wrong size.
Paper towels
To put over your board before ironing.
Plastic container
To bathe your board in warm water after ironing.
Common, houshold tape
For securing the pattern to the copper board
Tweezers
Not necessary, but can be helpfull for peeling off transfer remnants.
Fine grain sandpaper
To rough up the board and make it able to absorb the pattern better.
Basic LED – Green
Voltage Regulator – 5V
For more detail: DIY Arduino or The DIY-Duino
- What is the recommended method for making the PCB?
The tutorial uses the Toner-Transfer Method, also known as the Gootee Method. - Can I use a smaller copper board than 12x12 inches?
Yes, you can buy a smaller board, though the author prefers 12x12 for multiple projects. - Which type of photo paper works best for the transfer?
High-quality photo paper with a glossy finish is the best choice. - How do I remove the toner after etching?
You use Lacquer Remover to remove the toner once the pattern is etched. - What safety gear is required when handling Muriatic Acid?
You need plastic dishwashing gloves, breathing protection, and eye protection. - Can I substitute the 330 Ohm resistor with another value?
Yes, a 220 Ohm resistor will work fine if you have one available. - What tool is suggested for drilling holes in the copper board?
A Dremel or other rotary tool is suggested because standard drills may not have the right bits. - How should I dispose of the acid mixture?
You must use an acid disposal container sized according to how much acid you are using. - Why does the author recommend making their own PCB instead of buying one?
The author enjoys the craziness of making something from scratch and learning more about the device. - What component is needed to upload programs to the board?
An FT232RL USB to Serial converter is required for programming materials.