Summary of Digital Clock Design Using Arduino
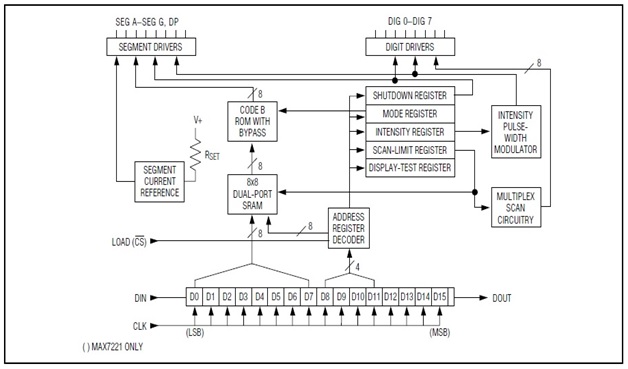
This project details the design of a digital clock utilizing an Arduino MEGA2560 microcontroller and a real-time clock (RTC) IC (DS1307) to maintain accurate time even when powered off. The time is displayed using 7-segment LED displays driven by a MAX7219 driver chip, showing hours, minutes, seconds, and an AM/PM indicator via the decimal point. The clock is powered by a 5V supply and is housed on a custom PCB compatible with Arduino pin headers. Communication protocols used include I2C for the RTC and SPI for the display driver.
Parts used in the Digital Clock Design:
- Arduino MEGA 2560 R3
- MAX7219 Serially Interfaced, 8 digit LED Display Driver
- DS1307 64x8, I2C Real Time Clock
- Two 4 Digit, 7-Segment Displays
- 32.768kHz Crystal (CL = 12.5pF)
- 10µF Tantalum Capacitor
- 0.1µF Ceramic Capacitor
- 9.53kΩ Resistor
- Two 2.5kΩ Resistors
- CR1220 Battery Retainer
- CR1220 Battery
Introduction
This design project utilizes an Arduino MEGA2560 with an ATMEGA1280-16AU microcontroller to create a digital clock. The clock will be able to save time when disconnected from power, and it can be powered from a USB connection or from the wall outlet. The clock displays the hours, minutes, and seconds with an AM/PM indicator. The digital clock design should meet all of the required design specifications for this design project.
Digital Clock Design
The following sections list the details of the project including: required specifications, basic operation, build of materials, and the source code that controls the digital clock.
Specifications
- The design should use 7-segment LED displays to display AM/PM, hours, minutes, and seconds.
- The board and the Arduino should be powered from a 5V wall mounted power supply.
- All components used in the design need to be mounted to a separate printed circuit board designed using CAD software.
- The PCB design should be compatible with the Arduino pin headers, so that the PCB can plug directly into the Arduino.
Basic Operation
The digital clock uses a real-time clock (RTC) IC to accurately keep track of time. A real-time clock is a computer clock (most often in the form of an integrated circuit) that keeps track of the current time. Although this project could have been done without using an RTC, it has the benefits of using minimal power when powered off, keeping track of time when the power is disconnected, and it is more accurate for keeping track of time compared to other methods.
When the Arduino board is programmed with the firmware, it updates the RTC to the current time setting that is currently stored in the computer that it is connected to. Once the firmware is loaded, it does not need to remain connected to a power source in order to keep track of time. The clock can be disconnected for several days or weeks and it will retain the current time.
There are 8 digits in the 7-segment display, which 6 of those are used to display the hours, minutes, and seconds. The hours are displayed on the left two digits, the minutes are displayed on the middle two digits, and the seconds are shown on the right two digits. The hours, minutes, and seconds are separated by dashes in the remaining two digits. The AM/PM indication is shown by the decimal point in the least significant digit. When the decimal point is on, it represents PM; and when the decimal point is off, it represents AM time.
The Arduino powers the system with its +5 volt supply, and it controls all of the external components in the system. The Arduino uses the I2C communication protocol to talk with the real-time clock, and it uses the SPI communication to interface with the 7-segment binary coded decimal decoder chip.
Parts List
Table 1: BOM
| Quantity | Component Description |
1 | Arduino MEGA 2560 R3 |
1 | MAX7219 Serially Interfaced, 8 digit LED Display Driver |
1 | DS1307 64×8, I2C Real Time Clock |
2 | 4 Digit, 7-Segment Display |
1 | Crystal – 32.768kHz (CL = 12.5pF) |
1 | 10µF Tantalum Capacitor |
1 | 0.1µF Ceramic Capacitor |
1 | 9.53kΩ Resistor |
2 | 2.5kΩ Resistor |
1 | CR1220 Battery Retainer |
1 | CR1220 Battery |
Source Code with Decimal Point AM/PM Indicator
#include <Wire.h>

#include <LedControl.h>

#include <RTClib.h>
//Program variables

float Time_Shift = 0;

int Time_Temp;

int Hour;

int Minute;

int Second;
RTC_DS1307 RTC;
LedControl Display = LedControl(51,52,53,1); //Setup LED display pinouts
void setup()

{

Wire.begin();

RTC.begin();

//RTC.adjust(DateTime(__DATE__, __TIME__));  //Set time when uploading source code
Display.shutdown(0,false);

Display.setIntensity(0,8);  //Set LED brightness level

Display.clearDisplay(0);  //Clear display

}
void loop()

{

Display.setChar(0,2,'-',false);

Display.setChar(0,5,'-',false);

DateTime Time_Update = RTC.now();  //Call for current time

Hour = Time_Update.hour();  //Assign current hour to variable

Minute = Time_Update.minute();  //Assign current minute to variable

Second = Time_Update.second();  //Assign current second to variable //Controls clock hour display

if (Hour == 00)

{

Display.setDigit(0,7,1,false);

Display.setDigit(0,6,2,false);

}

else if (Hour >= 1 && Hour <= 9)

{

Display.setChar(0,7,' ',false);

Display.setDigit(0,6,Hour,false);

}

else if (Hour >= 10 && Hour <= 12)

{

Time_Shift = Hour/10;

Time_Temp = int(Time_Shift);

Display.setDigit(0,7,Time_Temp,false);

Time_Shift = Hour%10;

Display.setDigit(0,6,Time_Shift,false);

}

else if (Hour >= 13 && Hour <= 21)

{

Display.setChar(0,7,' ',false);

Time_Shift = Hour - 12;

Display.setDigit(0,6,Time_Shift,false);

}

else if (Hour >= 22 && Hour <= 23)

{

Time_Temp = Hour - 12;

Time_Shift = Time_Temp/10;

Time_Temp = int(Time_Shift);

Display.setDigit(0,7,Time_Temp,false);

Time_Shift = (Hour - 12)%10;

Display.setDigit(0,6,Time_Shift,false);

} //Controls clock minutes display

if (Minute < 10)

{

Display.setDigit(0,4,0,false);

Display.setDigit(0,3,Minute,false);

}

else if (Minute >= 10)

{

Time_Shift = Minute/10;

Time_Temp = int(Time_Shift);

Display.setDigit(0,4,Time_Temp,false);

Time_Shift = Minute%10;

Display.setDigit(0,3,Time_Shift,false);

}
//Controls clock seconds display
if (Hour <= 11)
{
if (Second < 10)
{
Display.setDigit(0,1,0,false);
Display.setDigit(0,0,Second,false);
}
else if (Second >= 10)
{
Time_Shift = Second/10;
Time_Temp = int(Time_Shift);
Display.setDigit(0,1,Time_Temp,false);
Time_Shift = Second%10;
Display.setDigit(0,0,Time_Shift,false);
}
}
else
{
if (Second < 10)
{
Display.setDigit(0,1,0,false);
Display.setDigit(0,0,Second,true);
}
else if (Second >= 10)
{
Time_Shift = Second/10;
Time_Temp = int(Time_Shift);
Display.setDigit(0,1,Time_Temp,false);
Time_Shift = Second%10;
Display.setDigit(0,0,Time_Shift,true);
}
}
}
Theory of Operation
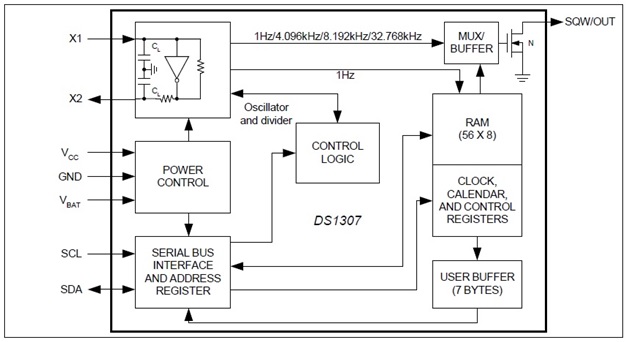
At the center of the digital clock system is the real-time clock, which accurately records real-time information. The DS1307 serial real-time clock (RTC) is a low-power, full binary-coded decimal (BCD) clock/calendar plus 56 bytes of non-volatile SRAM. Address and data are transferred serially through an I2C, bidirectional bus. The clock/calendar provides seconds, minutes, hours, day, date, month, and year information. This digital clock design uses only the seconds, minutes, and hours data to display time information.
The DS1307 uses an external 32.768kHz quartz crystal. The oscillator circuit does not require any external resistors or capacitors to operate. Our system uses a crystal with a rate load capacitance of 12.5pF because the internal oscillator circuitry is designed for operation with a crystal having a specified load capacitance (CL) of 12.5pF. The RTC is connected to the +5V power supply when the power is turned on, and it also connects to a 3 volt backup battery for when the power is turned off. This 3 volt battery allows for the RTC to keep track of time when the power is disconnected from the system.
For more detail: Digital Clock Design Using Arduino


