In today’s modern world, where ever we go we have lots of electronic devices around us. But, out of all, there is only one device that we personally have in our pockets all the time. Yes, it is our mobile phones. Now Mobile phones have become more than a device used for communication, they are our cameras, they are our maps, they are our shopping karts and what not?
With this capability in our hands, it is really a boring idea to use Remote controls to control any electronic applications in our home like TV, AC, Home theatre etc. It’s always frustrating to reach for the AC’s Remote from the comfy comfort of our Bed or sofa. Hence in this project we are going to build a small set-up using which you can control the Air conditioner through your Smart phone using Bluetooth and Arduino. Sounds interesting right! Let’s built one
Materials Required:
- Arduino Mega 2560
- TSOP (HS0038)
- IR Led
- Any Colour LED and 1K Resistor(optional)
- HC-06
- Breadboard
- Connecting Wires
Working Methodology:
All the Remote Controls in our home that we use to control TV, Home Theatre, AC etc work with the help of IR Blasters. An IR blaster is nothing but an IR LED which could blaster a signal by repetitive pulsing; this signal will be read by the receiver in the electronics appliance. For each different button on the remote a unique signal will be blasted which after read by the receiver is used to perform a particular pre-defined task. If we are able to read this signal coming out from the Remote, we can then mimic the same signal using an IR LED when ever required to perform that particular task. We have previously made a IR Blaster circuit for Universal IR Remote and for Automatic AC Temperature control.

A TSOP is an IR Receiver that could be used to decode the signal coming from the Remotes. We will use this TSOP to decode all the information from our Remote and store it on Arduino. Then using that information and an IR Led we can re-create the IR signals from our Arduino whenever required.
Pre-requisites:
For this Arduino Bluetooth Controlled AC Project, make sure you have an Arduino Mega and not any other version of Arduino, since the code size is heavy. Install the IR Remote Library using this link to work with TSOP and IR Blaster.
Working of an AC Remote:
Before we proceed into the project take some time and notice how your AC remote works. AC remotes work in a bit different way compared to TV, DVD IR remotes. There might be only 10-12 buttons on your Remote, but they will be able to send a lot of different types of signals. Meaning the Remote does not send the same code every time for the same button. For example, when you decrease the temperature using the down button to make it 24°C (degree Celsius) you will get a signal with a set of data, but when you press it again to set 25°C you will not get the same data since the temperature is now 25 and not 24. Similarly the code for 25 will also vary for different fan speed, sleep settings etc. So let’s not fiddle around with all options and just concentrate only the temperature values with a constant value for other settings.
Another problem is the amount of data that is being sent for each button press, normal remotes with send either 24 bits or 48 bits but an AC remote might sends up to 228 bits since each signal contains a lot of information like Temp, Fan Speed, Sleep timing, Swing style etc. This is the reason why we need an Arduino Mega for better storage options.
Circuit Diagram and Explanation:
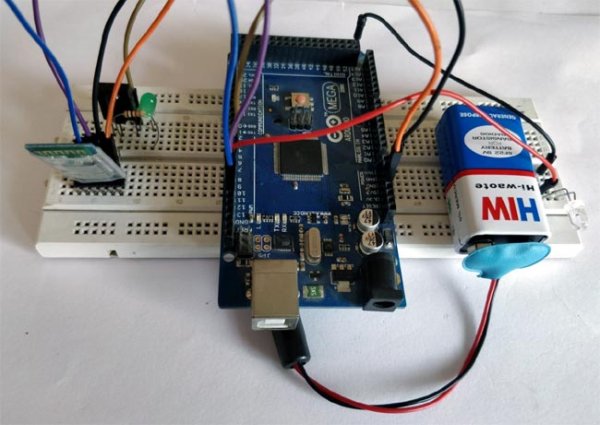
Luckily the hardware setup of this Mobile Phone Controlled Air Conditioner is very easy. You can simply use a breadboard and make the connections as shown below.
The following table can also be used to verify your connections.
| S.No: | Component Pin | Arduino Pin |
| 1 | TSOP – Vcc | 5V |
| 2 | TSOP – Gnd | Gnd |
| 3 | TSOP – Signal | 8 |
| 4 | IR Led – Cathode | Gnd |
| 5 | IR Led – Anode | 9 |
| 6 | HC-05 – Vcc | 5V |
| 7 | HC05 – Gnd | Ground |
| 8 | HC05 – Tx | 10 |
| 9 | HC05 – Rx | 11 |
Once you connections are done it should look something like this shown below. I have used a Breadboard to tidy things, but you can also you Male to female wires directly to hook up all components
Decoding your AC Remote Signals:
The first step to control your AC is to use TSOP1738 to decode AC Remote Control IR Codes. Make all the connections as shown in the circuit diagram and make sure you have installed all the mentioned libraries. Now open the example program “IRrecvDumpV2” which can be found at File -> Examples -> IRremote -> IRrecvDumpV2.
int recvPin = 8;
IRrecv irrecv(recvPin);
Since our TSOP is connect to pin 8, change the line number 9 to int recPin=8 as shown above. Then Upload the program to your Arduino Mega and open the Serial Monitor.
Point your Remote towards TSOP and press any button, for each button you press its respective Signal will be read by the TSOP1738, decoded by Arduino and displayed in the Serial Monitor. For every change in temperature on your Remote you will get a different Data. Save this Data for we will be using it in our main program. Your serial monitor will look something like this, I have also shown the Word file on which I have saved the copied data.
The Screenshot shows the code for setting the temperature at 26°C for my AC remote. Based on your Remote you will get a different set of codes. Similarly copy the codes for all different level of temperature. You can check all the Air Conditioner Remote control IR codes in the Arduino Code given at the end of this tutorial.
Main Arduino Program:
The complete main Arduino program can be at the bottom of this page, but you cannot use the same program. You have to change the Signal code values that we just obtained from the Example sketch. Open the main program on you Arduino IDE and scroll down to this area shown below where you have to replace the array values with the values that you obtained for your Remote.
Note that I have used 10 Arrays out of which two us used to Turn ON and turn OFF the AC while the rest 8 is used to set different temperature. For example Temp23 is used to set 23*C on your AC, so use the respective code in that Array. Once that is done, you just have to upload the code to your Arduino.
We need to import two libraries for this project. One is the IRremote library that we just added to Arduino and the other is the in-built Software Serial Library that helps us in using the Bluetooth module.
#include <IRremote.h> //Lib for IT Blaster and TSOP
#include <SoftwareSerial.h>// import the serial library
Next we initialize the Bluetooth Module on pin 10 and 11 and then use an object called irsend to access all the IR features of the library.
SoftwareSerial BT_module(10, 11); // RX, TX
IRsend irsend;
Next comes the very important lines of code. This is where the information to control your AC is present. The one shown below is for my AC remote, you should have obtained yours in the previous step.
Next inside the void setup function, we initialize two serial communications. One is Bluetooth at 9600 Baud rate and the other is Serial monitor at 57600 baud rate.
void setup()
{
  BT_module.begin(9600); //BT works on 9600
  Serial.begin(57600); //Serial Monitor work son 57600
}
Inside our void loop (infinite loop), we check if there is anything received by the Bluetooth Module. If anything is received we store that information in the variable BluetoothData.
   while (BT_module.available()) //If data is coming
   {
    BluetoothData=BT_module.read(); //read it and save it
    Serial.println(BluetoothData); //print it on serial for testing purpose
   }
The information received by the Bluetooth will be based on the button pressed on our Android app that we will be installing in our next step. Once the information is received we just have to trigger the respective IR code like below
   if (BluetoothData == '2')
   {
    irsend.sendRaw(Temp23, sizeof(Temp23) / sizeof(Temp23[0]), khz);  delay(2000);//Send signal to set Temperatue 23C
   }
Here if the code ‘2’ is received we have to set the temperature of the AC to 23°C. Similarly we have code from 0 to 9 to perform all the basic control functions of AC. You can refer to the complete arduino code at the end of this page.
Read more: Cell Phone Controlled AC using Arduino and Bluetooth