Does it happen to you to slide your finger across your phone’s screen and turn the alarm off … just because you have automated this task and don’t even need to open your eyes?
Well, let me present to you the alarm clock that WILL MAKE YOU:
….. stand from the bed ….. open your eyes ….. get you absolutely focused ….. and finally WAKE UP !!!
Here are some stories from life that may encourage you to buld such a 100%-wake-up-clock for yourself …
I am an engineering student in third year now and this speaks that I do not get enough sleep during the term time.
For me being prepared means actually managing to wake up for the 9am lecture which is very tough ….. and unfortunately I have to do it every day except Thursday and the weekends. It comes hard when I have an assessment in the lab and really have to do it that early.
I have joined the Instructables Be Prepared Contest because it is quite dramatic when I oversleep and then rush without having breakfast and miss the bus … and have to walk another 40mins going to the second lecture. I hate myself when this happens.
I want to add a happy-ending story that once happened to me to wake up at 7am while I had a flight at 8:30am and now I’m scared to oversleep whenever I’m going to bed.
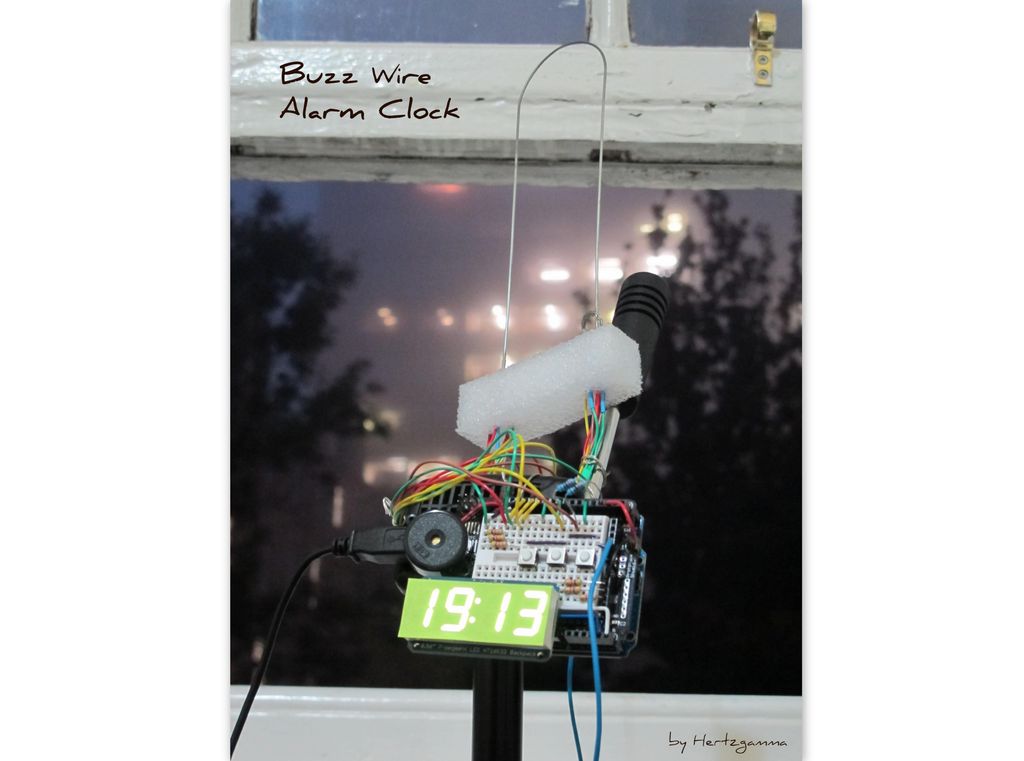
Step 1: Buzz Wire Alarm Clock
I was inspired by some sort of a game that you need to focus and move a hook across a wire and not touch the wire …
The Buzz Wire Alarm Clock shares exactly the same idea …
- First you set the time / screen brightness
- You have a nice clock that even beeps every exact hour!
- Then you set two alarms – Alarm 1 and Alarm 2 ON/OFF/Set time
- Wait for the alarm to start beeping the buzzer and flashing the lights – Now you want to turn the alarm off
- Get the hook and touch either end of the alarm stand
- Carefully get the hook across the other end of the alarm stand without touching the wire – ALARM OFF 🙂
- If you happen to touch the wire 🙁 Now repeat again starting from either end of the alarm stand
As simple as that.
- And what’s more cool – you can customize the buzz wire to your own preferences – make it look like a roller coaster or maybe simple and with minimum bends.
- You can also choose the hole diameter of the hook!
Below is the settings video:
Step 2: Parts List
To complete this instructable you will need:
- Arduino board (I used Arduino Uno, but similar would do … Arduino Mega etc.)
- Arduino Prototyping shield OR any breadbord would do
- 4-digit 7-segment display – the one I used is from Adafruit (If you want to use my Arduino code, you will need the same display, but if you decide to connect 4 separate 7-segment displays … then write your own code)
- Resistors – 5pcs, anything between 20 kOhm and 50 kOhm
- Button swithes – 3pcs
- Buzzer
- Wires
- Heat shrink tubing
- Cable shield
- Piece of foam – 10 x 3 x 3 cm (could use cardboard or wood)
- Sticky notes for decoration
Basic tools required:
- Soldering iron & wire
- Cable strippers/cutters
- Lighter or heat gun
Step 3: The Display
Plug the 4-digit 7-segment display into the board using the correct orientation – the four lower dots are marked on the board.
Solder the 14 pins and trim the excess wires.
Plug and solder the 4-pin header.
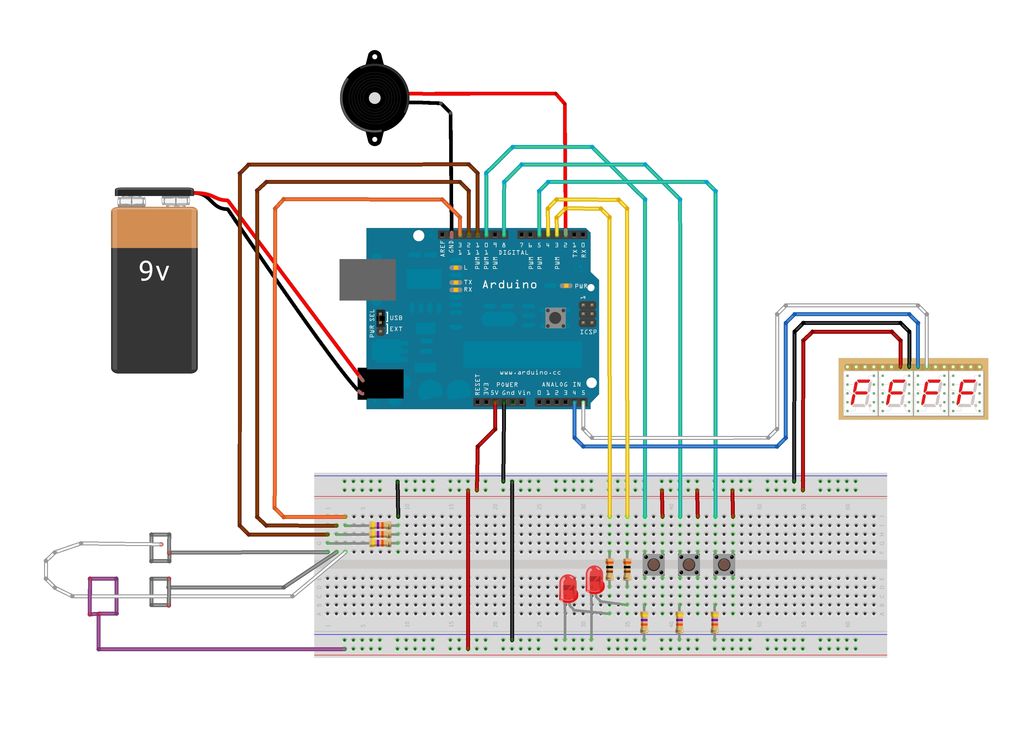
Step 4: Arduino Hardware Set Up
I have not specifically shown the building process as it is very straight forward. Also, there is an unlimited number of ways you can put your components around just at your best convenience.
The pins as programmed are:
Analog:
- A4 – Screen data
- A5 – Screen Clock signal
Digital:
- 2 – Buzzer (output)
- 3 – LED set one (output)
- 4 – LED set two (output)
- 5 – Button switch for minutes (input)
- 8 – Button switch for hours (input)
- 10 – Button switch for settings/in/out (input)
- 11 – One contact ring of alarm stand (input)
- 12 – Other contact ring of alarm stand (input)
- 13 – Buzz wire (input)
- 14 – Used as ground
Step 5: Arduino Software Set Up
- Download the Adafruit LED Backpack library from github
- You’ll also need to download the Adafruit GFX library that provides the graphics drawing routines, and must be installed! To download click the DOWNLOADS button in the top right corner, download, uncompress. The uncompressed folders Adafruit_LEDBackpack & Adafruit_GFX are what you need. Check that the Adafruit_LEDBackpack folder contains Adafruit_LEDBackpack.cpp and Adafruit_LEDBackpack Place the Adafruit_LEDBackpack & Adafruit_GFX library folders in your arduinosketchfolder/libraries/ folder. You may need to create the libraries subfolder if its your first library.
*If you get stuck at some point here, do not hesitate to ask me.
I have uploaded a pic to show you the folder structure.
Step 6: Coding
Here is the developed version of the software that you should upload to the Arduino Uno.
It took me around a week to complete it.
You may notice some new functions like:
matrix.writeDigitRaw(0,B01110111); //”A” < This is the bit to the left
matrix.writeDigitRaw(1,B00111000); //”l” < This is the middle left bit
matrix.writeDigitRaw(3,B11010000); //”r.” < This is the middle right bit
matrix.writeDigitRaw(4,B00000000); //” ” < This is the bit to the right
matrix.writeDisplay(); < This is needed to “put” your symbols to the display
This is all to do with the 4-digit display and the way that you write characters to it.
The above lines of code would mean that “Alr. ” is written on the screen where “B11010000” is an 8-bit mask.
Program code:
Step 7: Alarm Stand and Deactivation Circuit: Contact Rings
Make two 1.5cm diameter rings from the cable shield. You can also make another one – the hook. We will need it later.
Solder a piece of cable on each ring insulating the solder joints with heat shrink tube.
Feed the cables through the Styrofoam leaving the rings lay on top of the Styrofoam.