
Summary of Making a 9v Battery DC power supply
This article describes building a portable 9V DC power supply for an Arduino using common electronics components. The project involves soldering wires from a battery holder to a coaxial DC jack, ensuring correct polarity between positive and negative connections without shorting them.
Parts used in the 9V Battery DC Power Supply:
- 2.1mm coaxial DC jack (positive tip)
- PP3 9Volt battery
- PP3 9Volt Connector / 9Volt battery holder
- Solder
- Soldering iron
Rather than use the USB to power my Arduino board with a handy trip to the electronics store with some more knowledgeable people than I, I have constructed a 9Volt DC power supply.
Taking a 9 volt battery, a 9v battery holder and a 2.1mm coaxial DC jack (positive tip) I have quickly soldered a portable power supply and better yet it works! (You will also need solder and a soldering iron).
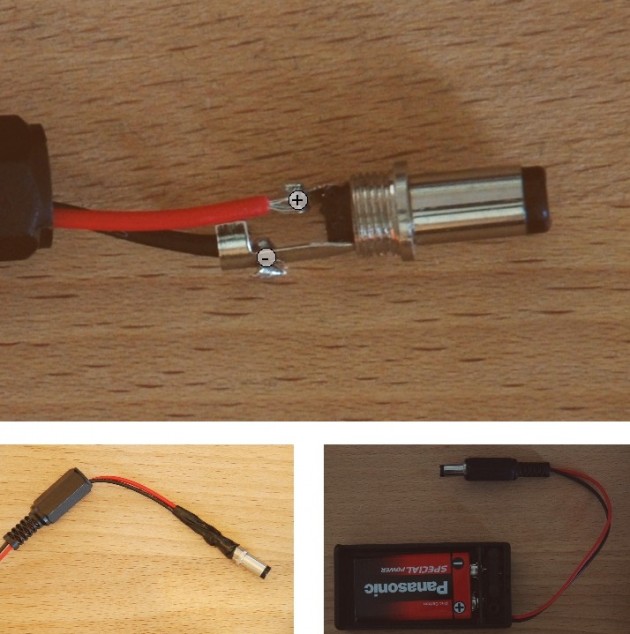
DC Power Supply Components
2.1 mm coaxial DC jack
PP3 9Volt battery
PP3 9Volt Connector / 9Volt battery holder
Step 1:
Trim the wires on the battery box and make sure that theres at least 5-10mm of exposed wire. Unscrew the jack, take the housing and thread the wires through.
Step 2:
Connect to positive (red) wire to the base of the pin and solder, connect the negative/ground (black) wire to the tall pin and solder. Making sure that there is no connection between the two.
Read more: Making a 9v Battery DC power supply
- How can I power my Arduino board without visiting a store?
You can construct a 9Volt DC power supply using a 9 volt battery, a 9v battery holder, and a 2.1mm coaxial DC jack. - What components are required to build this power supply?
The required parts include a 2.1 mm coaxial DC jack, a PP3 9Volt battery, a PP3 9Volt Connector or battery holder, solder, and a soldering iron. - How should I prepare the wires on the battery box?
You must trim the wires to ensure there is at least 5-10mm of exposed wire before threading them through the jack housing. - Which wire connects to which pin on the DC jack?
Connect the red positive wire to the base of the pin and the black negative ground wire to the tall pin. - What tool is needed to connect the wires to the jack?
You need a soldering iron and solder to make the connections between the wires and the jack pins. - Why is it important to check the connection between the two pins?
You must ensure there is no connection between the two pins to prevent short circuits while making sure the positive and negative are correctly placed. - Can I use this setup as a portable power source?
Yes, the author confirms that they quickly soldered a portable power supply that works effectively. - What type of battery is used for this project?
A PP3 9Volt battery is used to power the circuit.
