Summary of Build Your Own BARBOT using Arduino
This article details a DIY robotic liquor server named "BarBot," built for a university science fair. The creator repurposed an existing Lynxmotion robotic arm and Arduino to dispense alcohol into shot glasses, opting for a stationary dispenser with a moving tray to reduce torque requirements. The project emphasizes cost-effectiveness, aiming for under $200, and requires basic electronics skills like soldering.
Parts used in the BarBot:
- Lynxmotion robotic arm
- Arduino (deci) microcontroller
- Joystick controller
- 5 servos
- 14" by 14" piece of 1/4" polycarbonate
- Servo brackets from Lynxmotion
- Hitec HS-645MG Servo (or HS-422)
- Small Snap-action switches with levers
- Multi-wired cord (8 strands)
- 1/4" tubing
Ever wanted a robotic liquor server?
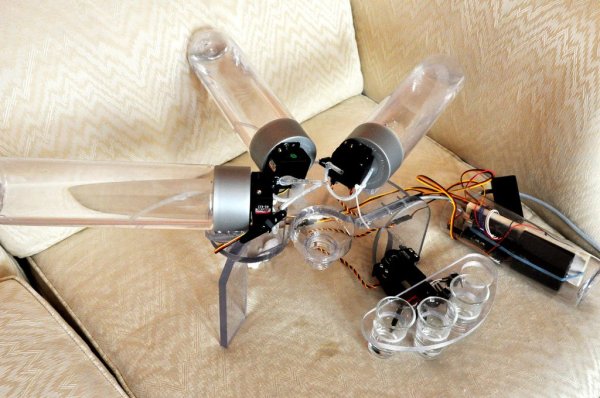
I purchased a Lynxmotion robotic arm last year and an Arduino (deci) to play around with. I had it serial controlled with a joystick and it was a great way to start in robotics. More recently I wanted to take on another micro-controller related project for a university science fair. Since it was going to be hosted at the on-campus pub, I thought it would be fitting to build a robot that would dispense alcohol into shot glasses.
I hope this instructable is easy to understand and I will try to include as much detail as possible so that anyone could make one for under 200 dollars. Please vote and comment on this instructable. It is my first one and I hope to make even better ones in the future.
DISCLAIMER: It is a experimental project and will require some basic electronic skills such as soldering and AVR programming. Modifications may cause damage to your micro controllers if you are not careful (since you are working with liquids). I DO NOT claim any responsible for such misfortunes. As well, this project is not fully documented as I was tight on time completing it, therefore more detail may be added as time goes on. If you have any question, please ask and I will be happy to help.
PS. During the build I discovered that there is competition and audience for this kind of robotics and to my surprise it is under the same name “BarBot” (link: robogames.net/barbot.php). I hope no one is angry that I used the same name. I do wish I could attend Robogames though.
Step 1: From Concept to Reality
My first step was to consider my available resources. I had 5 servos, a 14″ by 14″ piece of 1/4″ polycarbonate, the Arduino, and a few servo brackets from Lynxmotion. (Purchase from www.robotshop.ca/)
Then I considered the features required:
Liquor Reservoir (I wanted at least 3 containers of minimum 500ml each in volume)
Tray for the shot glasses (I wanted at up to 4 shots to be served at once)
Human Interface (Controls for the selection of type of liquor to be intuitive)
Liquor Selector (A mechanism that chooses the selected type of liquor to dispense)
Dispensing volume controller (A mechanism that allows the control of volume of liquid per shot)
Initially, the idea was to directly use the robotic arm and attach a liquor dispensing mechanism to it, but this proved to be difficult due to a number of factors. First, I did not have proper sized valves so it was difficult to figure out how to transport the liquid to the dispenser on the arm without interruption. Second, I had 1/4″ tubing (sourced locally at a hardware store) but it was not the silicone type and therefore not very flexible (too much torque will be required for the servo).
The tray arm is made from:
1 x Lynxmotion “L” Connector Bracket
(www.robotshop.ca/lynxmotion-connector-bracket-asb-06b-3.html)
1 x Lynxmotion Long “C” Servo Bracket
(www.robotshop.ca/aluminum-long-c-servo-bracket-asb-05-3.html)
1 x Lynxmotion Multi-purpose Servo Bracket
(www.robotshop.ca/lynxmotion-aluminum-multi-purpose-servo-3.html)
1 x Hitec HS-645MG Servo, although a cheaper HS-422 would do as well.
(www.robotshop.ca/hitec-hs422-servo-motor.html)
4 x Small Snap-action switches with levers. There are great inexpensive contact sensors I got from All Electronics, a great online store
(www.allelectronics.com/make-a-store/item/SMS-242/SMALL-SNAP-ACTION-SWITCH-W/-LEVER/1.html)
1 ft of Multi-wired cord (8 strands needed) I got this great 10-strand cable that is useful for situation such as this.
(www.allelectronics.com/make-a-store/item/10CS22/10-CONDUCTOR-SHIELDED-CABLE-W/-DRAIN/-/1.html)
The images below highlight some of the ideas, with them evolving to the final sketch at the end. Funny thing is I know AutoCAD and SolidWorks, but prefers to draw them because I get most of my ideas right before I go to bed (I have pen and paper prepared under the bed just for that :P).
Step 2: Building the Supporting Structure.
I had a piece of polycarbonate left over from an underwater camera case I built last year. Originally it was destined for a computer case mod that I started but never finished. I felt bad for it as it was just sitting there waiting to be useful. It was a 14″ by 14″ square, so just over a square foot. Unfortunately it is also the only material for this project that I do not know where a good and well-priced source could be found. I hope avid readers of this instructable could provide their insight on this matter (so I could update this).
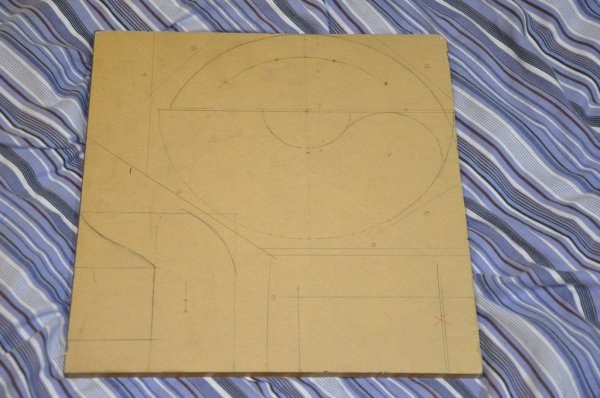
I am a fan of circles, and since the tray would be traveling in an arc, I decided to build the base based on circles (its a pun, I love puns). The main dimensions are based on the material constraints, so its pretty easy to see the general size of the whole structure by looking at the image below. However, the dimension are also based on the size of the shot glasses I used as well as the size of the Lynxmotion servo bracket (I wanted the tray to have the same curvature as the base so it looks like two intersecting half-circles).
I found that the easier way to prototype for structures like this is to build a 1:1 scale out of cardboard (this was faster for me than CAD and can provide similar insight on whether your designs will be feasible. Attached are pictures of the frame built with cardboard.
For more detail: Build Your Own BARBOT using Arduino
- How much does it cost to build this robot?
The project is designed to be made for under 200 dollars. - Can I use a cheaper servo than the Hitec HS-645MG?
Yes, a cheaper HS-422 servo would also work for the tray arm. - What material was used for the base structure?
A 14" by 14" piece of 1/4" polycarbonate was used for the supporting structure. - Does the robot have a manual liquor selector mechanism?
No, the design uses a moving tray that travels under the selected stationary liquor container. - Why was the initial idea of attaching a dispenser to the arm abandoned?
It was difficult due to a lack of proper sized valves and the high torque required by non-silicone tubing. - What is the maximum number of shots the robot can serve at once?
The tray is designed to hold up to 4 shots simultaneously. - Are there specific electronic skills required for this build?
Yes, the project requires basic skills such as soldering and AVR programming. - What type of tubing was sourced locally?
1/4" tubing was sourced locally at a hardware store, though it was not silicone.