Summary of Bubble Alarm Clock Makes Waking Up Fun using Arduino
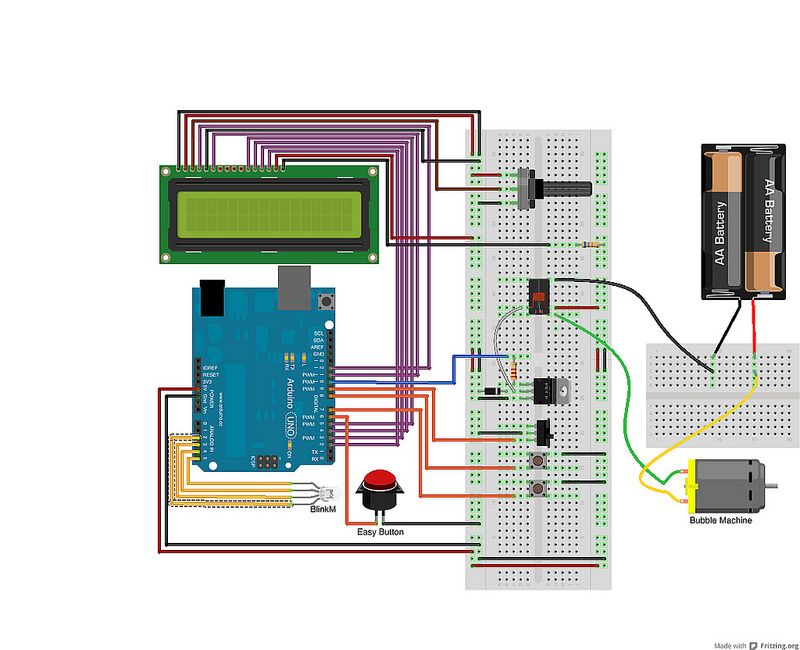
The article describes creating a fun "Bubble Alarm Clock" using an Arduino and a bubble machine toy to wake up with bubbles instead of a traditional alarm. The project involves modifying a Super Miracle® Bubbles Bubble Factory by wiring it to an Arduino microcontroller, adding components like an LCD display, snooze button, and LED for interaction and control. The bubble machine is opened, rewired for external control, and enhanced with an LED. A Staples Easy Button is hacked to serve as a snooze button. This DIY alarm setup aims to make waking up enjoyable.
Parts used in the Bubble Alarm Clock:
- Super Miracle® Bubbles Bubble Factory
- Arduino microcontroller (e.g., Seeduino)
- Sparkfun Basic 16x2 Character LCD
- Staples Easy Button (for snooze)
- ThingM BlinkM LED
- TIP-120 transistor
- 5V SF COM-00100 relay
- Assorted buttons/switches (SF COM-09190 & SF COM-00102)
- Potentiometer (SF COM-09806)
- Perfboard
- 1N4001 diode
- 2.2K resistor
- Wires
- Power adapter for Arduino
- Pin headers
Waking up to a buzzing alarm clock sucks. I’m one of those people who doesn’t like to wake up before the sun is out (or has been out for many hours). So what better way to make waking up fun than having a bubble party in bed!
Using an arduino and a commonly available bubble machine toy, you too can wake up to the joy of bubbles.

Step 1: Tools & Materials
The Parts (you can definitely substitute for stuff you have around the house):
Bubble generating toy: Super Miracle® Bubbles Bubble Factory (purchased at Michaels for 12 bucks)
Microcontroller: Arduino (old Seeduino in my case)
LCD display: Sparkfun Basic 16×2 Character LCD
Snooze button: Staples Easy Button
LED: ThingM BlinkM
Transistor: TIP-120 (Radio Shack 276-2068)
Relay: 5V SF COM-00100
Assorted buttons/switches to adjust time: SF COM-09190 & SF COM-00102
Potentiometer: SF COM-09806
Perfboard
Diode (1N4001)
Resistor 2.2K
Wire
Power adapter for arduino
Pin headers
Tools
Soldering iron
Wire Strippers
Zip Ties
Dremel
Multimeter
Breadboards
Step 2: Break Open the Bubble Machine
First you’ll need to open up the bubble machine. The one I found was easy to open, just four philips head screws.
Once inside, disconnect the battery and motor from the switch and solder wires for both the motor and the battery pack long enough to feed outside of the machine.
Next, use a Dremel tool to make an opening in the plastic to feed the wires out.
If you like colorful bubbles, attach the LED or ThingM BlinkM on the top of the machine.
Finally, I opted to place a mini-breadboard on the back of the bubble machine to collect all the wires. This made it easier to adjust the distance between the controller and the unit.
Step 3: Prepare the Easy Snooze Button
The easy button is, uh, easily opened by removing the plastic feet to access the four philips head screws. Be sure to hang onto the feet.
Big buttons rock.