Story
Wiscore: Integrating Arduino with Alexa
As part of the series of tutorials for the Wiscore Alexa AVS EVK, we will see how to integrate Arduino boards (Uno, Leonardo, Due etc) directly with Alexa Voice Service. The Wiscore board provides the means to communicate with other devices via the UARTs. We will in depth on how to enable one of the UARTs, connect an Arduino to the EVK and then communicate over Serial. Another tutorial will cover getting the Yun Bridge ported to the device and how to use the Bridge APIs for operations
Getting your firmware with Uart2 Enabled
The Mt7628 chipset has 3 UARTs in total as described below:
- UART1: UART_RXD1 – GPIO#46 and UART_TXD1 – GPIO#45
- UART2 : MDI_TN_P2 – GPIO#21 and MDI_TP_P2 – GPIO#20
- UART0 : UART_RXD0 – GPIO#13 and UART_TXD0 – GPIO#12
UART0 is used for the serial debugging port exposed via the CH340 USB to serial chipset
UART 1 and UART 2 need to enabled on the firmware to be exposed to the user.
Exposing the UART ports:
We need to edit the following .dts file in the Wiscore SDK to enable the UART1
- Clone the Wiscore SDK at: https://github.com/RAKWireless/WisCore-SDK
- Edit .dts
vi WisCore-SDK/products/wisAvs/target/linux/ramips/dts/ MT7628.dts
- Add the following status to the UART1
- Then save file and re-compile the SDK
- Enter the system and you will see the device “ttyS1” of Uart1
ls /dev/
Finally, you can use Uart1.
Then save file and re-compile the SDK
- Enter the system and you will see the device “ttyS2” of Uart2
ls /dev
Now you can use the ttyS2 dev entry as Uart2
Installing some important tools:
During the development of this feature, There are certain tools that are worthwhile to install.
- First install the packages repo in the Wiscore board
a. SSH into your wiscore board from a terminal program like putty.
b. Login as root. If you have not enabled root account on the wiscore then you can telnet to the same IP at port 23 instead of port 22 (SSH port)
c. Once inside the console. Cd to the directory
/etc/opkg.conf
d. And add the following lines at the end of the file:
src/gz chaos_calmer_packages https://downloads.openwrt.org/snapshots/trunk/ramips/mt7628/packages/packages/
e. Save the file and exit
- Run the command opkg update to get the latest packages form the newly added repo
- Install stty:
opkg install stty
- Install screen:
opkg install screen
- Install python:
opkg install python
The Python 2.7 package will take up lots of space. I had 19 percent storage left after installing all these packages.
Getting to know your UART1
The UART1, as described in the previous section is on GPIO 45 and GPIO 46 (txd and rxd) and are exposed via the Arduino headers on the Wiscore Base Board (please refer to the picture in the previous section)
UARTs function at a particular speed called Baud Rate. If we communicate with the incorrect baud rate we will only see gibberish on the console. Here is where stty comes into play. To know the setting of UART1 on the Wiscore board type the following into the terminal session:
stty -F /dev/ttyS1 –a
On my board this command showed the baud rate as 115200. So for all future Arduino communication this would be the speed we have to use.
Screen is a command-line utility to open the serial port for communication. For brevity here is command to run to open up UART1:
screen /dev/ttyS1 115200
Now you can send characters from the terminal to the uart port.
Another quick test would be to echo some strings directly to the dev like so:
Echo hello world > /dev/ttyS1
The Arduino talks to Wiscore Alexa.
Now we have the board setup for communication with an Arduino board. Here is how to connect you arduino with the Wiscore board.
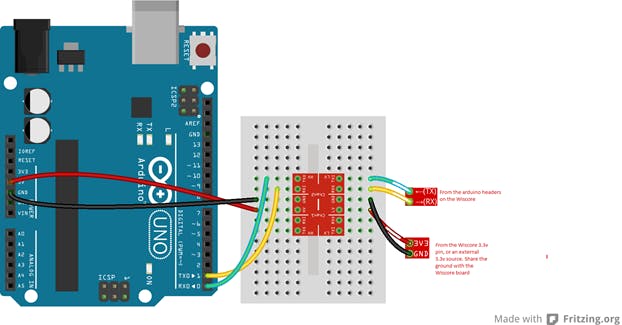 If you use the Arduino Board like DUE which are 3.3v compatible. You can directly connect the wiscore UART pins to the UART pins on the Arduino.
Sample UART test to read and print some charcaters to the terminal:
For more detail: Integrating Wiscore Alexa EVK and Arduino via Serial Port