
Summary of WIRELESS TIN CAN TELEPHONE
This article describes a wireless tin-can telephone project that replaces traditional string with radio frequency transmission. Using an Arduino Uno, a microphone input board, and an NRF24L01+ transceiver, the system captures audio and sends it wirelessly to a receiver unit. The receiver utilizes an LM386 amplifier and a small speaker to output the voice signal. While the audio quality is described as scratchy rather than high-fidelity, the build serves as an educational tool for learning about digital audio signals and radio communications.
Parts used in Wireless Tin Can Telephone:
- Arduino Uno
- Microphone input board
- NRF24L01+ wireless transceiver
- LM386 amplifier
- Small speaker
For many kids, the tin-can telephone is a fun science experiment that doesn’t last much longer than it takes to tangle the string around a nearby tree. [Geoff] decided to go a different however, building a tin-can telephone that’s completely wireless.
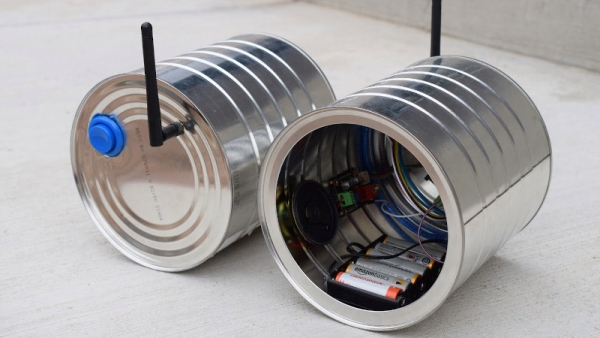
The build starts with a hacker favorite, the Arduino Uno. It’s hooked up to an microphone input board which uses the Arduino’s analog input to pick up audio. The Arduino then sends this data out over an NRF24L01+ wireless transceiver, to be picked up by the corresponding tin can receiver at the other end. An LM386 is given amplifier duties, hooked up to a small speaker so the user can hear the incoming audio.
The Arduino Uno is in no way a high-fidelity digital audio platform, but the project does deliver some legible, if scratchy, voice transmission. It also serves as a great way to learn about radio communications and working with digital audio signals. The NRF24L01+ is a great way to add wireless communication to a project, and if you’re looking for more range, we’ve got that covered, too. Video after the break.
Source: WIRELESS TIN CAN TELEPHONE
-
What is the main difference between this project and a traditional tin-can telephone?
This project is completely wireless, whereas traditional versions rely on a physical string that often gets tangled. -
How does the Arduino Uno function in this build?
The Arduino Uno acts as the central hub by using its analog input to pick up audio from the microphone board and sending data via the wireless transceiver. -
Which component is responsible for amplifying the incoming audio?
An LM386 amplifier handles the duties of boosting the signal so the user can hear the audio through the small speaker. -
What type of wireless technology does the project use?
The project uses an NRF24L01+ wireless transceiver to send and receive data between the transmitter and receiver cans. -
Is the audio quality considered high-fidelity?
No, the article states the Arduino Uno is not a high-fidelity platform, delivering legible but scratchy voice transmission. -
Can users extend the range of this wireless communication?
Yes, the article mentions that there are options available to cover more range if needed. -
What educational concepts does this project help learners understand?
The project serves as a way to learn about radio communications and working with digital audio signals.
