Summary of Weather Portal
This article details a DIY "Weather Portal" project using an ESP8266-based Wemos D1 Mini to visualize local weather data via animated Neopixel lights inside a custom tube. Designed for the Anchorage YMCA with a zero budget, the project fetches data from Weather Underground and displays six weather conditions (Snow, Rain, Clouds, Sun) and temperature as a flame animation. It offers two build options: a 6-foot aluminum tube or a shorter PVC/cardboard alternative, emphasizing scalability and low cost under $25.
Parts used in the Weather Portal:
- Wemos D1 Mini microcontroller
- Neopixel LED strip (RGB or RGBW)
- Level shifter (to convert 3.7V to 5V)
- Tubing (Aluminum Speed Rail, PVC pipe, or cardboard mailing tube)
- Red and Blue LED sequins for status indicators
- Capacitor and resistor for power stabilization
- Power supply (5V wall wart or USB charger)
- Adhesives (E6000) and mounting hardware (channel stock)
- Spray paint (flat white for interior, acrylic for exterior)
There have recently been a series of web query projects that use the miraculously tiny and affordable ESP8266 micro controllers. Most have involved the output going to a tiny screen with small graphics. The local YMCA in Anchorage just completed a beautiful remodel but lacked funds for decorative elements. I wanted to build them something large, interesting and of course computer affiliated with lights, but not too obtrusive for the understated and easygoing place. The budget was zero so it couldn’t be too expensive to construct.
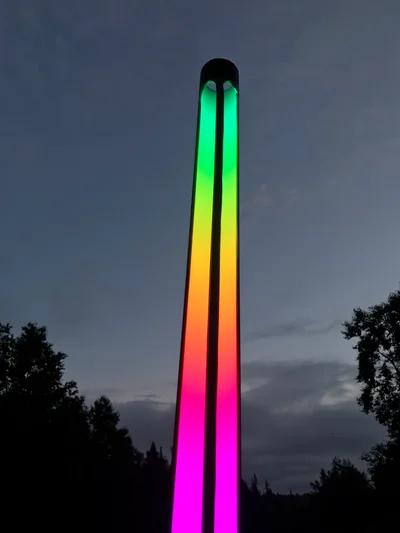
The wonderful work by Daniel Eichhorn https://blog.squix.org/ already did most of the groundwork for my project–carefully integrating the parsing of weather information with the simplicity of using an insanely cheap build with the Wemos D1 mini that only costs $4. The other ingredient was a simple strand of Neopixels which can be as long as you want–so scaling the project is up to you. The Weather Portal is just a simple 2 inch diameter tube that is as long as the neopixel strand. The strand faces inward projecting onto the flat white painted surface like a screen. The tube isolates the projected image and makes vertical animations of the weather possible. The tube I did for the YMCA is made of 6 feet of Aluminum–Speed Rail and can be easily obtained from a metal supplier fairly cheaply. Metal working is difficult for most so I also presented an easier alternative of plastic 2 inch PVC pipe from the big box store with only 1 meter of Neopixels. If you want cheaper and easier go with a cardboard mailing tube and call it a day. The only other part is a level shifter–the total cost for the electricals is under $25 for a meter long Weather Portal.
Step 1: Introduction to Weather Reporting
If you are new to ESP8266 and the Wemos Mini and all things having to do with Arduino this isn’t the best place to start. But if you just want to build this cool weather station this instructable will show you how I built it and what elements you need to put it together. There are certain elements about the software where you need to have some understanding of how to get an API and how to change the code to allow your Wemos to get onto your wifi. This is easy to pick up from Daniel’s blog and he also has a downloadable book that is quite helpful. Essentially the process involves asking wunderground.com for an API–which is a key that allows your Wemos micro controller to ask the wunderground web site for the weather report on your location (the location also has a key to parse into the web request–in the software I left Anchorage Alaska–so unless you want unending freezing temps and snow I would change it…) The API is free as long as you don’t tax the system too much–the web site has its limits listed. My program does an ask every ten minutes and based on the current forecast projects one of six animated graphics for the weather: Snow, Rain, Partly Cloudy, Cloudy, Sun, Temperature. The temperature is the animated flame who’s height is related to the outside temp–I reversed it for mine (Low Temp: High Flame, High Temp: Low Flame) it will look like a fireplace on those cold days….The output switches between Current Condition and Temperature every 30 seconds. But there is a ton of information that can be obtained from the parsed report so feel free to change the graphic elements to anything you want and present any of the data:wind, accumulated rain, dew point whatever…
Step 2: Gather Your Materials
1. Wemos D1 Mini: https://www.banggood.com/WeMos-D1-Mini-V2-NodeMcu…
2. Neopixels:https://www.adafruit.com/product/2842–Neopixels occur in a lot of lengths and dot concentrations –in my long aluminum tube I used the RGBW ones with xtra white led on each unit and the code reflects this change–the shorter tube I used just RGB neopixels and I included the code changes for this too. Use 60 lights per meter. You also need a capacitor to go across the power supply to the neopixels and a resistor for the control wire–see “Best Practices” in the Neopixel Uberguide on Adafruit site.
3. Level Shifter:https://www.adafruit.com/product/395 there are a lot of varieties of these and you can find cheaper ones…. The output of the Wemos is at 3.7 volts and this raises it to 5 for controlling the Neopixel strip–I have had some trouble with this in the past.
4. Metal, PVC Plastic, Cardboard tube(2 inch inside diameter/ long aluminum tube is 68 inches short PVC tube is 43 inches)–or if you really don’t care you can just stretch the neopixel strand on a wire mounted two inches from a white wall…I mean you can just look outside and see the weather….
5. Red and Blue LED sequins–indicators for power on and Wifi connected.
Step 3: Construct the Tube
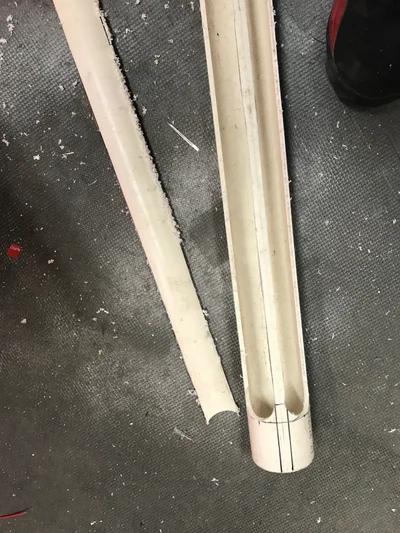
As noted I am demonstrating two versions of the weather portal. The aluminum one utilizes a 68 inch 2 inch aluminum Speed Rail. A 2 inch hole saw placed holes at each end about 3 inches from the openings. A jigsaw with a metal cutting blade was used to connect the tangents of the two circle holes to create the pill shaped opening. The PVC tube was 43 inches long. A 1 3/8 hole saw was used to cut 4 circles that left approximately 2 inches of tube on either end. All four tangent lines were cut with a jigsaw to leave a central isthmus of PVC 3/8 inch wide to support the LED strip. The aluminum tube was sandblasted with glass beads to give it a nice finish. The PVC tube was sanded with 120 grit and prepped for painting.
Step 4: Painting the Tubes
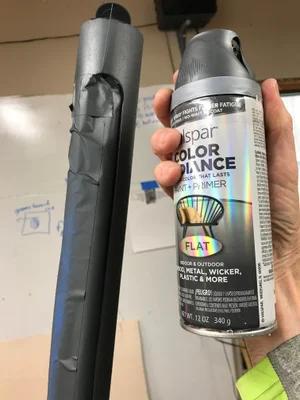
The insides of the tubes were spray painted with flat white which gives the screen like effect for the LED’s. The outside of the sandblasted aluminum was painted with protective Acrylic finish and the PVC tube with flat acrylic black.
Step 5: Adding the Neopixels
The aluminum tube needed a aluminum strut element to run the length of the sculpture to hold the Neopixels. A piece of channel stock was used and J/B welded into position at the top and bottom. The design of the PVC was better leaving a central integral channel as part of the tube to glue the Neopixel strip to. E6000 was used to hold the Neopixel strip in position after stripping out of its silicon shell. Make sure you cover the back conductive pads on the strip if mounting it to anything conductive like aluminum. The waterproof silicon cover that comes with the Neopixels is very difficult to glue to anything. The strut in the large piece bends slightly inward due to the heating and expansion effects of the LED strip–if I was redesigning it I would mount it in a channel that would allow for this change without bending.
Step 6: Wiring It Up
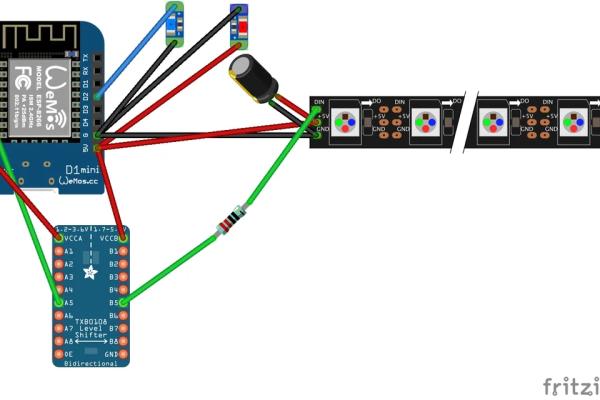
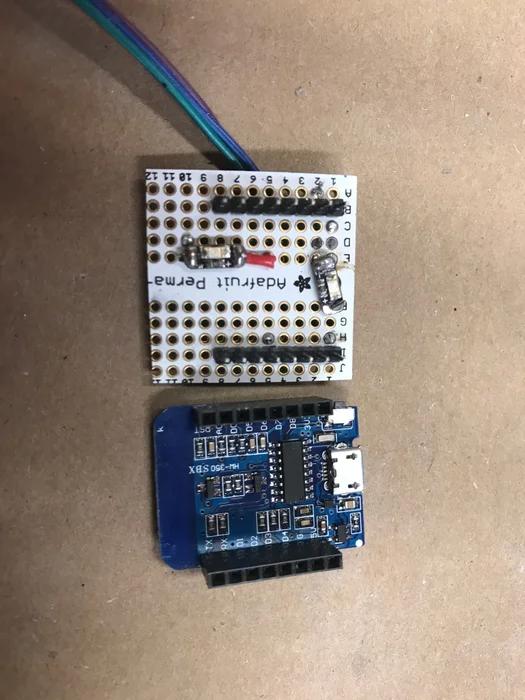
The fritzing diagram is included above. I used a simple perf board with the level shifter on one side and the Wemos with female headers on the other. This made it easy to just remove and replace the brains of the machine trivial in case it went down. In the aluminum model I had the brain mounted external to the underside of the unit so that the wifi signal would not be shielded by the tube. The two LED’s are to indicate power to the unit and if the wifi signal has been acquired to aid in troubleshooting. The aluminum tube has an external power connector to a 5 v 2 A wall wart that supplies it. The PVC model is run with a wire directly connected to the micro USB on the Wemos. The power requirements are related to the length of the Neopixel length that you choose–you can get away with this project with 1A wall USB charger for the 1 meter length. Obviously if you want this thing to be 30 feet long the power requirements are going to be more complex. Since the size of the electronics are so tiny you can completely enclose them in either of the ends. When connecting the capacitor make sure you check polarity.
Step 7: Software
The software is adopted and put together from several sources and goofing with the physics formula for falling bodies and not so strong gravitational forces. Please adapt it any way you want. There are two programs included–one for the long piece with RGBW Neopixels and other for straight RGB kind. The adjustments for the length of the Neopixel chains are indicated. You can change the number of snowflakes and raindrops and how high they pile up and the colors of course. If you want to add additional animations–say for hurricanes, thunderstorms, or zombie attacks–just design them as new functions at the end of the program and add them to the switch/case clause.
Step 8: Enjoy the Weather
These guys are plug and play. As soon as you attach the current the Red LED will light–followed by the Blue LED indicating you are connected to Wifi. It waits 10 minutes before it connects with Wunderground while displaying a full flame to the top of the tube. When it gets the weather report it will modulate the flame to the current temp and display the current weather animation in 30 sec intervals. If it misses the report from the web it goes back to high flame for another ten minutes then retries. Its actually cool to have around.
Source: Weather Portal
- How does the system determine which weather animation to display?
The program queries wunderground.com every ten minutes and projects one of six animations based on the forecast: Snow, Rain, Partly Cloudy, Cloudy, Sun, or Temperature. - What is the best way to construct the enclosure if metalworking is difficult?
Use a 2-inch PVC pipe or a cardboard mailing tube instead of aluminum; the PVC version requires only 1 meter of Neopixels and is easier to cut and assemble. - Does the project require expensive materials to be successful?
No, the total electrical cost is under $25, and the enclosure can be made from cheap aluminum, PVC, or even cardboard. - How does the temperature visualization work?
The temperature is shown as an animated flame where the height relates to the outside temp, reversed so that low temperatures create a high flame resembling a fireplace. - Why is a level shifter necessary for this project?
The Wemos outputs at 3.7 volts, but the Neopixel strip requires 5 volts, so the level shifter raises the signal voltage to prevent control issues. - Can I change the number of snowflakes or raindrops in the code?
Yes, the software allows you to adjust the number of snowflakes, raindrops, how high they pile up, and their colors. - How do the indicator LEDs help with troubleshooting?
The Red LED indicates power is on, while the Blue LED confirms the device has successfully connected to the Wi-Fi network. - What happens if the device fails to get a weather report from the web?
If the report is missed, the device reverts to displaying a full flame for ten minutes before attempting to connect again.