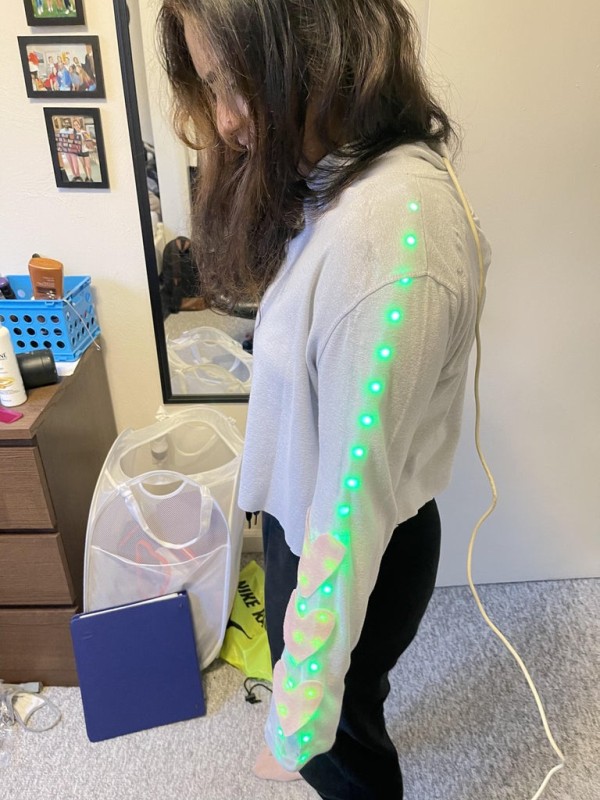
There are many smart devices available to us that are able to detect our heart rate and other bio data by using a method called photoplethysmography (PPG), a concept of how blood is able to reflect red light while absorbing green light. The device can detect the amount of blood flowing, so when there’s more light absorption when the heart beats faster. We will be creating a wearable heart rate monitor which will use a pulse sensor and record PPG data. This shirt will display the range that your heart rate falls in based on three different colors.
Supplies:
- Arduino Uno
- Neopixel LED Light Strip
- Pulse Sensor
- USB 2.0 Cable Type A/B
- Jumper Wires
- Alligator Clips x3
- Conductive Thread / Thread
- Sewing Needle
- Scissors
- Long Sleeved Shirt (Slightly longer than desired final length)
- Velcro
- Adjustable Wrist Band
- Fabric Glue
- Scotch Tape
Optional:
- Felt
- Wire Strippers
Step 1: Assemble the Arduino Circuit
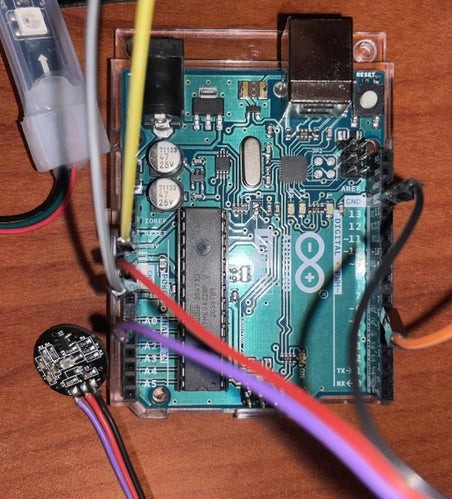
- Using wire strippers, strip the ends of the Neopixel LED Light Strip so the wires are exposed
- Connect the Pulse Sensor to the ground (GND), A0, and 5V slots
- Red: power
- Black: ground
- Purple: analog input
- Using 3 jumper cables, connect them to the ground (GND), digital pin 6, and 3.3V slots
- Using alligator clips, connect the jumper cables to the respective wire ends of the light strip
- Red: power
- Black: ground
- Green: analog input
Step 2: Create the Shirt
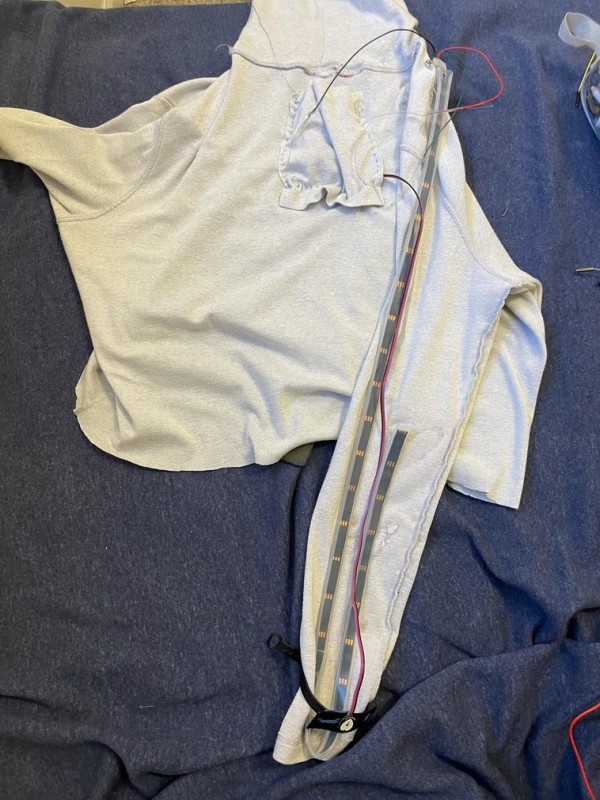
- Cut 5 inches off the bottom of the shirt
- Using the scraps, cut a 5 in. x 5 in. square
- Flip the shirt so that it is inside out
- On the back of the shirt, sew 3 sides of the patch to the shirt making sure to leave an opening big enough for the Arduino Uno board to fit in
- Optional: use conductive thread to have an easier connection to the Arduino without using alligator clips, be sure the wires do not cross or tangle
- Place the Arduino into the pocket and allow the wires to come out of the top of the pocket
- Using fabric glue, glue the LED strip down the sleeve with the LED lights facing downwards
- Allow the glue to dry completely before flipping the shirt back
- For the heart rate sensor, place a piece of velcro on the inner side of the adjustable wristband
- Stick the other half of the velcro to the Pulse Sensor so that the side with the heart faces down and makes contact with the skin
- Tape the wire of the pulse sensor to the sleeve
- The band can be sewed into the shirt, ensuring that it can still be tightly secured around the wrist
- Carefully flip the shirt back and ensure that no wires become detached from the Arduino/breadboard
- Optional: decorate the outer side of the shirt using the felt and fabric glue
Your heart rate monitor shirt is now complete.
Step 3: Run the MATLAB Code

The MATLAB code uses the MATLAB Support Package for Arduino Hardware and requires the NeoPixel Add-On Library for Arduino. The code for the function is available on GitHub at https://github.com/utsav-vt/wearables-Bioinstrumentation-/blob/master/heartratefunction.m. Once the support package and add-on library is installed, you can download the heartratemonitor function from GitHub, connect your Arduino to your computer and call the function. The code to call the function can be found at https://github.com/utsav-vt/wearables-Bioinstrumentation-/blob/master/heartratecustom.m.
Note: The link is not currently public due to course policies.
You can now monitor your heart rate and see the colors displayed on your sleeve. Each color represents a different range, where red is on the higher end and green is in a resting zone. The code will plot your PPG data and reset every 30 seconds so you will be able to see your heart beat from that data plot as well.
Source: Wearing Your Heart on Your Sleeve