
Summary of Voice-Controlled Home Automation System
This article describes a voice-controlled home automation system using an Arduino Mega 2560 and an Android app. The system allows users to switch appliances on or off via voice commands transmitted through Bluetooth. The project involves programming the microcontroller with an Arduino sketch and developing a custom Android application using MIT App Inventor, which utilizes Google's speech recognition to send text data to the MCU for processing.
Parts used in Voice Controlled Home Automation System:
- Arduino Mega 2560 board
- Bluetooth module HC-05
- Relay (or multichannel relay board)
- Android smartphone
- Bluetalk app
- Arduino IDE software
- MIT App Inventor
- 9V DC battery or USB 5V DC power supply
- Seriel cable
- Single-side PCB
- LED indicator
- Connectors CON1, CON2, CON3, CON4
- Appliance (e.g., bulb)

This is a project for a voice controlled home automation system to control appliances with your voice through an Android app. An Arduino Mega board is used for controlling the relay through which an appliance is switched on/off. You can modify the Android app to add more functions.
First, download Bluetalk app and install it on your Android phone. Screenshot of Bluetalk app is shown in Fig. 1. Block diagram of the voice-controlled home automation system is shown in Fig. 2.

Screenshot of Bluetalk app

Block diagram of the voice-controlled home automation system
Circuit and working of the voice controlled home automation system
Circuit diagram of the voice-controlled home automation system is shown in Fig. 3. The circuit consists of Arduino Mega 2560 board (Board1) for comparing the input string received through Bluetooth with the stored string to give output to digital pin 6 of Board1 to control the relay.
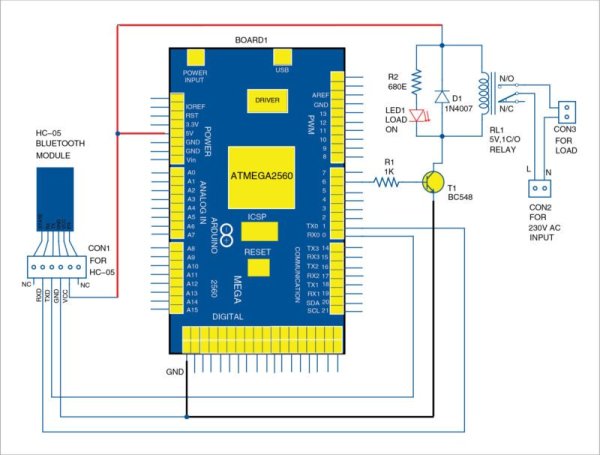
Circuit diagram of the voice-controlled home automation system
Bluetooth module HC-05 transmits and also receives data serially via Board1 that can be read by the microcontroller (MCU). A relay is used here to control only one appliance, though you can use a multichannel relay board to control multiple appliances. Mega 2560 has 54 digital pins, each of which can be used to control an appliance. The MCU can be programmed to compare the relative strings (speech).
Software

There are two software programs used in this project. One is Arduino sketch (Bluetalk.ino) for the MCU and the other is Android app (Bluetalk.apk).
Arduino IDE is used for programming the MCU. For developing Android app, MIT App Inventor is used, as it is easier to use as compared to Android SDK. MIT App Inventor is good for hobby projects and DIY enthusiasts to create small apps for their project-specific use.
Bluetalk.apk app uses Google’s speech-recognition function and transmits the text to the MCU via the connected Bluetooth (HC-05). The .apk code can be read by importing Bluetalk.aia file in MIT App Inventor. Both .apk and .aia files can be downloaded from the source folder present at the end of the article.
Install Arduino IDE (v1.6.9) in your PC and connect Arduino board (here, Arduino Mega is used but we can use any other Arduino board) to the PC with the help of a serial cable. Choose correct serial COM port of the board and then upload the sketch to the MCU. Disconnect the serial cable from Arduino board and connect to the relay and Bluetooth module HC-05.
Again connect Arduino board to the PC via a serial cable. An LED (not shown here) on Bluetooth module will start blinking rapidly, which means it is not connected. Once HC-05 module is connected via the smartphone, the LED will blink just twice after some delay.
Now, say something on the smartphone and check data on the serial monitor of Arduino IDE. After confirming that you are receiving data from HC-05 module, you are good to go. Make sure you select the appropriate baud rate (9600 here). Next, disconnect the serial cable and connect the relay to the appliance as shown in the circuit diagram.
Construction and testing
An actual-size, single-side PCB pattern of the voice-controlled home automation circuit is shown in Fig. 4 and its component layout in Fig. 5.

Actual-size PCB pattern of the home automation system

Component layout of the PCB
Assemble the circuit on the PCB to minimise time and assembly errors. CON1 is used to connect HC-05 module, CON2 and CON3 are 2-pin connectors used to connect 230V AC mains and load (bulb), respectively. CON4 is used to connect Arduino board (Board1).
Power on Arduino board using a 9V DC battery (or any USB 5V DC power supply) to enjoy wireless control of your home appliances via speech. Upload Bluetalk.ino sketch into Arduino board and install Bluetalk.apk on your Android phone.
Pair your Android’s Bluetooth to HC-05 module. It will prompt you to enter a password. Default password is 1234. Open the app and connect to HC-05 again. Your voice controlled home automation system is ready to work.
Touch ‘Speak’ icon on the app, say ‘Turn On’ in front of your smartphone to turn the appliance on and ‘Turn Off’ to turn it off. Author’s prototype is shown in Fig. 6.

Author’s prototype
Download PCB and component layout PDFs: click here
Download source folder
Read More Detail :
- How do I control appliances with my voice?
You can control appliances by speaking commands like Turn On or Turn Off into your smartphone running the Bluetalk app. - What hardware is used to process voice commands?
The Arduino Mega 2560 board compares input strings received via Bluetooth with stored strings to control the relay. - Can I use this system to control multiple appliances?
Yes, although the prototype uses one relay, you can use a multichannel relay board since the Mega 2560 has 54 digital pins available. - Which software is used to develop the Android app?
MIT App Inventor is used to create the Bluetalk app because it is easier to use than the Android SDK for hobby projects. - How do I pair the Bluetooth module with my phone?
Pair your Android Bluetooth to the HC-05 module and enter the default password 1234 when prompted. - What baud rate should I select for the serial connection?
You must select the appropriate baud rate of 9600 when checking data on the serial monitor of the Arduino IDE. - How do I verify that the HC-05 module is connected?
The LED on the Bluetooth module will blink just twice after some delay once it is successfully connected via the smartphone. - What is the best way to assemble the circuit?
Assemble the circuit on the provided single-side PCB pattern to minimize time and assembly errors.
