Summary of Vibration Motor Foam Speaker Using Arduino
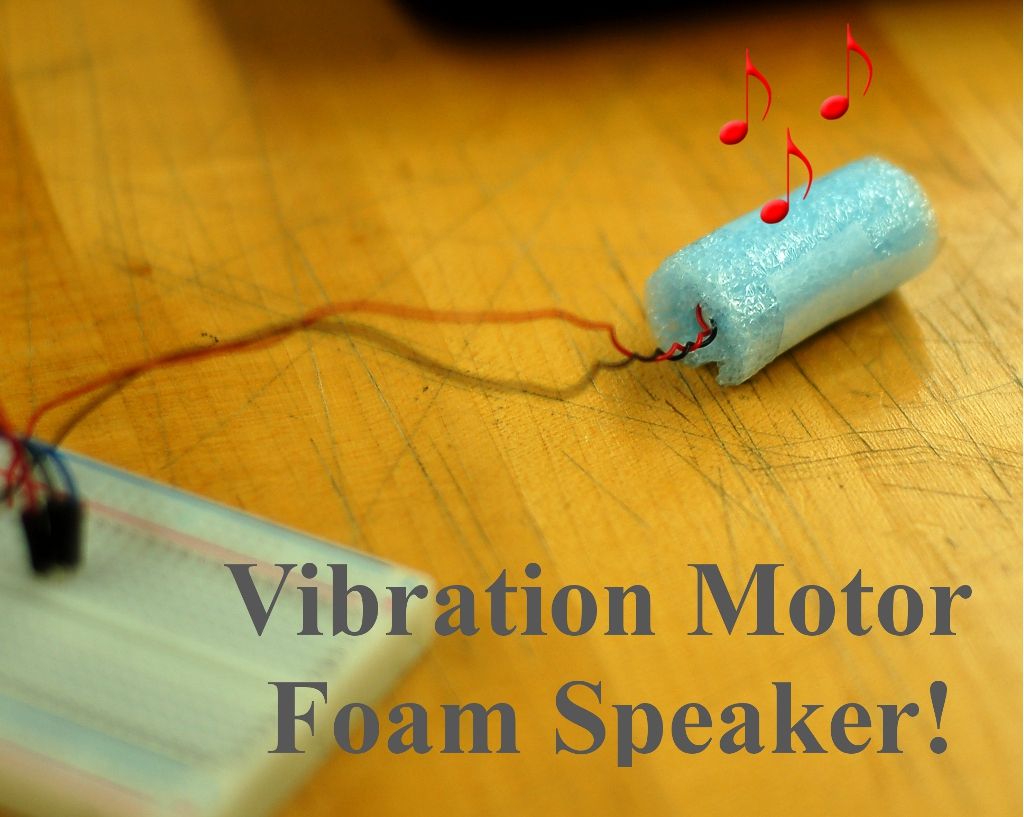
This article describes a DIY project to build a simple speaker using an Arduino and a vibration motor. Instead of a traditional speaker, the motor's vibrations are transferred to a piece of foam. The foam's air pockets compress to create sound waves, effectively turning the assembly into a makeshift audio device that plays melodies like Star Wars or Mario themes.
Parts used in the Vibration Motor Foam Speaker:
- Arduino (Uno)
- Jumper wires
- Vibration Motor
- LED
- 1" x 3" Foam
- Small piece of scotch tape
- Breadboard
Concept: Very simple, using an Arduino and the play melody basic program, create a music playing speaker out of a vibration motor and a piece of flexible foam. Instead of pulsing signal to a speaker, signal is pulsed to a motor varying how fast it can spin and when it spins.
Science behind it (this might not be super correct but it is my basic understanding of how it works): As the motor vibrates (uses an imbalanced shaft) it transfer the kinetic energy into the foam which has many air pockets throughout its structure. As the foam absorbs all this kinetic energy into all the air pockets it spreads out the rough vibrations throughout into little air vibrations everywhere within the foam and smoothing it out. All the air pockets now vibrate at the same frequency and each acts as a small speaker using compression of air to produce sound. Think of it like a 100 little piezo speakers all playing the same song tied together on a hammock, this is essentially what the foam is, lots of little air pockets connected on a web which allows many of them to vibrate almost independently.
Tools Required:
Scissors
Materials Required:
Arduino (uno used for this) and jumper wires
Vibration Motor (Radio Shack http://www.radioshack.com/product/index.jsp?productId=2914700)
LED (not necessary but fun)
1″ x 3″ of Foam (can try many different materials here) (http://tinyurl.com/9b6cohq)
Small piece of scotch tape
Step 1: Wrap vibration motor with foam
Step 2:
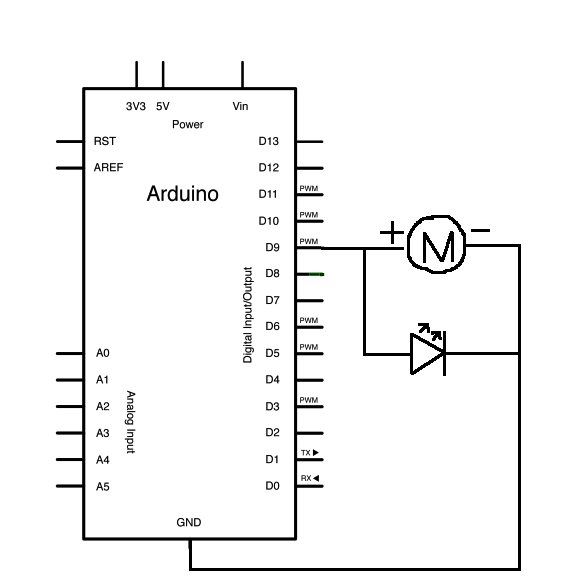
The motor and LED are wired in parallel so they receive the same outputs from the Arduino for the music. Pin 9 on the Arduino is what outputs the music signal so that will be the lead to the positive for the LED and motor. Both the negative leads on the LED and motor will goto ground. Plug in the components into a breadboard (or wired together directly if desired) following the pictures and schematics.*Note: Depending on what LED is used, a resistor may be needed (but will probably not burn out without it)
Wiring diagram courtesy of Arduino example projects (Great resource, check it out!) http://arduino.cc/en/Tutorial/Tone
Step 3: Upload code and play vibrational music!
Last step is to upload the code (currently has Star Wars theme and Mario themes, remove commenting on the mario theme and comment out the Star Wars theme to play different melodies).
For more detail: Vibration Motor Foam Speaker Using Arduino
- How does the foam produce sound?
The motor transfers kinetic energy to the foam, causing its air pockets to vibrate at the same frequency and compress air to produce sound. - Can I use different types of foam for this project?
Yes, you can try many different materials, but the example uses a 1 by 3 inch piece of blue foam. - Which Arduino pin outputs the music signal?
Pin 9 on the Arduino is used to output the music signal to the motor and LED. - Do the motor and LED need to be wired in series?
No, the motor and LED are wired in parallel so they receive the same outputs from the Arduino. - Is a resistor required for the LED?
A resistor may be needed depending on the LED used, though it will probably not burn out without one. - How do I change the melody being played?
You must remove commenting on the desired theme code, such as the Mario theme, and comment out the current theme like Star Wars. - What tools are required to assemble the project?
The only tool explicitly listed as required is scissors to cut the foam.