Summary of Vacuum form an Arduino/Electronics Enclosure
This article describes using a vacuum forming machine to create custom plastic enclosures for Arduino or standalone electronics projects. It covers selecting or making a mold, heating and vacuum forming plastic sheets over the mold, and cutting and finishing the formed parts. The guide suggests making two pieces (a base and a lid) for a closing enclosure and provides tips for adjusting heating times and shapes to avoid sticking. The process is demonstrated at the Tech Shop facility, but can be adapted for DIY vacuum formers.
Parts used in the Vacuum Form Arduino/Electronics Enclosure:
- Material to vacuum form (acrylic, PVC, PET-G, styrene, etc.)
- A mold or plug (wood, foam, rubber, box, Tupperware, or similar)
- Vacuum forming machine
- Hot glue
- Strong snips, hacksaw, or razorblade (for cutting)
- File or sander (for finishing edges)
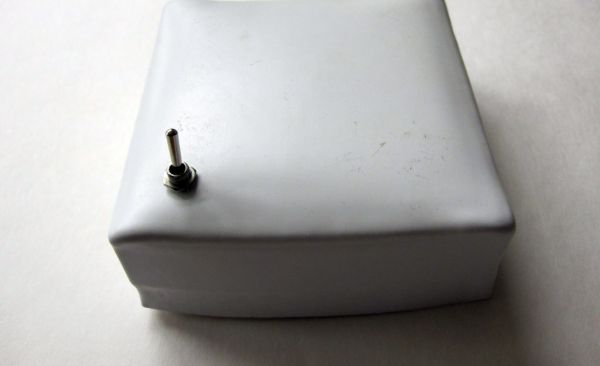
- On/off switch
- Drill or drill press with bit matching switch thread size
- Rubber (optional)
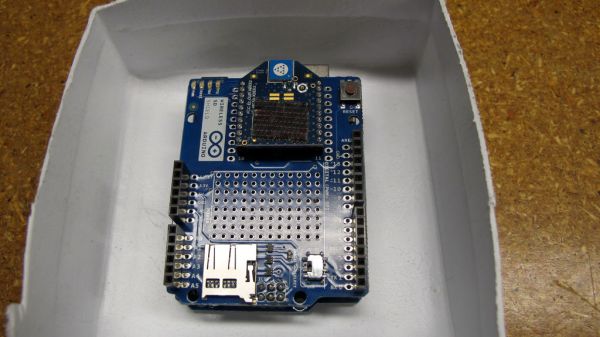
If you have access to a vacuum former, or have constructed a DIY one to use, simply vacuum form a compact case to house your standalone electronics or Arduino project.
I made this at techshop! www.techshop.ws
Step 1: Bill of materials
Material to vacuum form (acrylic, pvc, pet-g, styrene…)
a mold (make one from wood, foam, rubber or whatever you want, but more easily and quickly, find a box, a tupperware, piece of wood, or anything that is around the size of your electronics.
a vacuum form machine
hot glue
strong snips, a hacksaw, or a razorblade depending on the thickness of your material
a file or sander
an on/off switch
a drill or drill press with a bit the size of your switch’s threads
rubber optional
Step 2: Make the vacuum form
once you have a mold or plug for the object, and you have the material you want the box to be made of, Vacuum form it!
here’s how:
NOTE: I am using the Vacuum Form at Tech Shop San Francisco. Models may vary. Also, there are specifications for the mold or plug that are worth practicing to get aware of (ie totally vertical walls will most likely cause the mold to get stuck. A small angle is preferable)
-Turn the Vacuum Forming machine on. Turn the left most knob, heating the center, to about 4 and turn the knob to the right of that one to about level 4, to heat around the edges. Depending on the size of the objects and materials you are using, you might need to turn some of the outer heaters on. Wait for about 20 minutes for it to warm up.
After this time…
-Place the object on the table of the vacuum form. Rotating the large pivoting arm on the side of the machine, bring the vacuum table all the way down.
-Put your material in the tray, and clamp it down.
-Set your timer to about 180 seconds.
-Bring the heater forwards all the way to cover the tray. This activates the timer and it will count down.
-Look at your material. It should heat up and eventually droop down evenly.
-Once it is drooping a few inches down, or about 1/2 the height of your mold, push the heater back, pull the large arm forwards, raising your object, then press MOULD (green button)
NOTE: You might need to heat for a second round if your timer runs out but the material drooping hasn’t happened yet
-Once the material is formed around the mold, press RELEASE.
Step 3: Take your mold out
Extract your mold from the material. If it is tough, try using a pliers, or a burst of air. Or knock it against the table.
Then do the whole last step (vacuum forming ) again, for the top of the box. I used a more flexible material and then I was able to slip one side of the box into the other side, to form a closing enclosure. But, you can get creative here: One way to do this is adhere a piece of fabric or tape to the mold where the lip is, for the second vacuum form, so the size will be slightly larger, just fitting over the lip. Another way is to form them both the same size then adhere a lip over one edge
Step 4: Cut your material
For a thicker piece, I used a combination of a hacksaw (with my piece clamped) and a heavy-duty snips. For the thinner piece, a razorblade worked well.
Cut out the box shape from your material.
Sand or file the edges.
a mold (make one from wood, foam, rubber or whatever you want, but more easily and quickly, find a box, a tupperware, piece of wood, or anything that is around the size of your electronics.
a vacuum form machine
hot glue
strong snips, a hacksaw, or a razorblade depending on the thickness of your material
a file or sander
an on/off switch
a drill or drill press with a bit the size of your switch’s threads
rubber optional
For more detail: Vacuum form an Arduino/Electronics Enclosure