
Summary of VACUUM CHAMBER GETS AUTOMATION
Nick Poole automated a three-stage vacuum system for building custom vacuum tubes using an Arduino Pro. The setup separates rough, high, and evac sections with high-vacuum valves, uses two pumps, pressure instrumentation, addressable LEDs, and mechanical keyboard switches (including an emergency stop). The Arduino monitors pressures via ADCs and controls valves/switches to sequence operations safely, reduce human error, and respond quickly to hazardous conditions. The control hardware is mounted in a 19-inch rack with custom faceplates.
Parts used in the Vacuum Tube Vacuum System:
- Arduino Pro
- Two vacuum pumps (rough vacuum pump and high vacuum pump)
- High-vacuum valves separating three sections
- Pressure sensors / instrumentation (multiple ADC inputs)
- 19-inch equipment rack
- Custom faceplates
- Addressable LEDs for status indication
- Mechanical keyboard switches (including emergency stop)
- Evac port for connecting tubes
- Digital I/O for valve and switch control
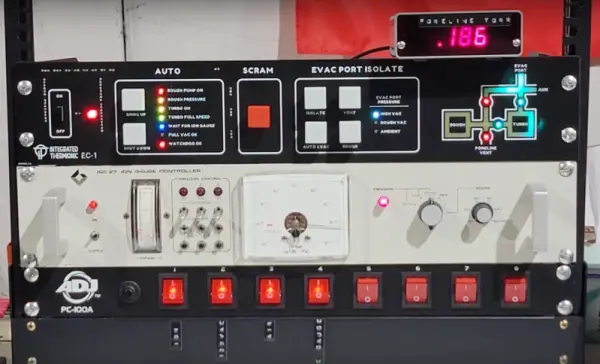
The vacuum system that [Nick] uses involves three sections separated by high-vacuum valves in order to achieve the pressures required for vacuum tube construction. There’s a rough vacuum section driven by one pump, a high vacuum section driven by a second pump, and a third section called the evac port where the tube is connected. Each second must be prepared properly before the next section can be engaged or disengaged. An Arduino Pro is tasked with all of this, chosen for its large amount of ADC inputs for the instrumentation monitoring the pressures in each section, as well as the digital I/O to control the valves and switches on the system.
The control system is built into a 19-inch equipment rack with custom faceplates which outline the operation of the vacuum system. A set of addressable LEDs provide the status of the various parts of the system, and mechanical keyboard switches are used to control everything, including one which functions as an emergency stop. The automation provided by the Arduino reduces the chances for any mistakes to be caused by human error, allows the human operator to focus on other tasks like forming the glass, and can also react much faster to any potentially damaging situations such as the high-pressure pump being exposed to atmospheric pressure.
As you can probably tell, [Nick] is pretty passionate about this stuff — last year he gave a talk at the Hackaday Supercon that went over all the intricacies of building one’s own vacuum tubes.
Source: VACUUM CHAMBER GETS AUTOMATION
- What sections make up the vacuum system?
The system has three sections: a rough vacuum section, a high vacuum section, and the evac port where the tube is connected. - What microcontroller is used to automate the system?
An Arduino Pro is used to automate the system. - Why was the Arduino Pro chosen?
It was chosen for its large number of ADC inputs for pressure instrumentation and its digital I/O for controlling valves and switches. - How does the system prevent operator mistakes?
Automation sequences the preparation of each section and controls valves and switches to reduce human error and allow the operator to focus on other tasks. - What safety feature responds quickly to dangerous situations?
The Arduino can react quickly to potentially damaging situations such as the high-pressure pump being exposed to atmospheric pressure. - How is user interaction handled on the control panel?
User interaction is via mechanical keyboard switches on custom faceplates mounted in a 19-inch rack, including an emergency stop switch. - How is system status displayed?
Status is provided by a set of addressable LEDs. - What purpose do the high-vacuum valves serve?
They separate the three sections so each section can reach and maintain the required pressure before engaging or disengaging the next section.
