Summary of Using switch to control Piezo speaker with Arduino
This project demonstrates controlling a piezo speaker's pitch using an Arduino and a switch button. The system cycles through three states: OFF, TONE1, and TONE2 when the button is pressed. A custom header file named "pitches.h" stores musical note frequencies as named constants to simplify coding. Users must include this file in their sketch to utilize these predefined pitches effectively.
Parts used in the Piezo Speaker Pitch Control Project:
- Piezo speaker (8 ohm)
- Switch button
- Arduino board
- pitches.h header file
In this project, we will learn how to use a speaker (peizo sounder) and use switch button to change the pitch of the sound.
Sorry about this one, you might find it a bit difficult to digest at first, and I didn’t realise it’s actually harder than it sounds. Anyway, spend some time on the code, let me know if you have problem understanding the code, or you have a better solution.
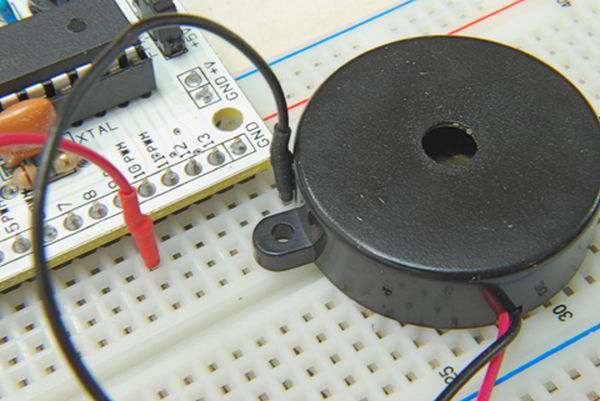
In this project, we will be using a low power speaker called Peizo speaker (around 8 ohm) that look like this:
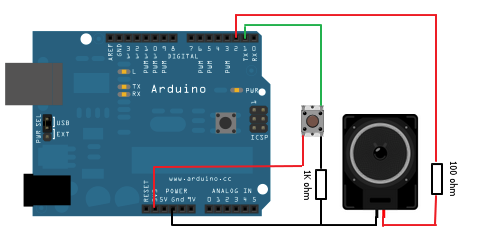
This program basically changes states as the button is pressed, between OFF, TONE1 and TONE2. This is the circuit diagram:
One thing we need to aware of in this project before we do any programming, is that, we will need to create a header file to store all the pitches as sensible names that we can use directly. Let’s create a new tap in the Arduino programming software:
And name it as “pitches.h”. Copy and save the following:
| #define NOTE_B0 31 #define NOTE_C1 33 #define NOTE_CS1 35 #define NOTE_D1 37 #define NOTE_DS1 39 #define NOTE_E1 41 #define NOTE_F1 44 #define NOTE_FS1 46 #define NOTE_G1 49 #define NOTE_GS1 52 #define NOTE_A1 55 #define NOTE_AS1 58 #define NOTE_B1 62 #define NOTE_C2 65 #define NOTE_CS2 69 #define NOTE_D2 73 #define NOTE_DS2 78 #define NOTE_E2 82 #define NOTE_F2 87 #define NOTE_FS2 93 #define NOTE_G2 98 #define NOTE_GS2 104 #define NOTE_A2 110 #define NOTE_AS2 117 #define NOTE_B2 123 #define NOTE_C3 131 #define NOTE_CS3 139 #define NOTE_D3 147 #define NOTE_DS3 156 #define NOTE_E3 165 #define NOTE_F3 175 #define NOTE_FS3 185 #define NOTE_G3 196 #define NOTE_GS3 208 #define NOTE_A3 220 #define NOTE_AS3 233 #define NOTE_B3 247 #define NOTE_C4 262 #define NOTE_CS4 277 #define NOTE_D4 294 #define NOTE_DS4 311 #define NOTE_E4 330 #define NOTE_F4 349 #define NOTE_FS4 370 #define NOTE_G4 392 #define NOTE_GS4 415 #define NOTE_A4 440 #define NOTE_AS4 466 #define NOTE_B4 494 #define NOTE_C5 523 #define NOTE_CS5 554 #define NOTE_D5 587 #define NOTE_DS5 622 #define NOTE_E5 659 #define NOTE_F5 698 #define NOTE_FS5 740 #define NOTE_G5 784 #define NOTE_GS5 831 #define NOTE_A5 880 #define NOTE_AS5 932 #define NOTE_B5 988 #define NOTE_C6 1047 #define NOTE_CS6 1109 #define NOTE_D6 1175 #define NOTE_DS6 1245 #define NOTE_E6 1319 #define NOTE_F6 1397 #define NOTE_FS6 1480 #define NOTE_G6 1568 #define NOTE_GS6 1661 #define NOTE_A6 1760 #define NOTE_AS6 1865 #define NOTE_B6 1976 #define NOTE_C7 2093 #define NOTE_CS7 2217 #define NOTE_D7 2349 #define NOTE_DS7 2489 #define NOTE_E7 2637 #define NOTE_F7 2794 #define NOTE_FS7 2960 #define NOTE_G7 3136 #define NOTE_GS7 3322 #define NOTE_A7 3520 #define NOTE_AS7 3729 #define NOTE_B7 3951 #define NOTE_C8 4186 #define NOTE_CS8 4435 #define NOTE_D8 4699 #define NOTE_DS8 4978 |
Here is the code, notice we have to include the line “#include “pitches.h” to use our pitches names.
Major Components in Project
Arduino
For more detail: Using switch to control Piezo speaker with Arduino
- How does the program change sound states?
The program changes states between OFF, TONE1, and TONE2 each time the button is pressed. - What type of speaker is used in this project?
A low power piezo speaker with approximately 8 ohms resistance is used. - Why is a header file created for this project?
A header file is created to store all pitches as sensible names that can be used directly in the code. - What is the name of the custom header file?
The custom header file is named pitches.h. - How do you use the defined pitch names in the code?
You must include the line #include pitches.h to use the pitch names. - Can I modify the pitches in the header file?
The article suggests spending time on the code and finding better solutions if problems arise, implying modifications are possible. - What happens if I do not understand the code?
The author encourages users to let them know if they have problems understanding the code or have a better solution. - Does the circuit diagram show the connection details?
Yes, the article mentions a circuit diagram is provided for the project setup.