Getting started with Python and Arduino MKR1000 for secure IoT projects.
Things used in this project
Story
Arduino MKR1000 meets Python
With the last release, Zerynth officially supports Arduino MKR1000, a device specifically designed for secure IoT projects.
The MKR1000 is described as a powerful board that combines the functionality of an Arduino Zero (already supported by Zerynth) and the connectivity of a Wi-Fi Shield, with a Cryptochip for secure communication. The design also includes a Li-Po charging circuit that allows the Arduino MKR1000 to run on battery power or external 5V, charging the Li-Po battery while running on external power.
Now, programming the board in Python thanks to Zerynth Studio makes Arduino MKR1000 one of the best choices for the development of secure IoT battery-powered projects.
MKR1000 specifications
The Arduino MKR1000 is based on the Microchip ATSAMW25 SoC, that is part of the SmartConnect family of Microchip Wireless devices. In particular, the ATSAMW25 is composed of three main blocks:
- SAMD21 Cortex-M0+ 32bit low power ARM MCU
- WINC1500 low power 2.4GHz IEEE® 802.11 b/g/n Wi-Fi
- ECC508 Crypto Authentication
The main features of the board are:
- Board Power Supply (USB/VIN): 5V
- Supported Battery: Li-Po single cell, 3.7V, 700mAh minimum
- Operating Voltage: 3.3V
- Digital I/O Pins (DIO): 14
- Analog Input Pins (ADC): 7
- UARTs: 1
- SPIs: 1
- I2Cs: 1
- Flash Memory: 256 KB
- SRAM: 32 KB
- Clock Speed: 48 MHz
- Size (LxW mm): 61.5 x 25.0
Go to the dedicated page of the Zerynth Docs to get more info about this board.
Get started with Arduino MKR1000 and Python
Download and Install Zerynth Studio
First of all, of course, you have to download and install Zerynth Studio, our cross-platform IDE for embedded and IoT development. If you didn’t do it yet, download it here for free! Once you’ve installed it, open Zerynth Studio and create a Zerynth user account.
Connect and Virtualize the board
To recognize the device, Windows machines require drivers that can be downloaded from the official Arduino MKR100 page, while OSX and Linux machines will recognize the board automatically.
Once connected to a USB port, if drivers have been correctly installed, the Arduino MKR1000 board is recognized by the Zerynth Studio and listed in the Device Management Widget.
To register and virtualize the board, Arduino MKR1000 MUST be put in virtualization mode by double clicking the RST button.
Then select “Arduino MKR1000 Virtualizable” on the Device Management Widget and register the device by clicking the “Z” button.
Put again the board in virtualization mode by double clicking the RST button and create a Zerynth Virtual Machine for the device by clicking the “Z” button for the second time. Now you can virtualize the device by clicking the “Z” button for the third time. You can find more info about the virtualization process in the relative doc.
Clone the “Blink” example and uplink it to the Arduino MKR1000
Now you can start to program your Arduino MKR1000 in Python! Zerynth Studio includes a lot of examples that you can clone with just a few clicks.
Let’s start with the “Blink” example. You can find it in the “Examples Browser” panel or you can use the “Quick Search” feature, searching for “Blink”. Let’s take a look at the code in the “main.py” file. The Python script is very easy:
pinMode(LED0, OUTPUT)

# loop forever
while True:
    digitalWrite(LED0, HIGH)  # turn the LED ON by setting the voltage HIGH
    sleep(1000)               # wait for a second
    digitalWrite(LED0, LOW)   # turn the LED OFF by setting the voltage LOW
    sleep(1000)               # wait for a second
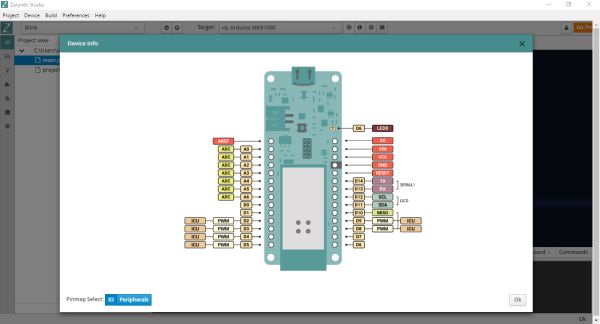
Clicking the third button of the toolbar you can get the pin map of the device. As you can see from the figure, the onboard LED is connected to the pin D6. However, Zerynth abstracts the board layout allowing to use LED0, LED1, etc as led names. In this example, LED0 is used.
Once you have cloned the example, uplink the code to your board and resetthe device by pressing the RST button when asked.
Done! Now you can see the LED of your MKR1000 turn ON and OFF thanks to a Python script running on the board!
Enabling IoT Security using Arduino MKR1000 and Zerynth
A plus of this board is its ability to access to a WiFi network through a wifi chip with SSL/TLS hardware support.
Zerynth helps you exploit this functionality in an easy and effective way: you just need to import the lib.microchip.winc1500 library in the Zerynth script!
(Of course, also root certificates must be loaded on the chip. See more here: Certificate Uploading.)
An example to simplify your job and let you get started with a few clicks is already available: just clone the “Secure HTTP” example as done for the “Blink” example and you’re almost done!
Below you can see the code. You have just to change “Network-Name” and “Wifi-Password” to match your actual network configuration. Easy, isn’t it?
################################################################################
# Zerynth Secure Sockets
################################################################################
import streams
import json
# import the wifi interface
from wireless import wifi
# import the http module
import requests
# the wifi module needs a networking driver to be loaded
# in order to control the board hardware.
# This example can be used as is with ESP32 based devices
from microchip.winc1500 import winc1500 as wifi_driver
streams.serial()
# init the wifi driver!
# The driver automatically registers itself to the wifi interface
# with the correct configuration for the selected board
wifi_driver.auto_init()
# use the wifi interface to link to the Access Point
# change network name, security and password as needed
print("Establishing Link...")
try:
   # FOR THIS EXAMPLE TO WORK, "Network-Name" AND "Wifi-Password" MUST BE SET
   # TO MATCH YOUR ACTUAL NETWORK CONFIGURATION
   wifi.link("Network-Name",wifi.WIFI_WPA2,"Wifi-Password")
except Exception as e:
   print("ooops, something wrong while linking :(", e)
   while True:
       sleep(1000)
# let's try to connect to https://www.howsmyssl.com/a/check to get some info
# on the SSL/TLS connection
# retrieve the CA certificate used to sign the howsmyssl.com certificate
cacert = __lookup(SSL_CACERT_DST_ROOT_CA_X3)
# create a SSL context to require server certificate verification
# ctx = ssl.create_ssl_context(cacert=cacert,options=ssl.CERT_REQUIRED|ssl.SERVER_AUTH)
# NOTE: if the underlying SSL driver does not support certificate validation
#       uncomment the following line!
ctx = None
for i in range(3):
   try:
       print("Trying to connect...")
       url="https://www.howsmyssl.com/a/check"
       # url resolution and http protocol handling are hidden inside the requests module
       user_agent = {"User-Agent": "curl/7.53.1", "Accept": "*/*" }
       # pass the ssl context together with the request
       response = requests.get(url,headers=user_agent,ctx=ctx)
       # if we get here, there has been no exception, exit the loop
       break
   except Exception as e:
       print(e)
try:
   # check status and print the result
   if response.status==200:
       print("Success!!")
       print("-------------")
       # it's time to parse the json response
       js = json.loads(response.content)
       # super easy!
       for k,v in js.items():
           if k=="given_cipher_suites":
               print("Supported Ciphers")
               for cipher in v:
                   print(cipher)
               print("-----")
           else:
               print(k,"::",v)
       print("-------------")
except Exception as e:
   print("ooops, something very wrong! :(",e)
This simple script connects to https://www.howsmyssl.com/a/check and displays info about the SSL/TLS connection on the serial monitor, as you can see in the figure above. Take a look at the ssl module in the standard library to spot how to expand this example.
Enabling Power Saving for battery-powered IoT devices
One of the most important challenges of battery-powered IoT devices is how to maximize the battery life.
To meet this specification, Zerynth has included the “Firmware Over-the-Air” feature within the Zerynth Virtual Machine Premium version, that also includes industrial-grade features like Power Saving and Hardware-driven Secured Firmware burned on the device at industrial volumes.
Via Zerynth Academy
Schematics


