Summary of Using the Arduino Serial Port
This tutorial explains how to use the Arduino Uno's serial communication feature via USB to send text messages to a PC. It covers setting up the Serial Monitor in the Arduino IDE, uploading a sketch that transmits "Hello, world!" every second, and utilizing this method for debugging or controlling electronics. The process requires only basic hardware and software prerequisites from previous tutorials.
Parts used in theArduino Uno Serial Communication Project:
- Arduino Uno board
- Standard USB cable
- PC with Arduino IDE software installed
- serial_tx_msg Arduino sketch
The Arduino Uno can send data (such as a text message) to the PC over the USB cable. The Arduino IDE has a serial monitor window that can be opened and will receive and display the data sent from the Arduino board. Data can also be sent to the Arduino board from the serial monitor.
This serial communication is very useful for controlling electronics that is connected to (interfaced to) the Arduino board from the PC. It can also be used to debug (find errors in) Arduino programs when writing new programs.
The following videos show what you will achieve in this tutorial.
Prerequisites
Complete tutorial 3 – Starting with Arduino before attempting this tutorial.
Components
All that is needed is an Arduino Uno board, standard USB cable and PC with the Arduino IDE software installed. You will already have these if you have completed tutorial 3.
Sending Data to PC from the Arduino
Copy the serial_tx_msg Arduino sketch below and paste it into the Arduino IDE.
/*--------------------------------------------------------------
  Program:     serial_tx_msg
               (serial transmit message)

  Description:  Sends a text message out of the serial (USB)
                port of the Arduino every second.

                Use the Arduino Serial Monitor to receive the
                message.

  Date:         3 March 2012

  Author:       W.A. Smith, http://startingelectronics.com
--------------------------------------------------------------*/

void setup() {
  Serial.begin(9600);
}

void loop() {
  Serial.println("Hello, world!");
  delay(1000);
}Compile the program by clicking the "Verify" button in the Arduino IDE. Upload the program to the Arduino board by clicking the "Upload" button.
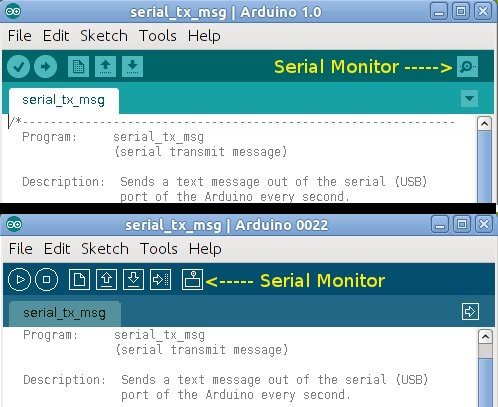
Now start the serial monitor by clicking the “Serial Monitor” button in the Arduino IDE. The figure below shows the location of the serial monitor in Arduino IDE version 1.0 (top) and Arduino IDE version 0022 (bottom).
For more detail: Using the Arduino Serial Port
- How can data be sent between the Arduino and PC?
Data is sent over the USB cable using the Arduino IDE's serial monitor window. - What is the primary use of serial communication in this context?
It is useful for controlling connected electronics and debugging Arduino programs. - Which prerequisite tutorial must be completed first?
You must complete tutorial 3 titled Starting with Arduino before attempting this one. - What baud rate is used to initialize the serial connection?
The setup function initializes the serial connection at 9600 baud. - How often does the example program send a message?
The program sends a text message out of the serial port every second. - What button is used to compile the program in the IDE?
You click the Verify button to compile the program. - What button uploads the program to the board?
You click the Upload button to transfer the program to the Arduino board. - How do you start the serial monitor?
You start it by clicking the Serial Monitor button in the Arduino IDE.