
Summary of UPGRADING AN OLD MIG WELDER WIRE FEEDER WITH ARDUINO
This article details how [Brett] upgraded an older Miller S-22A MIG welder wire feeder using an Arduino to add premium features like pre-flow, post-flow, and a spot welding timer. By replacing an expensive proprietary control unit, he improved weld quality by preventing oxygen contamination and ensuring consistent timing. The project utilized 24V circuitry, optoisolators for trigger signals, relays for outputs, and added potentiometers to the existing control panel, with all wiring neatly concealed behind it.
Parts used in the Old MIG Welder Upgrade:
- Arduino
- Miller S-22A wire feeder
- Optoisolator
- Relays
- Potentiometers
Older industrial equipment is often a great option if you’re on a budget, and you might even be able to add some premium features yourself. [Brett] from [Theoretically Practical] has done with his old MIG welder, adding premium control features with the help of an Arduino.
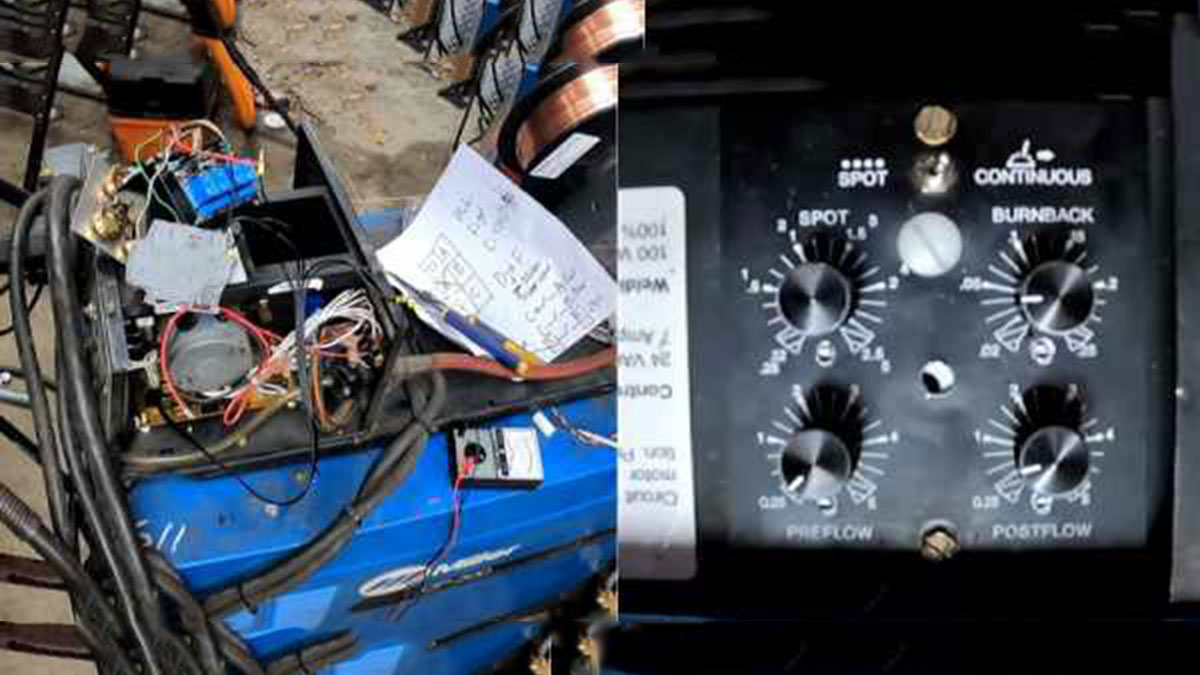
The main features [Brett] were after is pre-flow, post-flow, and a spot welding timer. Pre-flow starts the flow of shielding gas a moment before energizing the filler wire, while post-flow keeps the gas after the weld is complete. This reduces the chances of oxygen contaminating the welds. A spot welding timer automatically limits welding time, enabling consistent and repeatable spot welds.
The Miller S-22A wire feeder can have these features, but it requires an expensive and difficult to find control unit. All it does is time the activation of the relays that control the gas flow, power, and wire feeder, so [Brett] decided to use an Arduino instead. The welders control circuit runs and 24V, so an optoisolator receives the trigger signal, and relays are used for outputs. Potentiometers were added to the original control panel, and all the wiring was neatly fitted behind it. The upgrade worked perfectly and allowed [Brett] to increase the quality of his welds. See the video after the break for the full details.
Inverter welders can be picked up for ridiculously cheap prices, if you’re willing to live with the trade-offs. We’ve also seen some other DIY welder upgrades, on small and large machines.
Source: UPGRADING AN OLD MIG WELDER WIRE FEEDER WITH ARDUINO
- What features did Brett add to his old MIG welder?
Brett added pre-flow, post-flow, and a spot welding timer. - How does pre-flow improve the welding process?
Pre-flow starts shielding gas flow before energizing the filler wire to reduce oxygen contamination. - Why did Brett choose an Arduino over the original control unit?
The original control unit was expensive and difficult to find while performing the same simple relay timing functions. - What voltage does the welders control circuit run on?
The welders control circuit runs on 24V. - How are the output signals managed in this upgrade?
Relays are used for outputs to control gas flow, power, and the wire feeder. - Where were the new controls installed?
Potentiometers were added to the original control panel with wiring fitted neatly behind it. - Does this upgrade allow for consistent spot welds?
Yes, the spot welding timer automatically limits welding time for consistent and repeatable results.
