Summary of Universal Remote Using ESP8266(Wifi Controlled)
This project creates a universal Wi-Fi controlled remote using an ESP8266 NodeMCU to replace multiple household remotes. It involves decoding IR signals from existing remotes and encoding them into the ESP8266, which then transmits commands via an IR LED. Users can control devices through a web interface or an Android app by sending specific decimal codes derived from the original hex codes.
Parts used in the Universal Remote Using ESP8266:
- ESP8266 NodeMCU 1.0 (ESP-12E module)
- TSOP1738 IR receiver
- IR LED
- Transistor (BC547, 2N222, or 2N3904)
- Jumper wires
- Laptop or computer with Arduino IDE
- Android app (HTTP Request Shortcut)
This project is to replace the conventional remote control for all the home appliances like AC, TV, DVD players, music system, SMART appliances !!! Making a whole junk of remote littering around, making us puzzle!!!
This project will save us from the junk to remotes by replacing all by ONE REMOTE!
2 part of this project:
- DECODING ANY REMOTE
- ENCODING ESP8266 NODEMCU 1.0(ESP-12E module) or any esp8266 version with a ttl connection
IMPORTANT : PLEASE READ THE WHOLE PROJECT THOROUGHLY IT WILL TAKE 3MINS BUT DON’T HALF-READ AND DAMAGE YOUR PARTS…. I WILL NOT BE RESPONSIBLE!!
Step 1: Configuring Nodemcu With Arduino IDE
- First of all connect the Nodemcu (my one is lolin v3, amica and other clones will work too) with computer or laptop.
- Now install the driver of nodemcu(google search will help).
- After this open the Arduino IDE (Ofcourse you need to download it and install it)
- Click on “Tools” on Arduino toolbar
- Click on “Board“
- Select “Board Manager” and search for esp8266 install it (will take some time to finish)
- Now, select “Sketch” from arduino toolbar
- Select “Include Library” from there select “Manage libraries“
- Search for “IRremoteESP8266” and install it
Now the configuration is done only from “Tools” we need to go to “Boards” Select “NodeMcu 1.0(ESP 12-E)” or something else version of ESP8266.
Step 2: DECODING a Remote |CIRCUIT | Code
So, to make a universal remote we need to decode the other remotes i.e. to get IR hexadecimal codes emitted by each button of remotes. Just like to speak universally we need to know every language!!! OR learn English! Though I love my mother tongue Bengali the sweetest language!! REALLY it is, search it…
So components needed to decode a remote:
- Nodemcu board
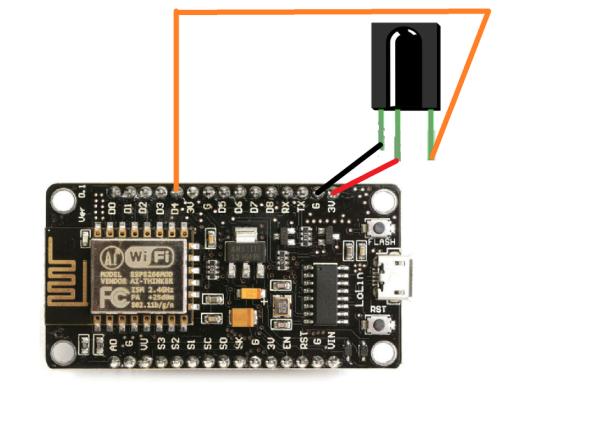
- TSOP1738 IR reciever or some other IR recievers
- jumpers
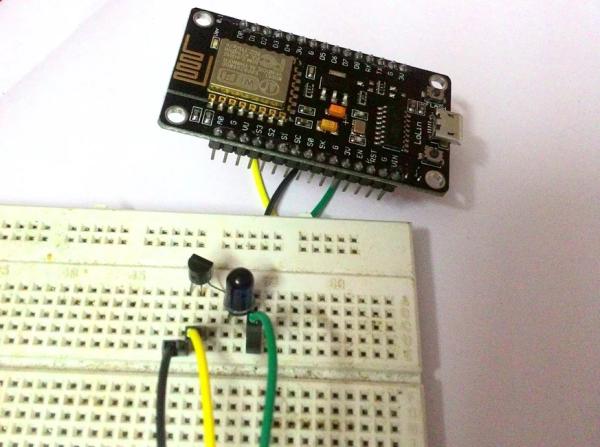
Now, follow the above circuit but after uploading the sketch to the nodemcu through Arduino.
- Open Arduino and connect the nodemcu to laptop or computer
- From “Files” select example go down and from IRremoteESP8266 select the IRrecvDump
- Upload to nodemcu
Connect the TSOP1738 to Nodemcu as the circuit and open the “serial monitor” from Arduino to see the decoded hex-code of any remote as pictures given above. Still uploading the code for reference update it as it has been long Im not wotrking on this anymore… feel free to change in github
CODE: https://github.com/abhrodeep/Arduino_projs/blob/master/IRrecvDump.ino
Step 3: Encoding Nodemcu | CIRCUIT
After decoding the remotes now it’s turn to upload the hex-codes to Nodemcu so that it can give IR led commands to emit those hex-code signals.
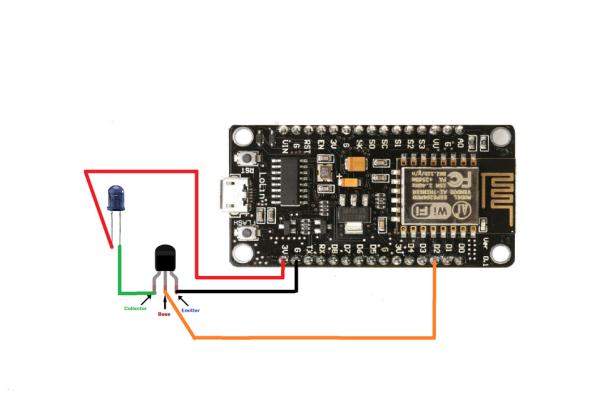
- NOTE: can’t connect IR led directly to Nodemcu cause it can’t deliver enough current.
- So need transistor moderated IR LED i.e. signal from Nodemcu goes to transistor then IR LED.
- Transistor like 2N222, 2N3904,BC547 works but
Transistor 2N222,2N3904 collector current : 600mA
Transistor BC547 collector current : 100mA
both works…
CAUTION SEE THE COLLECTOR, EMITTER, BASE TERMINALS as BC547 and 2N222 have different convention. I have used BC547 as it is easily available and works fine.
Code is taken from “IRremoteESP8266” examples “IRserver” modified accordingly as shown in picture.
circuit as shown. Please NOTE I have used BC547 transistor and NO resistance between base and D2 pin.
THE COLLECTOR, EMITTER, BASE ARE INDICATED IN PICTURE. DON’T DO THE SAME FOR OTHER TRANSISTORS.
EDITS: Credits “3615JMD”
IMPROVENTS:
May I suggest 2 improvements:
1) if one replaces : uint32_t code = strtoul(server.arg(i).c_str(), NULL, 10); by this uint32_t code = strtoul(server.arg(i).c_str(), NULL, 16); The web page accepts HEX codes directly. No need to convert manually to decimal !
2) I have improved the handler to be able to work with multiple IR formats. Nice when we want to control several devices from different brands: (more formats can be added with a switch/case)
void handleIr()
{ for (uint8_t i = 0; i < server.args(); i++) { if (server.argName(i) == “rcmm”) { // format pour la freebox uint32_t code = strtoul(server.arg(i).c_str(), NULL, 16); irsend.sendRCMM(code, 32); Serial.println(code); } else if (server.argName(i) == “rc6”) { // format pour la TV phillips uint32_t code = strtoul(server.arg(i).c_str(), NULL, 16); irsend.sendRC6(code, 20); Serial.println(code); } } handleRoot(); } The HTTP links must be modified accordingly of course : …. href=\”ir?rcmm=2400260C……. …. href=\”ir?rc6=0000C ….
Step 4: Encoding Code
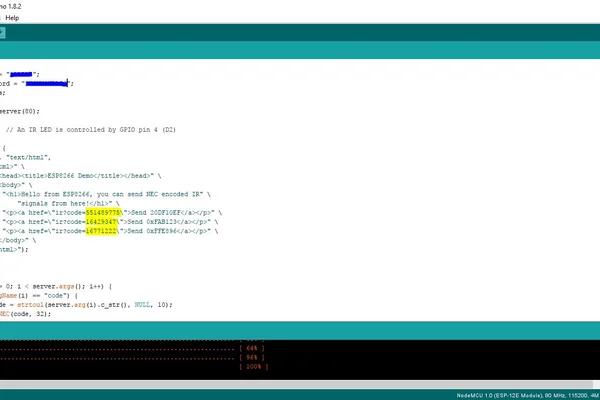
I have taken the code from examples of “IRremoteESP8266”, “IRserver”.
But there are some changes to be done your wifi credentials – Wifi ssid, Wifi password
The Web server based codes(yellow highlighted) – This codes are the decimal form of the hexadecimal IR codes. This decimal values are passed to ESP8266 as arguments converted to hex-code and transmitted to IR LED.
IMPORTANT : AFTER DECODING A REMOTE BUTTON CONVERT THE HEXADECIMAL CODE TO DECIMAL AND REPLACE IT IN THE Arduino program. Its not very hard to convert hex to decimal, search google for online hexadecimal to decimal converter.
images are self-explanatory!!! Much older code(2017), feel free to edit ..
CODE: https://github.com/abhrodeep/Arduino_projs/blob/master/IRremoteESP.ino
Step 5: CONTROLLING
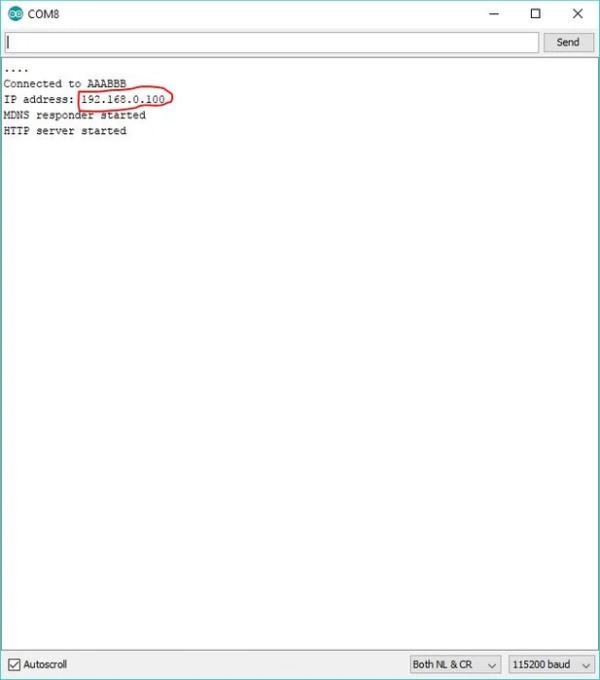
We can control it through the web server links… the IP of ESP8266 module on our router can be known by opening the serial monitor just after uploading the code. As in picture mine is 192.168.0.1
On opening this IP in any browser of mobile or laptop we can see the page as shown in picture.
OR ELSE FOR CONVENIENCE and simplicity we can use a android app…
“HTTP REQUEST SHORTCUT” app and do write the address to easily execute the code. As in picture, we can add widget on home screen to easily access the virtual buttons and get the necessary remote buttons.
Pictures are self explanatory.
SO WITHOUT WRITING IN THE PROGRAM WE CAN PASS THE ARGUMENT “CODE” WITH DECIMAL OF THE HEXADECIMAL CODE EXTRACTED FROM DECODING REMOTES DIRECTLY IN THE WIDGET.
IMPORTANT : PLEASE READ THE WHOLE PROJECT THOROUGHLY IT WILL TAKE 3MINS BUT DON’T HALF-READ AND DAMAGE YOUR PARTS…. I WILL NOT BE RESPONSIBLE!!
Step 6: Project Packed GIF!!!
If you like this make this project your favorite and encourage to do next project like internet controlled home automation… or something better!!!
Thanks a lot enjoy a remote-free life!!!
Source: Universal Remote Using ESP8266(Wifi Controlled)
- How do I configure the NodeMCU with Arduino IDE?
Install the driver, add the esp8266 board manager, install the IRremoteESP8266 library, and select the NodeMCU 1.0 board. - Can I connect the IR LED directly to the NodeMCU?
No, you cannot connect it directly because the NodeMCU cannot deliver enough current; a transistor is required. - Which transistors work for this circuit?
Transistors like 2N222, 2N3904, or BC547 work, but you must check their collector, emitter, and base terminals carefully. - How do I get the hexadecimal codes from my existing remotes?
Connect the TSOP1738 to the NodeMCU, upload the IRrecvDump sketch, and view the decoded hex-code in the serial monitor. - What format should the IR codes be in when uploading to the program?
You must convert the hexadecimal code to decimal before replacing it in the Arduino program. - How can I find the IP address of the ESP8266 module?
Open the serial monitor just after uploading the code to see the IP address assigned by your router. - Can I use an Android app to control the remote?
Yes, you can use the HTTP Request Shortcut app to create widgets that send the necessary decimal codes. - Does the improved code support multiple IR formats?
Yes, improvements allow the handler to work with multiple formats like RCMM and RC6 by modifying the server arguments.