Summary of Ultra Realistic Surfing Simulator
This article details the construction of an Ultra Realistic Surfing Simulator, a two-part system allowing users to surf indoors. Developed by Lena Strobel, Gabriel Rihaczek, and Guillaume Caussarieu for an ITECH masters seminar, it uses a motion-sensing board connected wirelessly to a wave diorama. The device translates physical movements into simulated ocean waves using servomotors, water, and baby oil within a plexiglas box, providing a realistic surfing experience without needing natural water bodies.
Parts used in the Ultra Realistic Surfing Simulator:
- 2x Arduino Board (Arduino Uno)
- 2x Batteries 9V
- 1x Servomotor (e.g., ServoMotox Reely Standard-Servo S-0090)
- 1x 3 axis digital acceleration sensor module - MMA8452
- 2x NRF24L01 Transceiver Module
- 6/7.5V Power Supply
- 2x 5.1kΩ resistor
- 1x Breadboard
- Jumper wires
- 2x Plexiglas sheets 250x500x3mm
- 1x Plexiglas sheet 250x500x2mm
- 20mm Plywood board
- 4x M3x15mm Bolts
- 8x M3 Nuts
- 1x Ø8x20mm Aluminium sleeve
- 1x M6x50mm Bolt + 2xM6 Nuts
- Ø3x50mm threaded rod
- 2x Ø8/4mm washers
- Ø5x50mm wood screws
- Blue Water colorant
- 1l of transparent baby oil
- 1x Tube Acrifix 1R 0192 or clear waterproof acrylic glue
- Transparent silicon
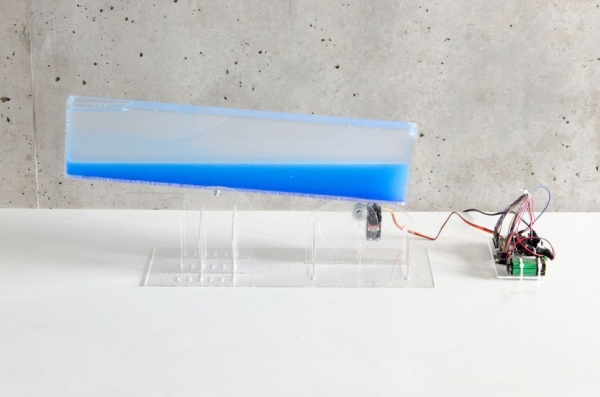
Do you feel a sudden urge of going surfing, but there is no large body of water nearby? Are you scared of deep and turbulent waters? Or are you just to lazy to go outside? Then the Ultra Realistic Surfing Simulator is the perfect solution for you! It allows for a close to reality surfing experience from any place imaginable. As a two part system, motion is sensed by a board and translated into wave motions of an ocean diorama.
Project by:
Lena Strobel, Gabriel Rihaczek, Guillaume Caussarieu
The project was conducted as part of the Computational Design and Digital fabrication seminar in the ITECH masters program.
Step 1: Materials
To build a Ultra Realistic Surfing Simulator, you will need the following supplies :
Electronics:
- 2x Arduino Board (Arduino Uno)
- 2x Batteries 9V
- 1x Servomotor, e.g. ServoMotox Reely Standard-Servo S-0090 (88/98N.cm)
- 1x 3 axis digital acceleration sensor module – MMA8452
- 2x NRF24L01 Transceiver Module
- 6/7.5V Power Supply, e.g. Voltcraft USPS-1000
- 2x 5.1kΩ resistor
- 1x Breadboard
- Jumper wires
Hardware:
- 2x Plexiglas sheets 250x500x3mm, e.g. Evonik
- 1x Plexiglas sheets 250x500x2mm, e.g. Evonik
- 20mm Plywood board (91*21cm + 2x 91*11cm)
- 4x M3x15mm Bolts
- 8x M3 Nuts
- 1x Ø8x20mm Aluminium sleeve (1mm thick)
- 1x M6x50mm Bolt + 2xM6 Nuts
- Ø3x50mm threaded rod
- 2x Ø8/4mm washers
- Ø5x50mm wood screws
- Blue Water colorant
- 1l of transparent baby oil
- 1x Tube Acrifix 1R 0192 (or other clear and waterproof acrylic glue)
- Transparent silicon
Tools:
- Plyers, Screwdriver, Power Drill, Laser Cutter, Wood band saw or CNC mill, 60ml syringe
Step 2: Assembly of Plywood Surfboard
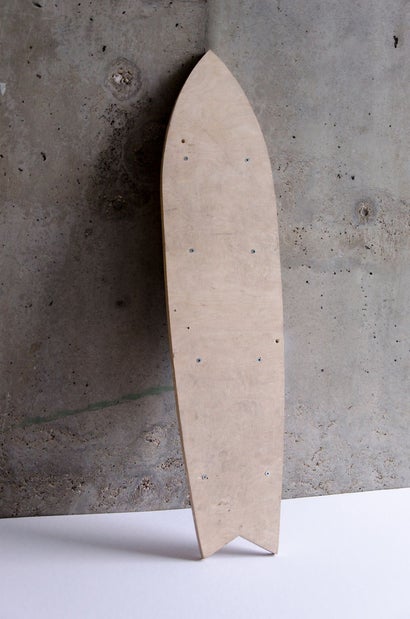
For cutting out the surfboard we used a band saw as we didn’t have access to a cnc mill. We traced the outline of the board onto the wood by using a paper stencil. The surfboard can be assembled by glueing and/ or screwing it together.
Step 3: Laser Cutting Diorama
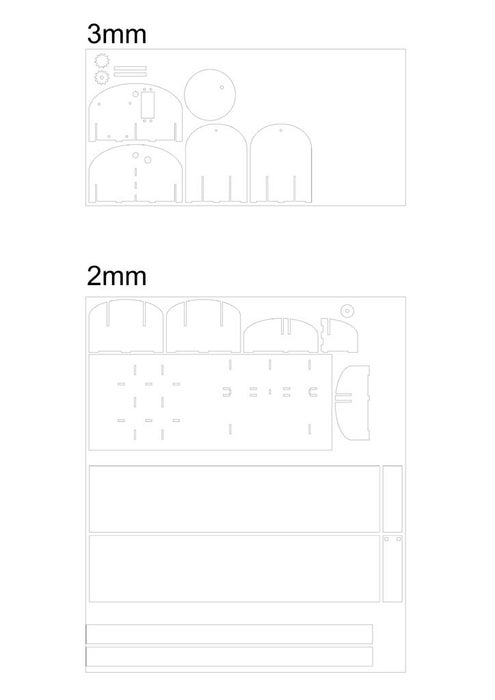
Use the following dxf file to cut the parts with a laser cutting router.
One part of the file has to be cut from 3mm plexiglas, the other one from 2mm plexiglas.
Use a good grade plexiglas. Experience has shown that poor quality plexiglas tends to get blurry when it gets in contact with Acrylic glue.
Step 4: Assembly of Diorama
To assemble the diorama :
- Start with the bottom plate and then add the 2 short sides. Wait 5min for the glue to start curing.
- Add the 2 long sides and then wait again for at least 15min for the glue to cure.
- Seal all edges from the inside. Go slowly, do one edge at the time and let the glue cure (~15min for each edge. This will prevent the glue to slide on your plexiglas as you seal the other edges.)
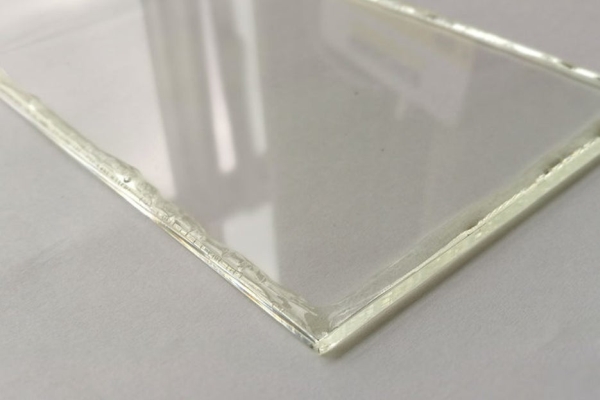
- Place the top plate on the table and pour glue in regions where the box is going to be in contact (As you are not going to be able to seal it from the inside afterwards, see photo)
- Let the whole box cure at least 30min in direct light (for UV curing glue)
- Fill the box carefully with water only, using the syringe. Check for any leaks. If it is leaking, empty the box, and add more glue or silicon on the edges. Redo this step until you achieve a proper waterproofing (Even if it takes time, it’s much easier to clean water than baby oil later on… Trust us!)
Some interesting tips can also be found here :
http://www.waynesthisandthat.com/How%20To%20Build%…
Step 5: Filling Diorama With Water and Oil
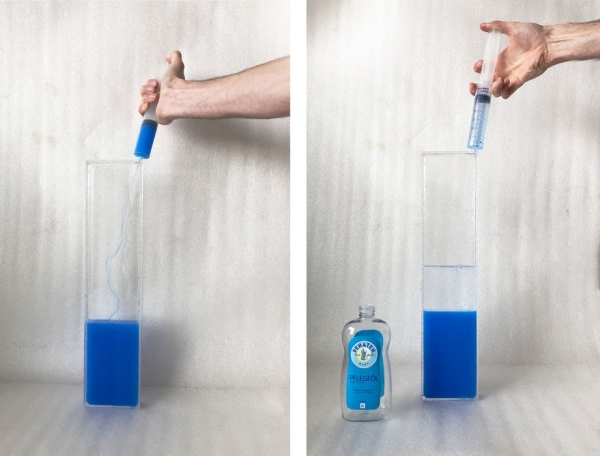
Now that your box is waterproof (is it really?) :
- Mix your water with the blue water colorant.
- Fill around 1/3 of the box with coloured water using the syringe.
- Fill the box to the very top with oil
- Wait for any air bubbles to disappear.
- When all bubbles are gone, make sure that the box is perfectly filled
- Clean the outer box with liquid dish cleaner
- Seal the two holes with transparent silicon
Step 6: Assembly of Diorama Base and Surfboard
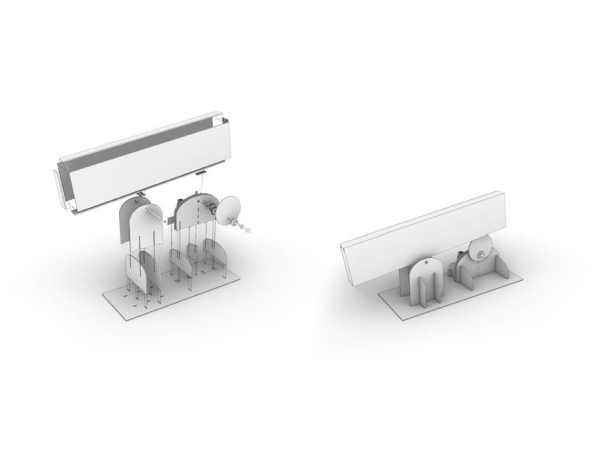
We designed a plug-in board underneath the wave box, in order to elevate the system. Supports can be plugged into the base plate in x and y direction to carry the wave box and the motor. The base can be assembled according to the pictures from the previosly cut plexiglass, gears, bolts, washers, nuts, aluminium sleeve and the servomotor. Make sure to stagger the gears and transfer the load of the water-filled box not directly on the servo-motor. The wavebox is not firmly attached to the base. It lies on an aluminium bolt (the tilt axis of the whole construction) and is only held in place by narrow plexi slices. The tilt axis of the construction is arranged asymmetrically in order to guide its movement and to prevent the box from falling down.
Step 7: Wiring
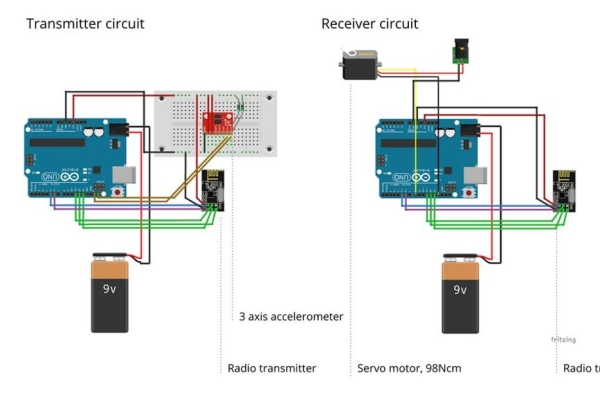
The wiring plan is shown in the image. Two circuits have to be created, one transmitter circuit for the board and one receiver circuit for the diorama.
The setup can work with a single arduino board by using a wire instead of a radio transmitter as a connection between the board and the diorama.
Source: Ultra Realistic Surfing Simulator
- How does the simulator translate user movement?
Motion is sensed by a board and translated into wave motions of an ocean diorama. - What materials are required for the plywood surfboard?
A 20mm Plywood board is used, which can be cut with a band saw or CNC mill. - Can the project work without radio transceivers?
Yes, the setup can work with a single arduino board by using a wire instead of a radio transmitter. - How should the plexiglas diorama be sealed to prevent leaks?
Seal all edges from the inside slowly, letting each edge cure for about 15 minutes before moving to the next. - What liquids fill the diorama box?
The box is filled with blue-colored water occupying about one-third of the space and transparent baby oil filling the rest to the top. - Why is the tilt axis arranged asymmetrically?
The asymmetric arrangement guides the movement and prevents the box from falling down. - What type of glue is recommended for plexiglas assembly?
Clear and waterproof acrylic glue like Acrifix 1R 0192 is recommended to avoid blurriness. - How long must the glued box cure in direct light?
The whole box must cure for at least 30 minutes in direct light if using UV curing glue.