Summary of The Ultimate FM Transmitter (Long Range Spybug)
This article provides a detailed tutorial on building a simple and compact FM transmitter with a range of up to 1/4 mile, suitable for room monitoring, baby listening, and nature research. The guide includes a PCB layout, schematic, and step-by-step instructions from gathering parts to assembling the device. The transmitter operates on a 9V battery and covers adjustable frequencies between 87-108MHz. It’s ideal for electronics beginners and emphasizes safe and legal use.
Parts used in the Foolproof FM Transmitter Project:
- Copper Clad PCB/ Perfboard
- Solid Gauge #18 Wire
- Electret Microphone
- ¼" Bolt
- 2N3904 General NPN Transistor (2x)
- 15pF or 40pF Trimmer Capacitor
- 100nF Ceramic Capacitor (2x)
- 10nF Ceramic Capacitor
- 4pF Ceramic Capacitor
- 1M Ohm ¼w Resistor
- 100K Ohm ¼w Resistor
- 10K Ohm ¼w Resistor (3x)
- 1K Ohm ¼w Resistor
- 100 Ohm ¼w Resistor
- A Pair Of Pliers
- Soldering Iron
- Hot Glue Gun
Have you ever wanted to broadcast your own radio station within your neighborhood? Ever get curious on where people get those “Surveillance Bugs” from spy and action movies? This small and simple FM transmitter is the toy that geeks have always wanted.
FM transmitters can be complicated to build, that’s why I’m teaching you how to make a foolproof FM transmitter. There’s no need to buy kits, this tutorial includes the PCB layout and the schematics. It has a range of up to 1/4 mile or more. It’s great for room monitoring, baby listening and nature research.
My Experience:
FM transmitters remind me of my early years in electronics. When I was 8, I came across Art Swan’s FM transmitter circuit. At the time I had no idea of where I’m supposed to buy the parts, so I recycled mine out of junk. I guess the biggest struggle that you’re going to face is finding a trimmer capacitor. I’ll give some tips on the last step of this instructable. In a nutshell, I highly recommend this project for everyone and also those who are still new in electronics.
Technical Specifications:
– 1/4 Mile Radius Range
-Powered By A 9V Battery
– Lasts For Several Days
– Adjustable 87-108MHz
Please Watch: Celebrating the 1st episode of my new YouTube channel! It’s my first time to document a project with videography. I hope you guys enjoy the vid! Please leave a comment below, I would appreciate some advise regarding the video.
Disclaimer: This project is for educational purposes only and is not intended to air/ interfere with present radio channels. Neither site nor I, am liable for careless actions. Please check for the legality before attempting the project within your area.
Step 1: Gather The Parts
All of these are available on any branch of RadioShack! 🙂
MISC:
– Copper Clad PCB/ Perfboard
– Solid Gauge # 18 Wire
– Electret Microphone
– ¼” Bolt
Transistors:
– 2N3904 General NPN Transistor (2x)
Capacitors:
– 15pF or 40pF Trimmer Capacitor
– 100nF Ceramic Capacitor (2x)
– 10nF Ceramic Capacitor
– 4pF Ceramic Capacitor
Resistors:
– 1M Ohm ¼w Resistor
– 100K Ohm ¼w Resistor
– 10K Ohm ¼w Resistor (3x)
– 1K Ohm ¼w Resistor
– 100 Ohm ¼w Resistor
Tools:
– A Pair Of Pliers
– Soldering Iron
– Hot Glue Gun
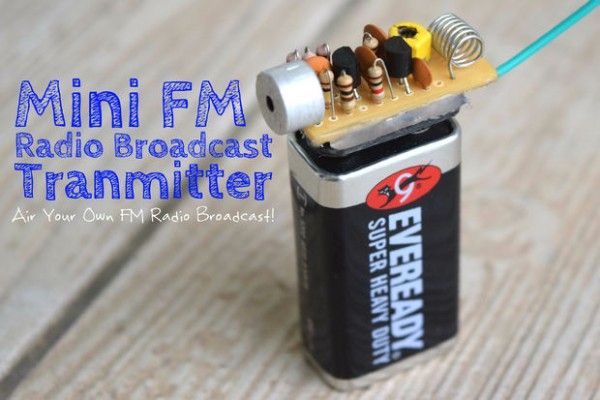
Step 2: PCB & Schematics
I designed a compact PCB layout for Art Swan’s miniature FM transmitter circuit using Fritzing. Use this step as your reference for the assembly.
About The Circuit: These is the exact description of Art Swan, the circuit’s Author, “This miniature transmitter is easy to construct and can be picked up on any standard FM receiver. It has a range of up to 1/4 mile or more. It’s great for room monitoring, baby listening and nature research”
Step 3: Print The PCB Layout
Download the PDF file then print it with your printer’s standard setting then cut the printed layout. Be careful when cutting, the tip of my thumb got sliced by the sharp cutter blade.
Step 4: Develop The PCB
I’m using something what’s called presensitized PCB fabrication, it’s different from the toner transfer method. If you’re not familiar with presensitized PCBs, better go with the toner transfer method.
Presensitized PCBs: I expose mine directly to a 10W fluorescent lamp for 5:20 minutes then use a dilute solution of Sodium Hydroxide to develop the exposed PCB.
Here’s a separate tutorial for the PCB fabrication:
Step 5: Etch The PCB
Pour Ferric Chloride on a plastic tray then start to etch the PCB.
Step 6: Clean The PCB
Use a swab and Acetone to remove the photo-positive layer/ toner.
Step 7: Solder The Components
Use step #2 as your reference. Solder the smaller parts first. Start with the resistors, the capacitors, the transistors, the coil, the antenna then the 9V cattery clip.
Step 8: Construct The Coil
Strip a solid gauge #18 wire. Use a 1/4″ bolt then turn the wire 7-8 times.
Step 9: Adding The Antenna
Solder a hook-up wire to the antenna pin, it’s located on the 2nd transistor’s collector pin. Use a maximum of 8 inches an a minimum of 5 inches.
Step 10: Recycle A Battery Clip
The key to this compact transmitter is the ingenious battery clip.You can get one by dismantling an scrap 9v battery.
For more detail: The Ultimate FM Transmitter (Long Range Spybug)