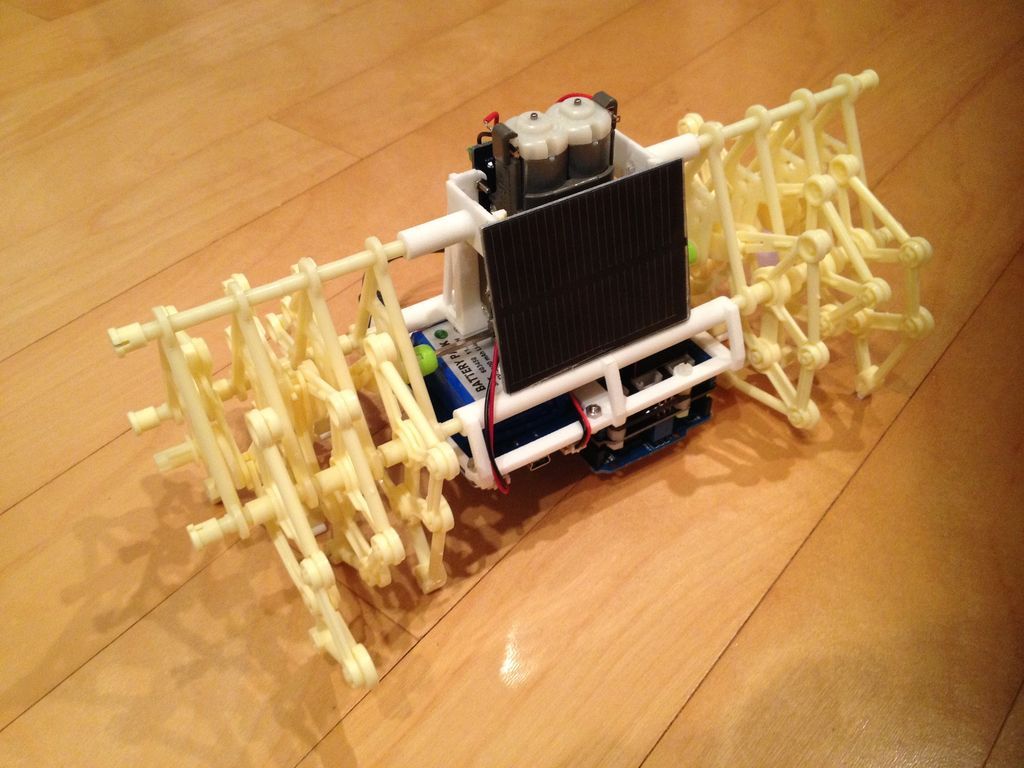
Summary of Strandbot – a solar & arduino powered R/C motorized Strandbeest
The Strandbot is a DIY, Arduino-powered upgrade to Theo Jansen's wind-driven Strandbeest. Designed for indoor use where wind is scarce, it utilizes solar energy and an Apple Remote for control. The project involves modifying a split Strandbeest with a motorized gearbox, GROVE electronics, and a Li-Po battery system. It can be assembled in approximately 30 minutes, offering a flexible platform that remains easy to disassemble or revert to its original form.
Parts used in the Strandbot:
- 1 Strandbeest, split in half
- 1 Strandbot body
- 2 Drive shaft couplers
- 1 Tamiya Dual Motor Gear Box
- 1 Arduino Uno R3
- 1 GROVE Base Shield v1.3
- 1 GROVE LiPo Rider Pro
- 1 GROVE i2c Motor Driver
- 1 GROVE Infrared Receiver
- 2 GROVE cables (5 cm)
- 1 Solar Panel (0.5 W measuring 55x70 cm)
- 1 LiPo Battery Pack (3 Ahr at 3.7V)
- 1 Battery (9 V)
- 1 Battery terminal with +/- leads
- 3 M3 x 6 mm nylon spacers
- 3 M3 x 6 mm nylon machine screws
- 4 M2.6 x 10 mm machine screws with nuts
- 4 M2 x 10 mm machine screws with washers and nuts
- 2 M2 x 5 mm machine screws
- 6 pieces of aluminum wire (100 mm length x 2 mm diameter)
- 1 USB cable (A to B, 15 cm length)
- 1 Apple remote
- Screwdrivers
The Strandbot is a DIY upgrade for the Strandbeest originally designed by Theo Jansen. Strandbeests are amazing mechanical creatures that are able to move on their own using just a little bit of wind power. Unfortunately my tiny apartment is short on wind, so I decided to upgrade a miniature Strandbeest using an Arduino and some motors. The brain is powered by a solar-charged Li-Po battery so the Strandbot will live on as long as it can find some sunlight. The motors are remote controlled using an Apple Remote, or with a tiny bit of coding you can make it work with just about any IR remote transmitting at 38 kHz.
The Strandbot can be built in about 30 minutes and requires the following ingredients:
1 Strandbeest, split in half (http://tinyurl.com/7qqs8op)
1 Strandbot body (http://shpws.me/ohXz)
2 Drive shaft couplers (http://shpws.me/oufQ)
1 Tamiya Dual Motor Gear Box (http://tinyurl.com/mp9gzcq)
1 Arduino Uno R3 (http://tinyurl.com/q3zteg6)
1 GROVE Base Shield v1.3 (http://tinyurl.com/ok4k2zo)
1 GROVE LiPo Rider Pro (http://tinyurl.com/pwwxba2)
1 GROVE i2c Motor Driver (http://tinyurl.com/q4jospz)
1 GROVE Infrared Receiver (http://tinyurl.com/qf5tjtl)
2 GROVE cables (5 cm) (http://tinyurl.com/lxz8cwl)
1 Solar Panel (0.5 W measuring 55×70 cm) (http://tinyurl.com/pdjksu9)
1 LiPo Battery Pack (3 Ahr at 3.7V) (http://tinyurl.com/pysmpml)
1 Battery (9 V)
1 Battery terminal with +/- leads
3 M3 x 6 mm nylon spacers
3 M3 x 6 mm nylon machine screws
4 M2.6 x 10 mm machine screws with nuts
4 M2 x 10 mm machine screws with washers and nuts
2 M2 x 5 mm machine screws
6 pieces of aluminum wire (100 mm length x 2 mm diameter)
1 USB cable (A to B, 15 cm length)
1 Apple remote
Screwdrivers
Step 1: Prepare the GROVE Base Shield
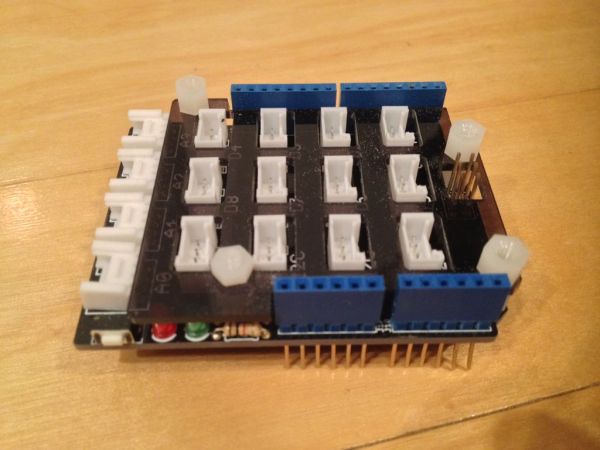
The GROVE Base shield makes it very easy to connect the i2c Motor Driver and Infrared Receiver to your Arduino with no soldering or messy wires. It also makes it VERY easy to add functionality to your Strandbot by simply connecting any of the plug & play GROVE modules, even after your Stranbot is fully built.
The basic shield requires slight modification before mounting to the Strandbot body. Remove the three 3M nylon machine screws securing the transparent cover plate and replace them with threaded 6 mm nylon spacers.
Then, connect one GROVE cable to the first I2C connector of the base shield.
Next, connect the other GROVE cable to the A1 connector of the base shield.
Step 2: Mount the GROVE base shield and LiPo Rider Pro
Now use three nylon machine screws (M3 x 10 mm) to secure the GROVE base shield to the Strandbot body.
Next, use 4 machine screws (M2.6 x 10 mm) to mount the LiPo Rider Pro next to the base shield.
Depending on which battery pack you are using, you may want to slip the pack inside the Strandbeest body before mounting the LiPo Rider Pro. Do this if your pack is thick and can’t easily slip in on top of the LiPo Rider Pro when mounted.
Step 3: Mount the Dual Motor Gear Box
Now you’re ready to add the gear box and motors. You will need to remove one of the drive shafts from the gear box before slipping the unit into the Strandbot body. This should be easy if you assembled the gear box properly (without securing the drive shafts so they can operate independently). Replace the drive shaft once the gear box is inside the Strandbot body. Do not secure the gear box to the body with screws yet!
Then mount the i2c Motor Driver onto the Strandbot body using two machine screws (M2.6 x 10 mm). The gear box casing will block the other two mounting holes, so you will have to use 5 mm machine screws without nuts. The mounting holes have been properly sized to ensure a tight fit without even without nuts when using M2.6 machine screws. After mounting the Motor Driver, connect the power wires for the motors and the 9 V battery terminal using the screw terminals on the board.
Next, place one drive shaft coupler on each of the drive shafts. The ones pictured were printed on a consumer grade extrusion 3D printer in PLA. DO NOT DO THIS. The resolution is nowhere near good enough to fit securely without some major clean up work. Use the high resolution parts available on Shapeways to ensure a good, quick and easy build.
Next, slide the 9 V battery into the space between the GROVE base shield and the gear box.
If you didn’t do this already, slide the LiPo battery pack into the space on the other side of the body.
Step 4: Attach Strandbot Legs
Now attach the Strandbeest leg assemblies to either end of the Strandbot body. The holes in the body have been spaced and sized to provide a nice tight fit without the need for adhesives or fasteners. This makes the Strandbot easy to disassemble if you want to make your own modifications or go back to the original wind-powered Strandbeest configuration.
Next, run one of the six pieces of aluminum wire through each of the tubes in the leg assemblies (3 on each side).
After attaching the leg assemblies, position the gear box to align both drive shafts with the centers of the leg crankshafts. Then, slide the drive shaft couplers over the ends of the crankshafts.
Now you can secure the gear box to the body using two machine screws (M2.6 x 10 mm) with washers and nuts.
Connect the battery pack to the LiPo Rider Pro “BAT” connector.
For more detail: Strandbot – a solar & arduino powered R/C motorized Strandbeest
- How long does it take to build the Strandbot?
The Strandbot can be built in about 30 minutes. - Can I control the Strandbot with any IR remote?
Yes, you can make it work with just about any IR remote transmitting at 38 kHz. - What powers the brain of the Strandbot?
The brain is powered by a solar-charged Li-Po battery. - Does the Strandbot require soldering for connections?
No, the GROVE Base shield allows connecting modules without soldering or messy wires. - What material should be used for drive shaft couplers?
You should use high resolution parts available on Shapeways rather than consumer grade 3D printed PLA. - How are the leg assemblies attached to the body?
The holes are spaced and sized to provide a tight fit without adhesives or fasteners. - Can the Strandbot be reverted to its original configuration?
Yes, the design makes it easy to disassemble and return to the original wind-powered Strandbeest configuration. - Where is the 9 V battery placed during assembly?
The 9 V battery is slid into the space between the GROVE base shield and the gear box.