
Summary of Tilt Sensing Bracelet using Arduino
A simple tilt-sensing bracelet uses six conductive fabric petals and a beaded thread with a metal bead to detect tilt: the bead contacts a petal (or two) to close a circuit that lights a corresponding LED. Made from neoprene, stretch conductive fabric, conductive thread and an Arduino, the design visualizes tilt input and connects to a feedback bracelet; it worked immediately for the maker and is adaptable to wired or wireless connections.
Parts used in the Tilt Sensing Bracelet:
- Conductive thread
- Neoprene
- Stretch conductive fabric
- Fusible interfacing
- Regular thread
- Regular beads
- One metal bead or small pendant
- Two sets of poppers (or Velcro)
- Male and female headers
- Arduino USB board
- Solderable perfboard with copper line pattern
- Ribbon cable (min. 8 wires)
- 6 x 10K or 20K resistors
- Aleene's Flexible Stretchable Fabric Glue
A bracelet decorated with six conductive fabric petals and a thread of beads with a metal bead at the end, makes for a simple six point tilt detection. It is also designed so that the metal bead will make contact with two petals if it lies in between. and then of course it will make no contact when it is in the air due to throw or tipped upside-down.
This was really fun to make and the best part about it was that it worked straight away, with no mistakes made on my part. It is simple, but takes some patience to accomplish. The application really only visualized the input, I have not thought of any further uses for this. Yet.
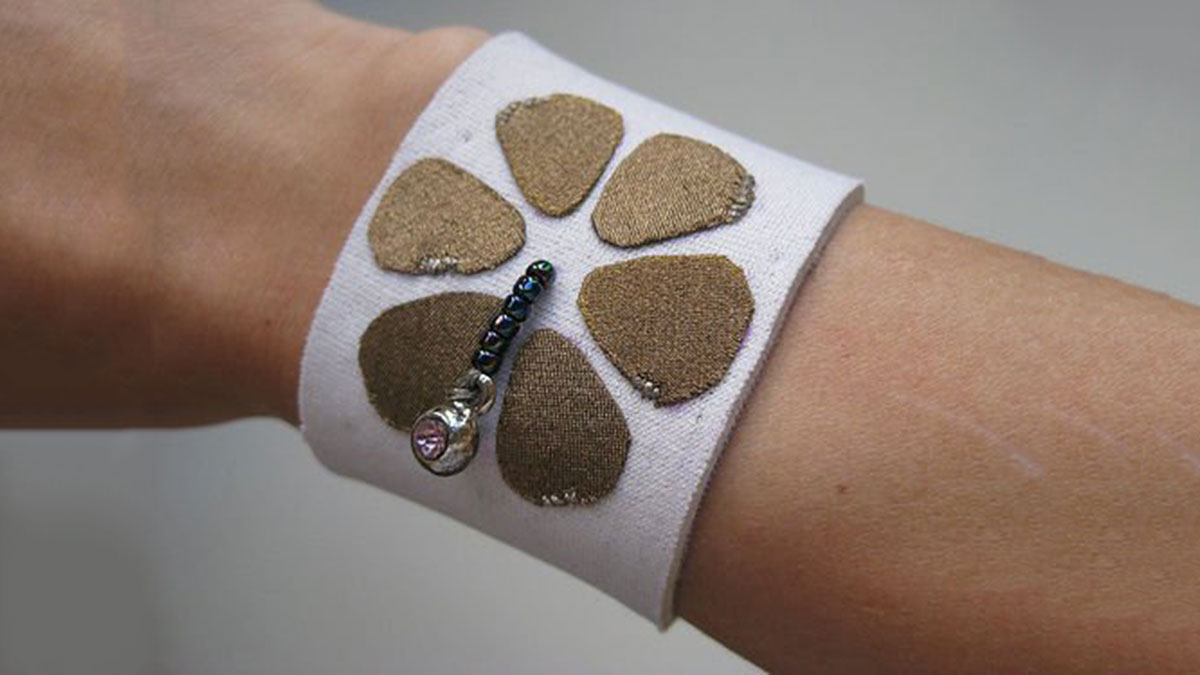
The feedback bracelet is connected to the tilt bracelet directly via wire, but this could also be wireless. When the bead makes contact with a conductive petal it closes the circuit for the corresponding LED, which turns it on. Check out instructables dot come for more and how to make your own!
Step 1: Materials and Tools
- Conductive thread from http://members.shaw.ca/ubik/thread/use.html
also see http://cnmat.berkeley.edu/resource/conductive_thread
- Neoprene from www.sedochemicals.com
- Stretch conductive fabric from http://www.lessemf.com
also see http://cnmat.berkeley.edu/resource/stretch_conductive_fabric
- Fusible interfacing from local fabric store or
also see http://www.shoppellon.com
-
- Regular thread
- Regular beads
- One metal bead or small pendant
- Two sets of poppers (could also use Velcro to close bracelet)
- Male and female headers from Sparkfun http://www.sparkfun.com/
- Arduino USB board from Sparkfun http://www.sparkfun.com/
- Solderable Perfboard with copper line pattern from All Electronics http://www.allelectronics.com/
- Ribbon cable with min. 8 wires
- 6 x 10 or 20K resistors
- Aleene’s Flexible Stretchable Fabric Glue from http://www.amazon.com/Aleenes-Flexible-Stretchable-Fabric-Glue/dp/B0001DSCQ0
- Arduino software free for download from http://www.arduino.cc/
- Processing software free for download from http://processing.org/
TOOLS:
– Fabric scissors
– Sewing needle
– Iron
– Fabric pen that disappears over time
– Pen and paper
– Ruler
– Soldering station (iron, helping hands, solder)
– Knife for cutting perfboard
– File for filing edges
– Wire cutters and strippers
– Pliers
Step 2: Stencil and Preparation
Print out the stencil (see illustration) and trace it to a piece of neoprene. Trace the flower petal pattern to stretch conductive fabric that has fusible interfacing adhered to one side. Cut out the neoprene and conductive fabric pieces.
Punch the poppers into the neoprene as shown in illustration. Make sure the active sides are facing the right ways. You could also use Velcro as a fastener.
For more detail: Tilt Sensing Bracelet using Arduino
- What detects tilt in this bracelet?
The metal bead on the beaded thread makes contact with conductive fabric petals; contact closes a circuit to indicate tilt. - How many sensing points does the bracelet have?
Six conductive fabric petals provide six sensing points. - Can the metal bead contact two petals at once?
Yes, the bracelet is designed so the metal bead can lie between petals and touch two at once. - What happens when the bead is in the air due to a throw?
When the bead is in the air it makes no contact and thus does not close any circuit. - What microcontroller is used in the project?
An Arduino USB board is used for processing and visualization. - How is the feedback bracelet connected to the tilt bracelet?
The feedback bracelet is connected directly via wire, though it could be wireless. - What materials are used for the petals?
Petals are cut from stretch conductive fabric with fusible interfacing adhered. - Are poppers required to close the bracelet?
Poppers are used in the example, but Velcro could also be used to close the bracelet.
