Summary of The Ultimate Guide to Building a Quadcopter From Scratch
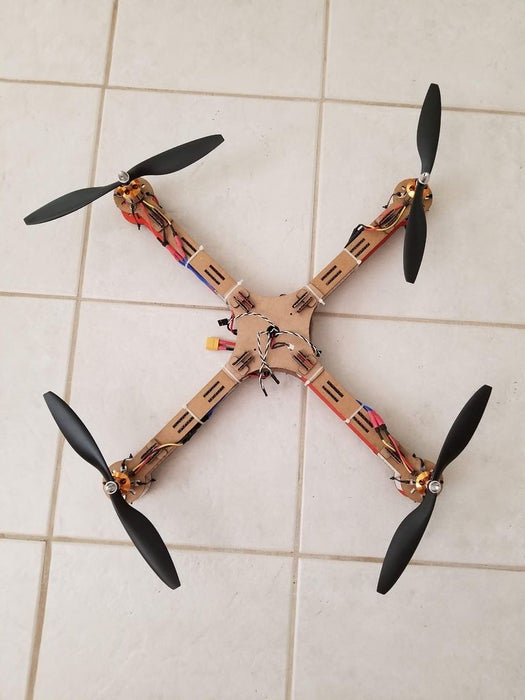
This Instructable documents a multi-year DIY quadcopter build—from physics and frame design through power and control electronics, wiring, code, PID tuning, and maiden flight—using a laser-cut cardboard X-frame, brushless outrunner motors, DIY flight controller and battery pack, and off-the-shelf ESCs, props, and connectors. It emphasizes practical explanations, component selection, and safety tips, aiming to teach fundamentals so beginners can replicate and learn without excessive trial and error.
Parts used in the 550 Cardboard Quadcopter:
- 1000kV brushless outrunner motors (x4)
- 10x4.5 inch propellers
- 30A BLHeli ESCs (x4)
- Power distribution board
- XT-60 connector(s)
- Bullet connectors (optional, if ESCs lack them)
- Heat shrink tubing
- 30 dB earplugs
- DIY flight controller
- DIY battery pack built from Samsung INR18650-15L cells (3s2p)
- Cardboard frame laser cut from CAD/DWG designs
- Zip ties (for securing frame)
This project started all the way back when I was in 6th grade and completely new to electronics, when I thought to myself, “Hey, let’s build a drone….it shouldn’t be that hard……right?” Yea, guess what, it’s hard. Almost 4 years later, this project is coming to a close, and along the way, I have built my engineering knowledge from the ground up, and I will be sharing my knowledge with everyone in the Instructables community so that if another 6th grader were to find themselves upon this Instructable, I hope they will not spend nearly as much time trying to build a drone, but still acquire the same knowledge that I have.
This drone tutorial go cover how I built my drone as well as go deep into the nitty-gritty aspects from the construction of the frame all the way to the code. I hope that by reading this instructable, you will be able to fully understand and admire the concepts and theory behind quadcopter building. I would like to thank and recommend some Youtube channels that I have watched and learned from which helped arm me with the knowledge that I have today:
– Joop Brokking: https://www.youtube.com/user/MacPuffdog (He has an AMAZING playlist for drone building)
– Great Scott: https://www.youtube.com/user/greatscottlab (Great electronics information)
– Electronoobs: https://www.youtube.com/channel/UCjiVhIvGmRZixSzup… (Clear explaination of PID)
– Electroboom: https://www.youtube.com/user/msadaghd (Funny and also great electronics information)
Without further ado, here’s the breakdown of this instructable.
Some parts are written as if a complete beginner was reading it:
– Steps 1-2: Physics and About Quadcopters
– Steps 3-6: Frame Design/Construction
– Steps 7-12: Power Electronics
– Steps 13-15: Control Electronics
– Steps 16-24: Wiring the Quadcopter
– Steps 25-31: Code, Calibration, Setup, and Theory
– Steps 32-34: PID Tuning and Maiden Flight-ish
– Steps 35: Summary, Future Upgrades/Add-Ons, Final Remarks
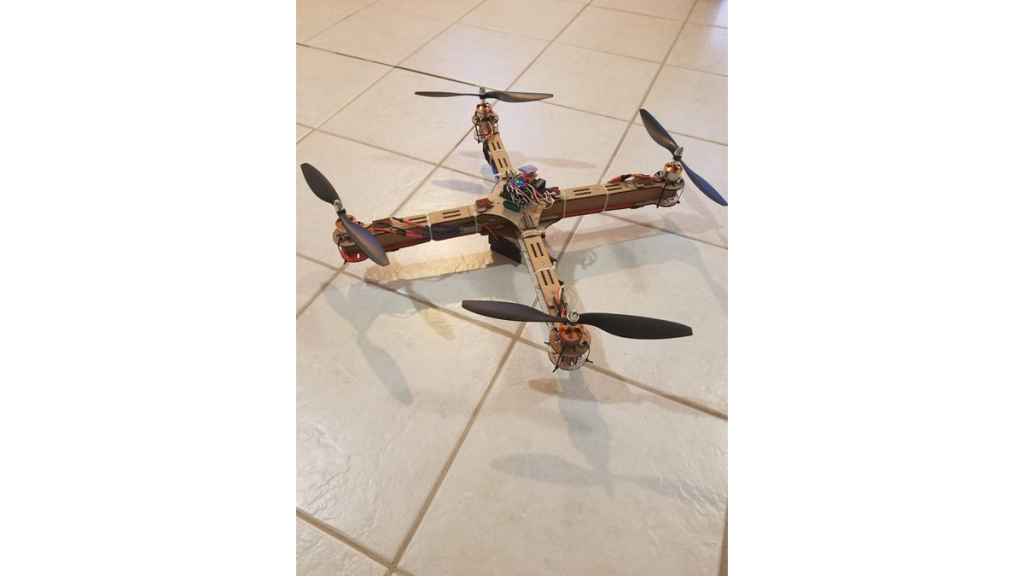
Note: Though this drone is made of cardboard, this is no slouch when it comes to flying. Fully loaded with the battery, the all up weight (AUW) is just above 800g, and with each motor pushing out up to 740g of thrust. Theoretically, this drone has a thrust-to-weight ratio about 4:1. In perspective, a DJI Phantom has a thrust to weight ratio of about 2:1.
Step 1: Physics
Newton’s 3 Laws of Motion
First Law: What is at rest will stay at rest and what is in motion will stay in motion, unless there is an external force acting on it.
Second Law: The force required to accelerate an object to a certain velocity depends on the mass (F=ma)
Third Law: For every action there is an equal and opposite reaction
Based off of the first law, a drone will stay on the unless you decide to move it. A drone will move if you move it.
Based off of the second law, it is clear if you have a lighter drone, you will have longer flight times (less force required to accelerate it), quicker reaction time (if you decide to put more force, the drone will accelerate faster), and better maneuverability.
Based off of the third law, drone propellers throw air down with a certain force, the air molecules will push up on the propellers with the same force, therefore the drone moves up. There is another aspect to this law however, and is the fact that anything rotating will generate a small spinning force in the opposite direction, called torque. Just like how a person needs to “push off” against the ground in order to walk forwards, the motor needs to continuously “push off” against something in order to rotate. That is why if helicopters only have the main rotor, the torque generated by the main propeller will send the body of the helicopter spinning in the opposite direction, and it needs a small rotor on the tail to prevent that.
Step 2: What Is a Quadcopter?
It’s a helicopter with 4 propellers.
In order to explain what makes a quadcopter stand out from the rest of the flying contraptions will take a lot more than 6 words. But before we go into that, we need to define some key terms I will be using to describe movement.
– X-axis: the axis that points left/right or west/east
– Y-axis: the axis that points forwards/backwards or north/south
– Z-axis: the axis that points up/down
– Roll: when the aerial vehicle tilts left/right; rotates about the y axis
– Pitch: when the aerial vehicle tilts forwards/backwards; rotates about the x axis
– Yaw: when the aerial vehicle spins in place left or right; rotates about the z axis
– Degrees of Freedom (DOF): the number of independent factors that can be assessed (I’ll explain this term in better detail later, with an example)
Helicopters have one main propeller that can provide the acceleration, but need the small rotor in the back to counteract the torque created by the big spinning propeller. Additionally, there are countless other control mechanisms to physically tilt the main propeller in order for the helicopter to move in the 2D-plane.
Bicopters have two equal-sized counter-rotating propellers that provide the acceleration, roll, and the yaw control, but needs the assistance of two servos to tilt the propellers in order to maintain balance and control the pitch.
Tricopters have three equal-sized propellers that provide the roll, pitch, and acceleration control. Two of the propellers spin clockwise and the remaining propeller spins counterclockwise. Due to the extra propeller spinning clockwise, there is no control over the yaw angle, so a servo must be use to tilt the last motor in order to compensate and gain yaw control.
Quadcopters, with four propellers, have the least amount of physical propellers and motors that can allow it to travel in 4 degrees of freedom (move linearly in the x-axis, move linearly in the y-axis, move linearly in the z-axis, and accelerate). However, if one motor fails, it will be the demise of the quadcopter…..unless there is specific code that can compensate.
Hexacopters and Octocopters have 6 and 8 propellers, respectively. They offer an advantage over quadcopters that if it loses one propeller, it will still be able to and safely, but at the cost of increase complexity, decreased flight time, higher cost, and less maneuverability.
Unlike planes, quadcopters are naturally unstable and will need software assistance. Overall, the greatest challenge in the construction of the quadcopter will not be the hardware, but instead, the code itself.
Step 3: Frame Selection
The frame makes up around 90% of a quadcopter….so it’s kinda important. The first thing you have to consider is the size of the frame you want. Note, the number represents the approximate diagonal arm span of the drone and is measured in millimeters (so if I say I have a 250 frame, the frame is about 250 mm diagonally from arm tip to arm tip). The size of the drone you make depends on your use case, but the general rule of thumb is that the smaller the frame, the more agile and maneuverable the drone is, but it will be less stable. A larger frame will be less agile and maneuverable, but it will be much more stable. In this instructable, I plan to make a size 550 quadcopter.
Step 4: Frame Material
There are a lot of different materials you can use to build a quadcopter, each with their own advantages and disadvantages. Here are some of the most popular materials:
- Carbon Fiber (strongest and lightest, but expensive)
- Wood
- Aluminum
- Foam
- Plastic
But I believe that with some engineering, you can make a working quadcopter frame out of almost anything. So as a result, I decided challenge myself and make my quadcopter out of cardboard (:D).
Step 5: Frame Arm Orientation
There are three main types of quadcopter frames, the “X” frame, the “+” frame, and the “H” frame. There are also some other obscure types like the Deadcat or hybrid H-X frames, but we’re not going to go into those.
The “X” frame is the classic drone frame, where the arms are at right angles to each other and the quadcopter looks nice and symmetrical. Most commercial drones like the DJI Phantom are based off of this frame type.
The “+” frame version is virtually identical to the “X” frame – the only difference is the orientation when it is flying in the direction that you call “forwards”. The “+” orientation is not as commonly used because the arm sticking out when flying “forwards” will block the view of the camera.
The “H” frame looks like an H and are mainly found on racing drones. An advantage that the “H” frame has over the “X” and “+” is there is a lot more room available to mount the electronics and batteries.
For my drone, I decided to go with the “X” frame.
Step 6: Designing and Assembling the Frame
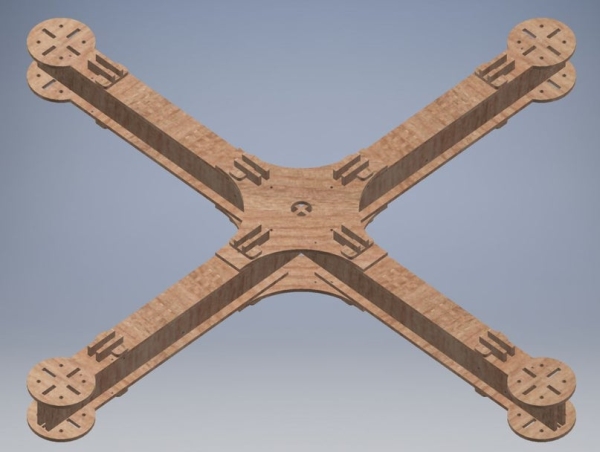
I planned to make my drone come together like a puzzle with a minimal use of adhesives. All the plates and pieces will slide into each other and are locked with additional arm lock pieces. I also used some zip ties to secure everything together even more.
I initially created my idea using a computer-aided design (CAD) software called AutoDesk Inventor Professional and imported the design into AutoCad to laser cut. The DWG files are attached. My frame consists of arms that mimic the shape of I-beams, as it will give cardboard arms the structural integrity the quadcopter arms will need.
Going to my local makerspace, I laser cut all the pieces out of cardboard and surprisingly, the result was better than I expected.
The bare frame weight is around 98 grams.
Assemble the frame and use zipties to hold everything securely in place.
NOTE: The “Arm Lock MIR” in the drawings are the same thing as “Arm Lock”.
Step 7: POWAAAAAA!!!!
Now, onto my favorite part about any engineering project: the electronics!
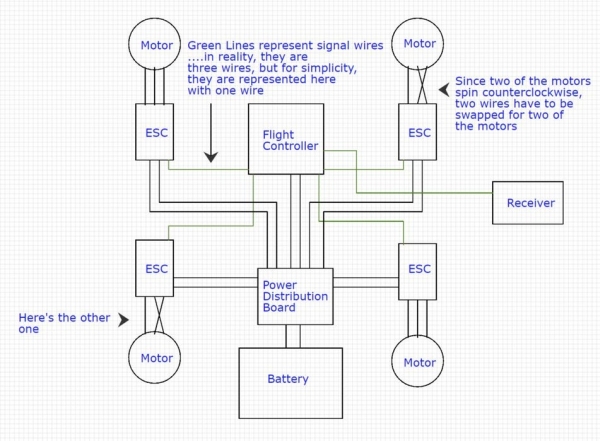
In a nutshell, the main electronics are pretty simple to understand: the battery power gets split and directed between the 4 individual motors and the control board. The control board decodes the signals sent by the controller and taking that information as well as the tilt information into account, controls the motors accordingly.
Refer to the schematics above for more information.
For those who are completely new to reading a schematic……..
CRASH COURSE ON HOW TO READ A SCHEMATIC:
Follow the lines to see where and how they connect. Overlapping lines do not mean those wires are connected, unless there is a dot at the intersection.
Step 8: Motors and Electronic Speed Controllers
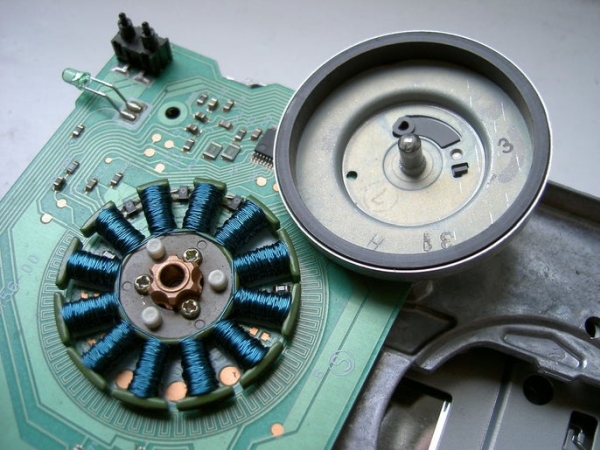
All motors have two parts, the rotor and the stator. The rotor is the part that spins and the stator is the part that stays in place.
Motors come in two main classes: brushed and brushless. Brushed motors have two wires and generally have the coils on the rotor and magnets on the stator. When the coils are energized, it will create a magnetic field that will attract or repel the magnets on the stator, causing the rotor to spin. The coils get the energy through “brushes” and as the rotor spins, the direction of electric flow will change accordingly, keeping the motor spinning. These motors are inexpensive, but generally spin slower and are less efficient due to the friction of the brushes on the rotor. This is why most drones use motors found in the latter class, brushless motors.
Brushless motors have three wires. Due to the structure of brushless motors, they cannot run directly off of the battery. Their structure is opposite of brushed motors, they have the magnets on the rotor and the coils on the stator. Now, the poles of the electromagnet will no longer flip with the rotation of the rotor, so a component called the electronic speed controller (ESC) is necessary. The main job of these devices is to turn on and off the coils in a timed manner in order to keep the motor running. Brushless motors are a lot faster and more efficient as they do not suffer from additional friction from brushes and their speed depends on the switching rate of the ESC. Almost all high-quality drones use brushless motors.
Brushless motors have two subclasses, inrunners and outrunners. The difference between the two are what each motor calls the rotor and stator. Inrunner motors have the rotor on the inside, where only the shaft of the motor spins and the casing outside stays in place. Outrunner motors on the other hand, have the rotor on the outside, so in outrunners, the whole casing spins and only the base of the motor, which the stator is mounted upon, stays in place. Generally, outrunner motors have a lower kV rating…..which is what I will explain in the next step.
Step 9: All Those Darn Numbers and Letters….What Do They Mean?
When looking at motors, ESCs, and batteries, you get bombarded with scary numbers with weird units….this step will explain all of those.
Let’s say on the motor, you saw this: A2212 1000kV 12N14P
kV: This unit is found on motors and does not stand for “kilovolts”. The letter “k” in this case stands for a constant and “V” is for volts. Basically what this tells you is the approximate number of revolutions per minute (rpms) the motor will spin per volt you put in. For example, the motor is 1000 kV, it means that this motor will spin about 1000 rpm at one volt, 2000 rpm at two volts, and so on. Generally, a motor with a lower kV rating will spin at slower rpms, but will have more torque, which is the turning force.
A2212: Ignore the A, but the first two numbers you see (the 22) tell you the diameter of the motor itself or the stator in millimeters. The second pair (the 12) tell you the height of the motor itself or the stator in millimeters.
12N14P: The number in front of the “N” tells you how many electromagnets/coils the stator has and the number in front of the “P” tells you how many permanent magnets are on the rotor.
The following numbers apply to all batteries, ESCs, and motors
A or Amps: This is usually found on ESCs and motor datasheets. This is the amount of punch the ESC can provide to the motor. Make sure that this amount is at least 20-30% higher than the amp rating of your motor. It is important to remember that you cannot shove amps into a motor, a motor will pull as many amps as it needs. SO if your motor only pulls 8 amps maximum, it is not necessary to have a 60 amp esc, because you will never pull anywhere near that 60 amps and you will be carrying around unnecessary weight. However, don’t pair a motor that can pull up to 60A with an ESC with a 20A rating because that ESC is going to fry faster than you can say “kV”. On ESCs, there is sometimes a “burst” amperage that the ESC can supply for a couple of seconds before irreversible damage. Only use this number for reference.
Battery labels: 3s 2000mAH 20c
mAH or milliamp-hour: This is found on batteries. This is the capacity of the battery, or how much electricity the battery can supply before it dies. Divide this number by 1000 (to convert it to Amp-hour) and multiply by the C rating to get the maximum number of Amps the battery can supply before damage. You can also use the Amp-hour value to calculate a crude approximate of your flight time. In this case, 2000mAH –> 2 AH, meaning that this battery can supply a continuous 2 amps for one hour before dying. Keep in mind that you are never going to discharge a battery all the way, so this is an estimate.
C rating or just C: This number along with the mAH can tell you the maximum amount of amps that this battery can supply. Just like an ESC, there is also a “burst C rating” which is the maximum amount of amps the battery can provide for a short period of time (like about 10-30 seconds). So with the example battery, it can provide 40A of continuous current (2000mAH –> 2 AH –> 2AH * 20C –> 40A).
3s: This is found on batteries and tells you how many cells are wired in series and parallel. Assuming we are talking about Lithium Polymer (LiPo) batteries, each cell has a nominal or “normal” voltage of 3.7v, but when fully charged, they are 4.2v, though some LiPos can go up to 4.35v per cell, and are labelled as LiHV or high voltage. So in this case, 3s means that there are three LiPo cells wired in series, which means this battery has a nominal voltage of 11.1v (3 * 3.7) and a maximum voltage of 12.6v (3 * 4.2). This is also found on ESCs and tells you how much voltage the ESC can handle.
BEC: Battery Eliminator Circuit. It is a circuit found inside ESCs that provide a steady 5v (or 6v…depending on your ESC) to power receivers, the flight controller board, servos, etc. Not all ESCs have a BEC.
Step 10: My Layout
Here are the parts that I have decided to use:
– 1000kV brushless outrunner motors (x4): https://www.amazon.com/Hobbypower-Brushless-Outrun…
– 10×4.5in propellers: https://www.amazon.com/Genuine-Gemfan-10×4-5-Prope…
– 30A Blheli ESCs: https://www.amazon.com/BLHeli-32-Brushless-Control…
– Power Distribution Board: https://www.ebay.com/itm/Multirotor-ESC-Power-Dist…
– XT-60 connectors: https://www.amazon.com/Finware-Female-Bullet-Conne…
– Bullet Connectors (if your ESC does not come with these): https://www.amazon.com/JFtech-Bullet-Banana-Connec…
– 30dB earplugs: https://www.lowes.com/pd/Safety-Works-Ear-Plugs/10…
– Heat Shrink Tubing: https://www.amazon.com/NTE-Electronics-47-23448-BK…
– DIY flight controller (which I well get to in Step 14)
– DIY battery pack (which I will explain in the next step)
Tip: Don’t go cheap on motors and ESCs, as poor quality parts will result in poor performance. If you are serious into drone building, put a bit of money into quality parts, it will be worth it in the long run. I do not recommend the no-brand motors I got, but I have provided the link anyways.
Step 11: Battery Choice
LiPo batteries are the most popular batteries for drones in general, but they scare me:
That is why I decided to take the path that not many people have taken: making my own battery pack.
Note, if this is your first drone, I do not recommend building your own battery, it is better to buy a good battery and a good charger.
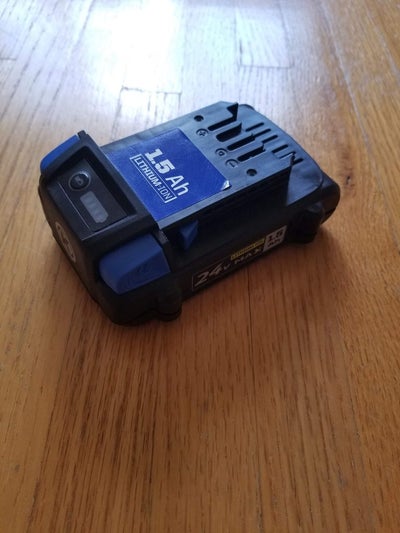
I salvaged cells from a lithium drill battery pack to build my pack. The cells found in a lithium drill battery pack are called 18650 cells and are also commonly found in old laptop batteries. However, not all 18650 cells are created equal. The ones found in laptop batteries are made to discharge slowly, but can last for a long time. Drills on the other hand, require a lot of continuous power but not for hours on an end. Drones are very similar when it comes to power usage- they need that punch of power, but flying for three hours on end is not a necessity.
I got my batteries from this battery pack: https://www.lowes.com/pd/Kobalt-24-volt-Max-1-5-Am…
Inside the pack, I got Samsung INR18650-15L cells, which according to their datasheet, can provide 18A of continuous current and have a nominal capacity of 1500 mAH. I will wire the pack into a 3s2p pack. The 2p stands for 2 parallel, and when batteries are wired in parallel, the overall capacity (the mAH) and the maximum current (A) will increase, but the voltage will stay the same. Therefore, I will have a battery pack that has a 11.1v nominal voltage, 12.6 v maximum voltage, 3000 mAH capacity (1500 mAH * 2p), and 36A continuous output current (18A * 2p).
Source: The Ultimate Guide to Building a Quadcopter From Scratch
- What materials were used for the frame?
The author used cardboard laser-cut from CAD/DWG designs to build the X-frame. - What motor type and kV rating were chosen?
1000kV brushless outrunner motors were used. - What ESCs were used with the motors?
30A BLHeli ESCs were chosen. - What battery configuration was built?
A DIY 3s2p battery pack using Samsung INR18650-15L cells was built. - What is the approximate all-up weight and thrust-to-weight ratio?
The all-up weight is just above 800 g and the theoretical thrust-to-weight ratio is about 4:1. - Why was an X-frame orientation selected?
The builder chose an X-frame for symmetry and classic drone appearance; it was preferred for this build. - How were frame parts joined together?
Pieces were designed to slide together like a puzzle, locked with arm lock pieces, and secured with zip ties. - What cells were salvaged to make the battery pack?
Samsung INR18650-15L cells from a Kobalt drill battery pack were used. - What safety or quality advice is given for components?
The article advises not to skimp on motors and ESCs because poor-quality parts harm performance, and recommends buying batteries/chargers if you are a first-time builder. - What is the role of ESCs in the quadcopter?
ESCs time the coil switching in brushless motors to control motor speed and often provide a BEC to power receivers and flight controllers.