I have a home security system that was installed when my home was built in the early 1990’s. It is, or was until I modified it, a wired perimeter system with a single wired motion detector. The system is a DSC PC1550 and originally was monitored by a well known alarm system service, a three letter acronym beginning with the letter “A”. Anyway I stopped paying for the monitoring long ago.
More recently I decided it would be nice if the system would send me a text if it went into alarm. I also wanted to capture video and send it to the web if an intruder came into my office. Here’s how to do that:
Required Components Texting:
- Home alarm system and associated wiring schematic
- Arduino Uno (or other Arduino compatible device)
- 12V SPDT relay
- Linux server (I’m using Ubuntu 12.04) running 24X7 with internet access
- MUTT (or equivalent) command line mail program
- Gmail or equivalent account
- email address to text your cell phone
- UPS for the linux server
- Continuous internet connection
- USB cable
- 1 1k ohm resistor
Required Components motion detecting Webcam:
- Webcam attached to the linux server
- Dropbox account
- a case for the arduino
- Breadboard for testing
- Multimeter
Hardware:
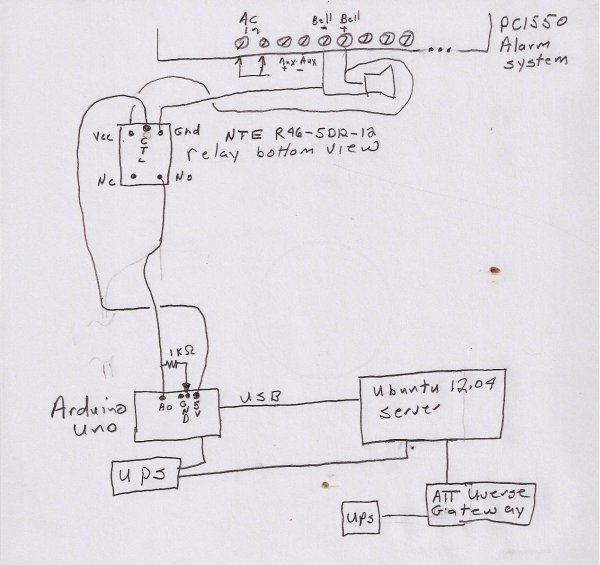
The design uses the output from the alarm system that sounds the siren to tell the Arduino Uno when an alarm is triggered. This is accomplished by sending the siren signal to a relay. The relay is normally open except when the siren sounds. Figure 1 below shows a schematic for the alarm system.
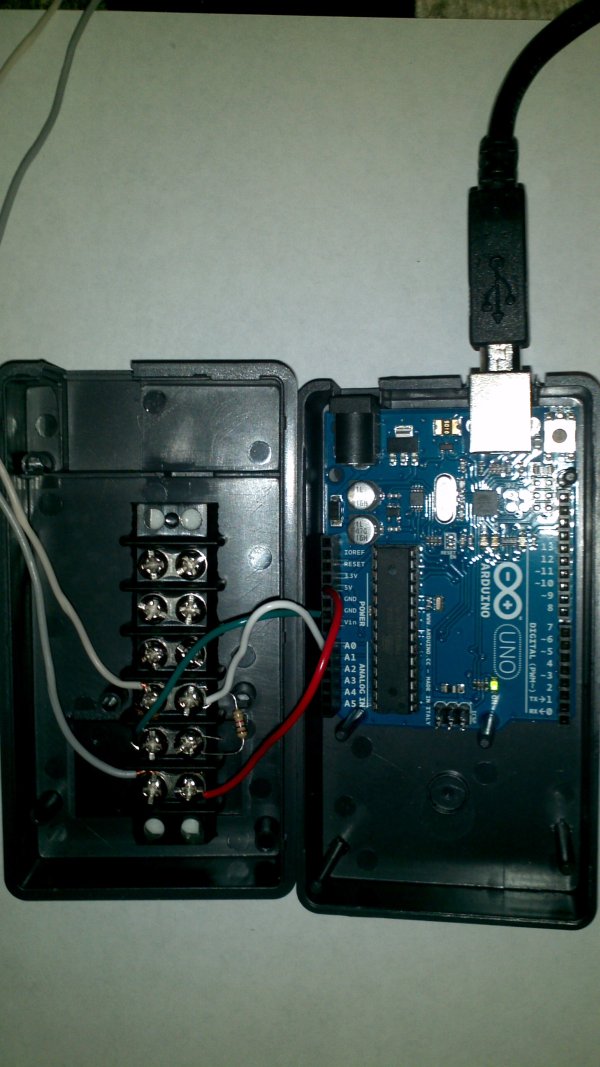
When the siren is activated the relay (see Figure 2. below) closes connecting the +5V Arduino output to analog input (A0). When the +5V signal is not connected a 1 K ohm pull down resistor ensures that the analog input A0 sees 0 V. The wiring diagram shown in Figure 2 below provides more details.
Note: a digital input could also be used. To do that you would use the 3.3V output on the Arduino and digital input D0 instead. You’d also need to make corresponding changes to the Arduino software to read a digital input instead of an analog input.
Software
A sketch (programs in the Arduino are called sketches) in the Arduino monitors the voltage output of the relay. When the sketch sees a voltage below 1.25 volts it sends the character “F” to the linux server via the USB connection. If the signal exceeds 1.25 V, the Arduino sketch sends the character “T” to the server.
Arduino sketch (code)
int sensorPin = A0; // select the input pin from the relay

int ledPin = 13; // select the pin for the LED--flashes to indicate living

int sensorValue = 0;// variable to store the value coming from the sensor

int alarmActivated=250; // alarm detect threshold corresponds to about 1.25 V
void setup() {
// declare the ledPin as an OUTPUT:
pinMode(ledPin, OUTPUT);
Serial.begin(9600);
}
void loop() {
// turn on Arduino led
digitalWrite(ledPin, LOW);
// read the value from the alarm system
sensorValue = analogRead(sensorPin);
if (sensorValue > alarmActivated) {
// tell the server that alarm was activated
Serial.print (“T”);
}
else {
// otherwise tell it there’s no alarm
Serial.print (“F”);
}
Serial.print(sensorValue);
// delay 5 seconds
delay(5000);
// turn on Arduino led
digitalWrite(ledPin,HIGH);
// wait 5 seconds
delay(5000);
}
The Linux server based monitoring script
Shell scripts on the linux server monitor the serial connection from the Arduino and perform the actual texting. There are two shell scripts, the first gets input from the Arduino via the USB cable and sends an email which is then forwarded on as a text to a cell number. The shell script uses the command line program Mutt to send the email (via gmail) to the cell phone text address.
Installing and configuring Mutt
Mutt is a commandline based Mail User Agent (MUA), and was written to view mail. It was not written to retrieve, send, or filter mail. It relies on external programs to do those tasks. One approach, sends and receives emails through a Gmail account. Begin by installing mutt with this command
sudo apt-get install mutt
Next set up IMAP to use gmail. Open gedit, click the Open button and select the file .muttrc in your home folder. (Note: files whose names begin with a “.” such as .muttrc are hidden files. So, if you don’t see your hidden files simply right click on the background of the file browser you just opened and tick the Show Hidden Files box.)
After you have opened the file, you have to tell Mutt how to connect to the Gmail account. To do this, put the following in your .muttrc
set from = “[email protected]”
set realname = “Your Real Name”
Then mutt has to know where your gmail mailbox is and what your password is.
set imap_user = “[email protected]”
set imap_pass = “yourpassword”
After making these changes save .muttrc and exit gedit. At that point you are ready to send a test email using mutt.
mutt -s “test” recipientemailaddress < textfiletosend
When you run mutt for the first time, a certificate will be downloaded and you will be asked if you want to keep it. Just type Yes.
Texting via email
To send a text message via email, just substitute your 10-digit cell number for ‘yourcellnumber’ for each carrier below:
AT&T: [email protected]
Qwest: [email protected]
T-Mobile: [email protected]
Verizon: [email protected]
Sprint: [email protected] or [email protected]
Virgin Mobile: [email protected]
Nextel: [email protected]
Alltel: [email protected]
Metro PCS: [email protected]
Powertel: yourcellnumber@ptel.com
Boost Mobile: [email protected]
Suncom: [email protected]
Tracfone: yourcellnumber@mmst5.tracfone.com
U.S. Cellular: [email protected]
Monitor/text shell script:
Next enter the code for the alarm texter.
#!/bin/bash
stty -F /dev/ttyACM0 cs8 9600 -parenb -parodd -hupcl -cstopb cread clocal -crtscts -ignbrk -brkint -ignpar -parmrk inpck -istrip -inlcr -igncr -icrnl -ixon -ixoff -iuclc -ixany -imaxbel -iutf8 -opost -olcuc -ocrnl -onlcr -onocr -onlret -ofill -ofdel nl0 cr0 tab0 bs0 vt0 ff0 -isig -icanon -iexten -echo -echoe -echok -echonl noflsh -xcase -tostop -echoprt -echoctl -echoke
tst=”T”
while true
do
read -n 1 P < /dev/ttyACM0 # echo $P if [ “$P” = “$tst” ] then ST=$(date +’%-c’) echo $ST > AlarmText
mutt -s “Alarm” [email protected] < AlarmText
# we have an alarm so turn on webcam to detect motion and capture video for 15 minutes
#only add the following line line if you are adding the webcam part
./motionon &
sleep 15m
#only add the following line line if you are adding the webcam part
killall motion
fi
done
then save the file in your home directory under the name “alarmtexter”. Next you’ll need to make the script executable by opening a terminal and:
chmod +x ~/alarmtexter.
Add motion detection
If you don’t have a dropbox account you will need one.
Open a terminal and:
sudo apt-get install dropbox nautilus-dropbox
then create a couple of directories you will need
mkdir ~/Dropbox/webcam1

mkdir ~/.motion
cp /etc/motion/motion.conf ~/.motion/motion.conf

sudo chown yourusername:yourgroupname ~/.motion/motion.conf
Open a text editor and enter the following:
#!/bin/bash
/usr/bin/motion -c ~/.motion/motion.conf &
sleep 1200
killall motion
Then save as:
~/motionon
Make the file executable using
chmod +x ~/motionon
Open
gksudo gedit ~/.motion/motion.conf
and do the following
Change:
framerate 100
to
framerate 15
Set:
post_capture 450
Add:
target_dir /home/yourusername/Dropbox/webcam1
Making all it run
Finally add your script to start up applications. Assuming you are running some version of Gnome desktop, use your launcher to run “Startup Applications”. Press the Add button and add the alarm texter as shown below:
Finally press the add button on the popup and your script should start on your next reboot.
 A second shell script checks once an hour to make sure the first program is running and restarts it if it is not. This is a bit of belt and suspenders, since there’s no reason the alarmtexter script should stop running. But I’m an engineer so:
Open your text editor and add the following new text file.
#!/bin/bash
process=alarmtexter
makerun=”/home/bruce/alarmtexter”
if ps ax | grep -v grep | grep $process > /dev/null
then
exit
else
$makerun &
fi
exit
Save the file to ~/checkalarmtexter
Then make it executable with:
chmod +x ~/checkalarmtexter
And finally add your script to your list of scheduled tasks. Use your launcher to run Scheduled Tasks. Click New button then select “A Task Task That Runs Recurrently” and enter your task in the popup window. I used the default hourly schedule but there’s nothing magic about that.
Pictures below show the physical layout in my alarm box and the Arduino wired up in its case.
For more detail: How to Text Yourself when your DSC PC1550 Home Security System Alarms

