Like most people I was skeptical about getting a robotic vacuum cleaner, so as a trial run I thought I would buy the now obsolete iRobot Roomba 530 which was heavily discounted (they’re still available in Australia, showing how behind the times we are).
Of course, as soon as I got it home I fell in love with it and for once had clean carpets!
Unfortunately, this model doesn’t come with a remote (I ended up getting a Logitech Harmony which allows me to control my robot slave) or a scheduler to allow scheduled cleans during the day while I was out.
I had to PRESS A BUTTON before I left the house to make it clean! Not hard but I generally forgot to do it.
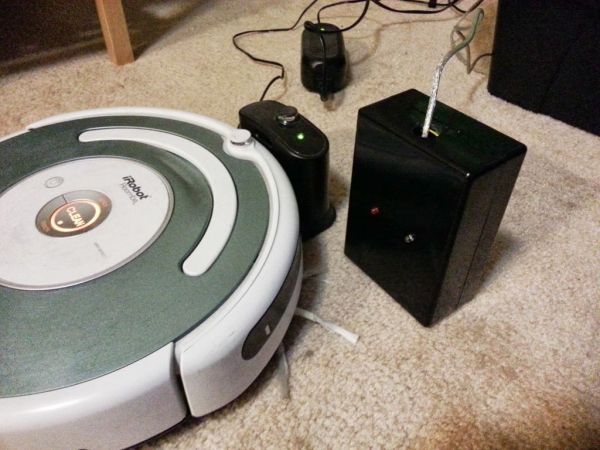
Rather than forking out money to buy a scheduler (which may or may not have worked with this model) I built my own. The black box in the picture.
This bare bones, super simple scheduler allows me to leave the house without having to do anything and come back to clean floors. As long as the Roomba is charged and at the docking station.
It’s cheap, takes less time to build than writing this instructable. And best of all, powered by an Arduino Uno!
I’ve been stalking instructables for several years now and this is the first time I’ve actually documented a project all the way through well enough to make into an instructable. I have tried to include as much detail as I could to help others. Feedback on both the project and the instructable are very welcome.
Step 1: Requirements
What you’ll need:
Important:
– A Roomba controllable by Infrared. Mine is a 530. I think most models below the 530 use similar IR codes so you might be in luck. Do a little research, there are a lot of great forums out there.
Components:
– 1 x 940nM Infrared LED
– 1 x LED (whatever colour you like, I picked red, this is to just signal if the device is on or not)
– 2 x 330 Ohm resistors (One for each LED)
– 1 x Arduino Uno (or similar, I initially used Arduino duemilanove, but the Uno works with the same script and set up perfectly)
– 4 lengths of wire (I used 2 wires with pins for my breadboard cut in half)
The power supply and Timer
– A power supply ( I used a spare USB cable type A/B – the one that plugs into the Arduino, connected to a AC/USB adaptor)
– A 24 hr timer switch (Cheap one from IKEA) – This is used to do all the scheduling, just set the timer to power up the arduino which then sends the “Clean” command to the Roomba.
– A project box to keep everything neat.
– A computer with the Arduino IDE (I’m using Arduino IDE 1.05)
– The Arduino IR library from https://github.com/shirriff/Arduino-IRremote
(installation instructions on the site)
– Soldering Iron to join everything together first (use a breadboard to test everything works first!)
Step 2: Wiring everything together
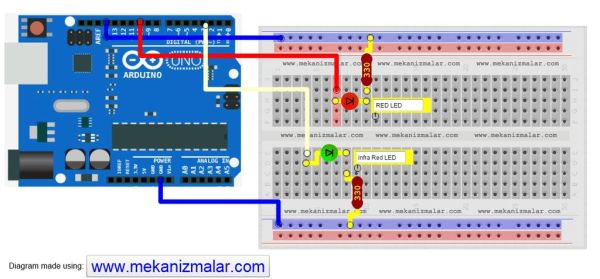
As you can see from the diagram, there isn’t much to the system.
Just 2 LEDs.
1 Infrared LED to control the Roomba.
And a optional LED (in this case red) to let you know the device is on.
Unless you can see in infrared, once everything is inside a project box you can’t tell if its working or not.
Use a 330 Ohm resistor on both LEDs so they don’t burn out.
The library used to control the IR LED is hardcoded to Digital Pin 3 so make sure the IR LED is connected to D3.
The signal LED (RED LED) is wired to digital pin 10. Both are grounded.
Make sure you get the LEDs polarity around the right way!
Next to the Arduino script!
I used the java tool at http://www.mekanizmalar.com/arduino_and_breadboard.htm to make the circuit diagram.
Step 3: Arduino Script
Now, the Arduino Script.
You’ll need a computer with the Arduino IDE installed (I’ve used Arduino 1.05)
Next, install the IR library from (instructions on the site) this is needed to run the script.
https://github.com/shirriff/Arduino-IRremote
I modified (i.e. stripped it back) the script developed by probono available from https://gist.github.com/probonopd/5181021. It’s much more detailed than the script I’ve used. WIth it, you can send every Roomba command via the arduino. Definitely worth checking out!
Basically, all the script I’ve pasted below does is:
– When the power is turned on
– Arduino is initialised, turns on red LED to let you know it’s on.
– Begins transmitting the “Clean” (136) command repeatedly with a 5 second delay in between each transmission.
– Doesn’t stop till the power is cut!
Below is the script….. Upload it to the board as normal.
If you’re interested, you can open the serial monitor (9600) and see the Arduino’s output, just transmitting the “Clean” command on repeat.
#include <IRremote.h>
/*
Super Simple Arduino Powerd Roomba Scheduler
by [email protected]
2013-08-03 Instructables release
Code adapted from: https://gist.github.com/probonopd/5181021
Send infrared commands from the Arduino to the iRobot Roomba
by probono
2013-03-17 Initial release
Copyright (c) 2013 by probono
All rights reserved.
Redistribution and use in source and binary forms, with or without
modification, are permitted provided that the following conditions are met:
1. Redistributions of source code must retain the above copyright notice, this
list of conditions and the following disclaimer.
2. Redistributions in binary form must reproduce the above copyright notice,
this list of conditions and the following disclaimer in the documentation
and/or other materials provided with the distribution.
THIS SOFTWARE IS PROVIDED BY THE COPYRIGHT HOLDERS AND CONTRIBUTORS “AS IS” AND
ANY EXPRESS OR IMPLIED WARRANTIES, INCLUDING, BUT NOT LIMITED TO, THE IMPLIED
WARRANTIES OF MERCHANTABILITY AND FITNESS FOR A PARTICULAR PURPOSE ARE
DISCLAIMED. IN NO EVENT SHALL THE COPYRIGHT OWNER OR CONTRIBUTORS BE LIABLE FOR
ANY DIRECT, INDIRECT, INCIDENTAL, SPECIAL, EXEMPLARY, OR CONSEQUENTIAL DAMAGES
(INCLUDING, BUT NOT LIMITED TO, PROCUREMENT OF SUBSTITUTE GOODS OR SERVICES;
LOSS OF USE, DATA, OR PROFITS; OR BUSINESS INTERRUPTION) HOWEVER CAUSED AND
ON ANY THEORY OF LIABILITY, WHETHER IN CONTRACT, STRICT LIABILITY, OR TORT
(INCLUDING NEGLIGENCE OR OTHERWISE) ARISING IN ANY WAY OUT OF THE USE OF THIS
SOFTWARE, EVEN IF ADVISED OF THE POSSIBILITY OF SUCH DAMAGE.
*/
IRsend irsend; // hardwired to pin 3; use a transistor to drive the IR LED for maximal range
int LED = 10;
void setup()
{
Serial.begin(9600);
pinMode(LED, OUTPUT);
digitalWrite(LED, HIGH); // turn the LED on (HIGH is the voltage level)
}
void loop()
{
roomba_send(136); // Send “Clean”
delay(5000); //Wait 5 seconds
}
void roomba_send(int code)
{
Serial.print(“Sending Roomba code “);
Serial.print(code);
int length = 8;
unsigned int raw[length*2];
unsigned int one_pulse = 3000;
unsigned int one_break = 1000;
unsigned int zero_pulse = one_break;
unsigned int zero_break = one_pulse;
int arrayposition = 0;
// Serial.println(“”);
for (int counter = length-1; counter >= 0; –counter) {
if(code & (1<<counter)) {
// Serial.print(“1”);
raw[arrayposition] = one_pulse;
raw[arrayposition+1] = one_break;
}
else {
// Serial.print(“0”);
raw[arrayposition] = zero_pulse;
raw[arrayposition+1] = zero_break;
}
arrayposition = arrayposition + 2;
}
for (int i = 0; i < 3; i++) {
irsend.sendRaw(raw, 15, 38);
delay(50);
}
Serial.println(“”);
Serial.print(“Raw timings:”);
for (int z=0; z<length*2; z++) {
Serial.print(” “);
Serial.print(raw[z]);
}
Serial.print(“\n\n”);
}
For more detail: Super Simple Arduino Powered Roomba Scheduler