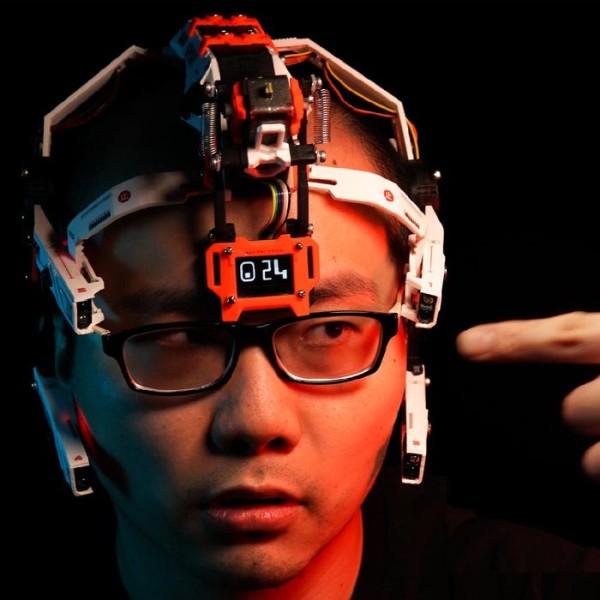
Why do you want to stop touching since it is part of our human nature? Well, it is all because of the virus floating around. Health officials keep telling the public to stop touching faces when they couldn’t help. So I decided to use some technology to help.
Supplies:
Hardware
M3 Hex socket head screw: https://amzn.to/39pA0bL
M3 Flat head screw: https://amzn.to/3w7ygO9
2/56 screw: https://amzn.to/3w7ygO9
Spring Kit: https://amzn.to/3w7ygO9
Washer Kit: https://amzn.to/3w7ygO9
Electronics
Arduino Nano: https://amzn.to/3m4D2at
7 Segment display: https://amzn.to/3dwNnbJ
IR Sensor: https://amzn.to/3dlfrOU
TT Motor: https://amzn.to/39pEfUY
OLED display: https://amzn.to/39r396r
Protoboard Kit: https://amzn.to/2PgUXiq
Jumper Cable Kit: https://amzn.to/3w7AYTP
3D Printer A5S: https://amzn.to/2QOc6jY
Hatchbox PETG: https://amzn.to/2Oae65a
Water Decal Paper: https://amzn.to/3u5HB7n
Elastic band: https://amzn.to/3rt1aVu
DISCLAIMER: These are affiliate links, which means that if you click on one of the product links, I’ll receive a small commission. This help support the channel and allows us to continue to make videos like this. Thank you for the support!
Step 1: The Idea
The main idea is to use some sensors to detect any face touching and apply some “punishment” to remind the end user. Based on Pavlovian Conditioning theory, constant negative feedbacks could change the behavior.
For the detection, any obstacle detection sensor could work. To keep it simple, I started using cheap IR sensors. Ultrasonic could be used here too, but we really don’t want a constant ultrasonic weave pulsing in front of our face, and constantly checking the logic for close distance.
For the negative feedback, I thought of a lot of different ways. however, since this is worn on my head, I don’t want any permanent brain damage. So I elected a physical hitting mechanism.
Step 2: About the IR Sensor
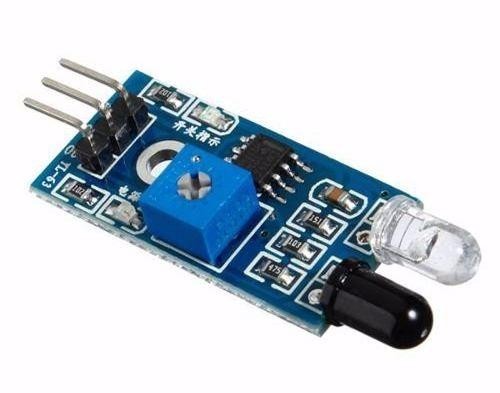
The IR sensor is the cheap one off of Amazon, it does say the detecting range is from 2 to 30 cm. I started by just using 2 of them, but soon realized they are not as advertised. With further investigation, I can only get about 6.5cm with my hand, and 11cm with white paper, so the reflectivity of the material does matter.
The onboard potentiometer does work to an extent. However, if you turn it all the way up, or down, it stays off or on all the time, rendering it useless. I had to turn it all the way up, then place an object in front with desired distance, then dial it down to the borderline. The borderline could make it a bit unstable, so prepared to dial it more.
It’s also prone to any heat source, like the sun, or even a radiant cooktop. I had to cover it with a heat shrink tube (later a 3d printed cover) to block the environment on the side, but when facing the heat source, it still has a reading.
It’s also funny that these sensors do not work with Apple Face ID. Since Face ID uses IR floodlight and dot pattern to read the reflection. Every time you unlock the recent iPhones using face ID, you’ll get a trigger.
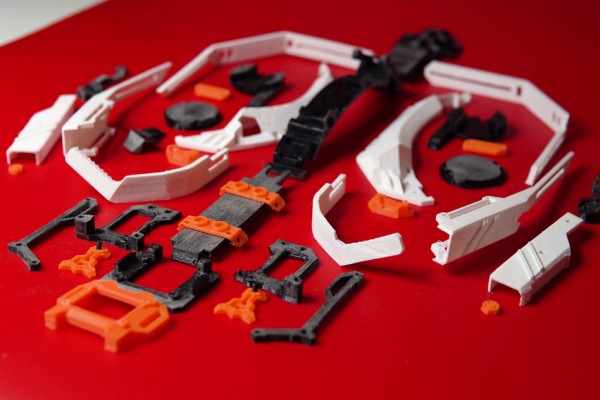
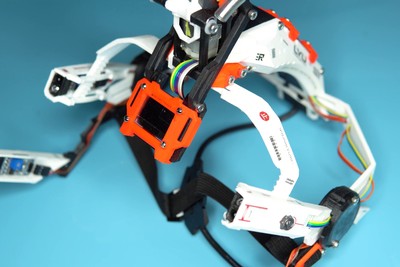
Step 3: Mechanical Design
The biggest moving part of this device is the hitter, I explored a couple of mechanisms.
1. Rotating drum with a flap: It’s quite big and looks ridiculous. I started using thick paper as the flipper but it’s not providing much damage, rather works pretty well as a cooling fan…
2.Hitting arm with bar linkage: This is actually fun to make, however, my lack of experience made it prone to binding, and when the load is high, the motor stalls.
3.Cam mechanism: to solve the binding and stalling, we need to separate the motor rotation and the hitting action, thus the cam mechanism ends up in the final design. it works great.
I also designed the joints to be adjustable, so the device can potentially fit many sizes. However, I don’t think I know what I’m doing, meaning it’s more like designing with a hunch than applying a scientific approach. So sometimes the parts bend a bit as I might have missed some degrees of freedom in the joints. More study is needed here for sure.
Other details including a flexible part to better embrace head contour. Strain relief for the power cable, removable service cover, etc.
Step 4: Electronics
Sensors:
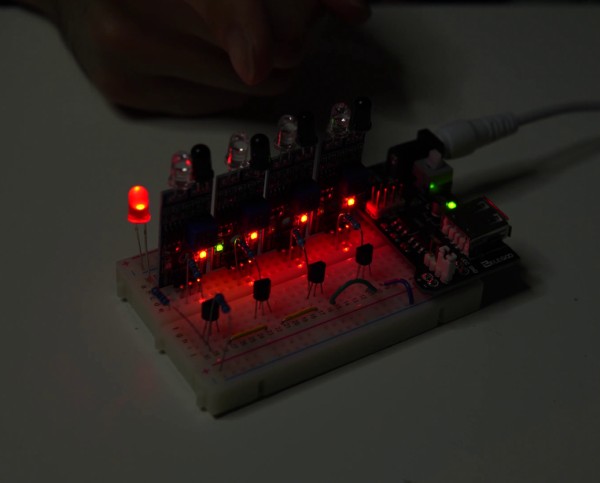
Since there are 4 of them and we really don’t care which one is triggered, I was hoping to somehow combine the input signals, so we just need to use 1 pin on Arduino rather than 4. I did build it out with 4 NPN transistors as switches in series, and adding the output parallel to them, so when any sensor is triggered, it will make the transistor switch open, thus output High on the signal line.
I had to give up this idea since all these are taking a lot of spaces that conflict with the slick industrial design. Too bad I’m not experienced with SMD components yet. So we end up still using 4 input pins on Arduino with software logic to trigger the hitting. Other than saving components, space, and energy, it actually provided other benefits, such as sensor calibration and troubleshooting, so we can pinpoint the problematic sensor.
Motor:
Nothing special here, just need to add a flyback diode and use a transistor for the Arduino signal.
I designed some circuitry for the protoboard, added connectors to better manage the cabling. The board ended up still too big, and I wish I have a CNC for carving actual PCBs and could use better connectors other than jumping cables.
Step 5: Code
The logic is pretty straightforward. In a nutshell:
It loops to check all the sensors, and if any of them is triggered, it will deliver a hit. The counter will also add up and display the number.
A couple of notes worth mentioning:
There is a small timer for more accurate counting. When a sensor is triggered, the counter +1, the timer starts. Before the timer ends, all subsequent sensor triggers will just refresh the timer, so the counter won’t add up if you hold a block on the sensor. After the timer ends, a new trigger will add the counter up again. The hitting works a litter differently, if the sensor is blocked, it will keep hitting 😀
I did add different hitting times based on the counter, a small, short hit for single touch; when you hit the number of 10, 20, 30… it’s a medium hit with a longer time. A jackpot hit will happen when you reach 100, 200…
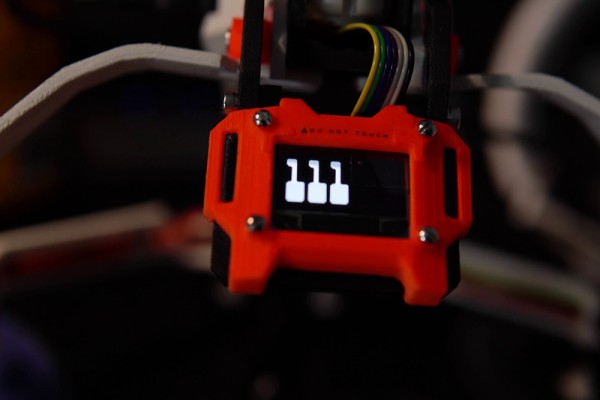
I spent quite some time polishing the graphics on the OLED display. The goal is to have a matching style as the industrial design. The first problem to solve is adding the custom font into Adafruit GFX library, there’s a lot of steps but Adafruit has it well documented here (https://github.com/adafruit/Adafruit-GFX-Library/blob/master/fontconvert/fontconvert_win.md). It’s a bit tedious though to make and test font files in different sizes. The next problem I run into was the file size, the font file is a bitmap representation of the font file, which is quite big (considering all the characters). I had to learn Fontforge, a font-making tool, to remove the extra chars with just the numbers left. The font I picked is also not monospaced, which means different chars has different width, that makes the number jump around all the time. I had to hand-edit the font file we made through the adafruit process for the monospace. Some leading zeros are also added, so it will display “001” rather than “1 “.
One benefit of using OLED is that you can add custom graphics, so I designed the stop sign and arrows in adobe illustrator, generated the code using this tool(http://javl.github.io/image2cpp/), then programed into arduino.
Step 6: Aesthetics
I love the cyberpunk style and took a lot of references from the 2077 game. Design is definitely part of my project so I had a lot of fun playing with the forms. I also designed the water slide decals and print them with a laser printer. The details does make the project more complete.
Source: STOP Face Touching Device